• Welcome to ClassicBroncos! - You are currently viewing the forums as a GUEST. To take advantage of all the site features, please take a moment to register. It's fast, simple and absolutely free. So please join our community today!
    If you have problems registering or can't log into your account, please contact Admin.

Broncorod: build thread

ehumaui

Sr. Member
Joined
Apr 17, 2004
Messages
913
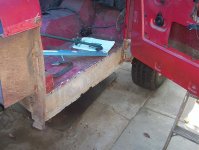
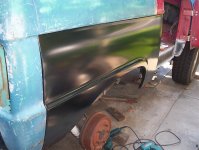
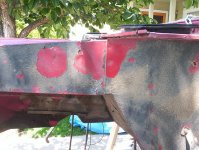
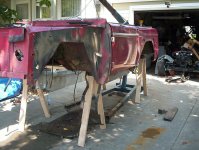
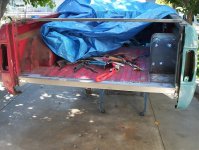
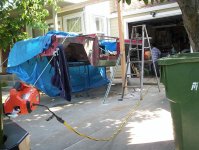
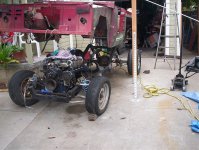
I have been working on a new project since the first of the year. A street rod bronco. I have seen some others on the board and always wanted to try and build one. Well here is the progress.

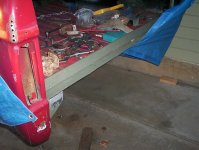
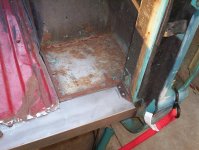
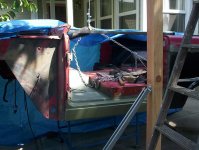
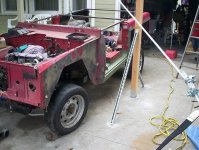
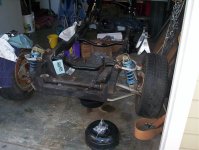
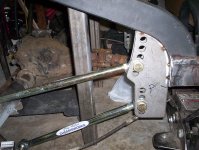
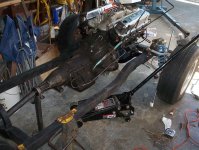
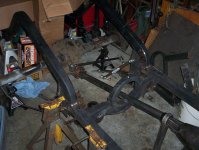
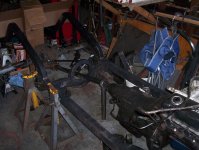
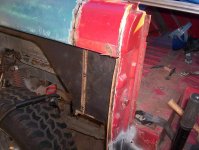
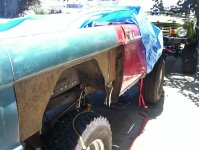
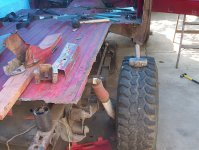
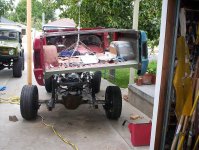
I picked up a hot rod frame for a early model chevy...i think, and modified it for the bronco. Shortened the wheel base and add a 4 bar with coilovers.

RC
 

Attachments

  • hot rod 002.jpg
    hot rod 002.jpg
    157.7 KB · Views: 489
  • hot rod 007.jpg
    hot rod 007.jpg
    161.5 KB · Views: 515
  • hot rod 006.jpg
    hot rod 006.jpg
    136.3 KB · Views: 456
  • hot rod 005.jpg
    hot rod 005.jpg
    133.3 KB · Views: 448
OP
OP
E

ehumaui

Sr. Member
Joined
Apr 17, 2004
Messages
913
Install the 351w on new motor and tranny mounts.

Located a 77 tub with right rear end damage. Talked the owner on just selling the tub.
I thought I just could pull out the damage but without a frame puller that was not going to work. I wanted to go back to uncut rear fenders and thought I could just use the cut-outs I have been collecting over the years but, the body took a big hit in the right side and pushed everthing forward. I had to remove or replace the entire right side. What to do....Oh I have both bed sides from a 66. Ya that will work, I will graft it on the damaged side. Here we go!


RC
 

Attachments

  • hot rod 004.jpg
    hot rod 004.jpg
    135 KB · Views: 329
  • Copy (3) of hot rod build 038.jpg
    Copy (3) of hot rod build 038.jpg
    106.9 KB · Views: 387
  • hot rod build 027.jpg
    hot rod build 027.jpg
    129 KB · Views: 337
  • hot rod build 026.jpg
    hot rod build 026.jpg
    128.3 KB · Views: 376
  • hot rod build 019.jpg
    hot rod build 019.jpg
    129.1 KB · Views: 321
  • hot rod build 017.jpg
    hot rod build 017.jpg
    129.1 KB · Views: 320
  • hot rod build 016.jpg
    hot rod build 016.jpg
    141.3 KB · Views: 326

RIbronco

Sr. Member
Joined
Jul 6, 2004
Messages
584
Loc.
Costa Mesa, CA
Cool.
Is it going to be for crusing or are you making it for the 1/4 mile?
Keep the updates coming as progress continues.
 
OP
OP
E

ehumaui

Sr. Member
Joined
Apr 17, 2004
Messages
913
Next on the list was to replace the rockers. They were covered by the PO with some heavy steel. They were toast on both sides. Lucky I had a pair in my attic that no one wanted to buy. This was my first try at rockers. Glade I and a spot welder cutter handy. Must have gone through 2 bits.
 

Attachments

  • hot rod build 018.jpg
    hot rod build 018.jpg
    130.4 KB · Views: 276
  • hot rod build 031.jpg
    hot rod build 031.jpg
    117.3 KB · Views: 290
OP
OP
E

ehumaui

Sr. Member
Joined
Apr 17, 2004
Messages
913
Its going to be crusing around town.

Time to get it off the frame.....so I could get it back to the PO. I saw everyone using the engine hoist. Lifted it up from the side but since I am on the driveway, I couldn't move the hoist safely. I moved it to the rear and extended the lift arm and legs to removed the body. It did drop to the tub on the left side and I damaged the right apron, will have to fix latter. Got the tub up angain and I had my wife stand on the hoist to remove the frame out. Thanks honey!
 

Attachments

  • hot rod build 036.jpg
    hot rod build 036.jpg
    174.6 KB · Views: 303
  • hot rod build 035.jpg
    hot rod build 035.jpg
    180.3 KB · Views: 383
  • Copy (3) of hot rod build 034.jpg
    Copy (3) of hot rod build 034.jpg
    148.4 KB · Views: 345

behemoth

Bronco Guru
Joined
Jul 2, 2003
Messages
1,736
Welcome to the neighborhood. Nice work. Modifying the bronco frame is proving to be a little more work than I had expected. The front ride height is pretty limited without modifying the frame up front. Not an issue with your plan though.

The other drawbacks are the rear, yours are solved, but you will be cutting the bed a bit to fit that frame under it.

Keep the pictures coming, nice work.
 
OP
OP
E

ehumaui

Sr. Member
Joined
Apr 17, 2004
Messages
913
Now for the driver side quarter panel, rocker, floor and rear bed brace.

For those who are about to do a rear bed brace replacement, I did run into a problem with the bed brace. I measured my brace and the one that came out of the 66 and it measured at 3 1/4 and new part was just short of 3 1/2. I installed it and of couse the 1/4 inch mad a big difference. I could not get the gate on. So a custom mod was in order. I cut it off at 1/4 inch to the edge and lap welded it back on.
 

Attachments

  • hot rod build 042.jpg
    hot rod build 042.jpg
    101 KB · Views: 250
  • hot rod build 037.jpg
    hot rod build 037.jpg
    124.9 KB · Views: 289
  • hot rod build 041.jpg
    hot rod build 041.jpg
    133.2 KB · Views: 233
  • hot rod build 047.jpg
    hot rod build 047.jpg
    124 KB · Views: 244
  • Copy (2) of hot rod build 029.jpg
    Copy (2) of hot rod build 029.jpg
    131.2 KB · Views: 261
OP
OP
E

ehumaui

Sr. Member
Joined
Apr 17, 2004
Messages
913
I just cut the bed today and ran into a problem........

Now with most of the body work done lets try a test fit. Since the engine hoist did not go well, and not to safe to boot. I needed a beter solution.

How about a post and beam with a electric winch.
 

Attachments

  • broncorod 039.jpg
    broncorod 039.jpg
    174.5 KB · Views: 211
  • broncorod 042.jpg
    broncorod 042.jpg
    127 KB · Views: 203
  • warn winch2.jpg
    warn winch2.jpg
    150.4 KB · Views: 266
OP
OP
E

ehumaui

Sr. Member
Joined
Apr 17, 2004
Messages
913
I have been waiting for this day.....the test fit. Cross your fingers and I hope all my measurements are correct!

Got up early and winched up the tub and rolled in the frame. Here we go.
 

Attachments

  • on new fram3.jpg
    on new fram3.jpg
    151.9 KB · Views: 317
  • on new frame.jpg
    on new frame.jpg
    180.6 KB · Views: 256
  • on new frame3.jpg
    on new frame3.jpg
    148.9 KB · Views: 280
  • on new frame2.jpg
    on new frame2.jpg
    154.2 KB · Views: 292
OP
OP
E

ehumaui

Sr. Member
Joined
Apr 17, 2004
Messages
913
I ended up cutting the rear bed to clear the suspension and ended up removing the rear tires (need new off set wheels) to get the tub low enough. Looks great but, something is wrong! I am to far forward. I am not centered in the wheel well. Now for the problem......

I thought I measured the correct distances but, the motor is to far to the rear. I off about 4 inches. Darnittttttttttttttttttttttttttttttttttttttttttttttttt. Oh well its my first try to make a custom rod. Anyone have a good line on motor mounts or do you guys make your own?

Back to the garage........I will keep you updated.

RC
 

behemoth

Bronco Guru
Joined
Jul 2, 2003
Messages
1,736
I have been looking at the motor mounts used on the early mustangs, they look more like hot rod parts than stock and give more steering clearance.

I did a test fit of mine last weekend and I too have an issue with the tape measure. Simple fix should be done tomorrow.

I like the post, beam and winch solution, my association already loves me that would make their day.;D
 
OP
OP
E

ehumaui

Sr. Member
Joined
Apr 17, 2004
Messages
913
With the motor going forward, I now have a oil pan clearance problem.

B did you use an early bronco pan or an aftermarket

RC
 

zombie66

Sr. Member
Joined
Aug 29, 2003
Messages
983
Loc.
Beaverton, oregon
Thanks for posting the pics its nice to watch this as you go. Sorry to hear about the engine location issue. I can imagine there are alot of measurements to factor in a project like this. Please keep the pics coming i cant wait to see it when its done. I;D 'm curious to see your plans for the paint, etc.
 

behemoth

Bronco Guru
Joined
Jul 2, 2003
Messages
1,736
I am using the stock explorer pan at this point. I have a mustang pan and pickup if needed. It looks as though it will fit, but I will not know until the engine stands are in.
 

bluebroncodrive

Full Member
Joined
May 16, 2004
Messages
284
It was good meeting you today Russell, I have not posted any of my bronco rod pics yet. one of these days?:?
 
OP
OP
E

ehumaui

Sr. Member
Joined
Apr 17, 2004
Messages
913
Not much done the weekend. Here is the bed cut out for the new suspension.
 

Attachments

  • broncorod 043.jpg
    broncorod 043.jpg
    129.5 KB · Views: 287

BronCowie

Contributor
Old Timer
Joined
Apr 24, 2007
Messages
8,031
Loc.
Vancouver, WA
Yeah man! Keep the posts commin'... I feel some good vibes offa this one. Maybe its cuz I was born in San Jose.
 
OP
OP
E

ehumaui

Sr. Member
Joined
Apr 17, 2004
Messages
913
Pulled engine and tranny out. Pulled the tranny off and guess what I found. A broken shaft....hum the PO did not tell me that. I guess thats why it was free. Good thing to find out now and not to far into the build.

RC
 

Attachments

  • broken shaft.jpg
    broken shaft.jpg
    184.3 KB · Views: 218
  • engine out.jpg
    engine out.jpg
    152.9 KB · Views: 205
  • broncorod 045.jpg
    broncorod 045.jpg
    126.9 KB · Views: 212
Top