


12-Pack Jeff
Full Member
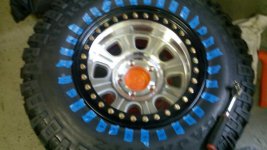
So I had to replace a tire on a 15" Allied 32 bolt beadlock rim.. I had never done it before, so I watched a few youtube videos, looks easy enough, time to dive in. I'll spare you the wrong ways to do it and go straight to the easy (proper?) way.
1) soap and soapy water are your friend.. use lots.
2) mount tire on rim - mine was easy.. slid right on. You may have to position tire at 45 degree angle over rim and take a flying leap at it.
3) put rim (with tire) on 5 gallon bucket
4) center tire over wheel, lay ring on top and line up holes
5) get (8) bolts that are long enough to reach to the threads from there (the stock ones are too short at this point)
6) install bolts in a star pattern, go around the star several times cinching down each bolt a little more until the ring is down far enough to install the proper bolts.
7) once all bolts were at the same hand tight level I used a small electric impact driver to get all the bolts barely snug before switching to a torque wrench - I tightened one bolt, then tightened the one 180 degrees across from it. - AGAIN this was only to snug everything, not TIGHTEN anything.
8) Set my torque wrench at 10 ft LBS and tightened every bolt (in a circle)
9) I did the same thing at 15 and 20 LBS
10) at 20LBS I noticed there was no more gap between ring and rim - so I made another loop around the rim @20LBS to make sure everything was even.
11)I made a total of 4 loops around before every bolt was tightened evenly at 20lbs - **See note at end
12) fill tire with air and attempt to seat rear bead - mine went on without issue.
***NOTE*** I do not know what the proper torque spec is. My wheels are Steel Allied Daytona w/ 32 Grade 8 bolts which I'm sure could take a lot more than 20 Ftlbs. I stopped here so I wouldnt hurt anything due to over tightening, and plan to call Allied tomorrow for the final word. I would suggest doing the same - especially if its aluminum.
Fun Fact: at TDS this year I got the pleasure of meeting the super awesome dude who runs the raceline division of Allied wheel. Already knowing I had to replace a tire, I asked him about how long should I expect it to take. He said his guys who do this daily get about 12 done in an 8 hour day.
") Then follow up with at least 2 stages of torque wrench settings to get to the final torque number.
Then follow up with at least 2 stages of torque wrench settings to get to the final torque number.