• Welcome to ClassicBroncos! - You are currently viewing the forums as a GUEST. To take advantage of all the site features, please take a moment to register. It's fast, simple and absolutely free. So please join our community today!
    If you have problems registering or can't log into your account, please contact Admin.

Tail Light Pilar Replacement

Jamie Chriss

Sr. Member
Joined
Feb 28, 2015
Messages
576
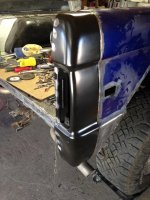
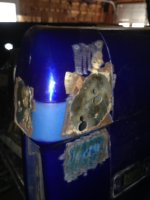
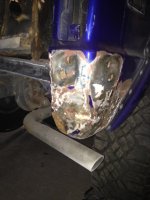
After many months of prognostication I am starting the build on my 1971 Bronco. I want to send special thanks to Dirt Donk for his diligence on this site, and making time for us newbies. I decided to tackle the easy stuff first.The drivers side light pilar was crushed along wih my frame and front end by one of the many previous owners. My goal is to do right by this Bronco, it has been mishandled for many years. After scouring I can't find any informantion on how to replace the tail light pilar, I am hoping that is because it is really easy. Can I repair the pilar or should I replace it? If replace is the only option is there any basic how to advice?

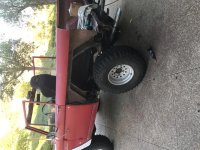
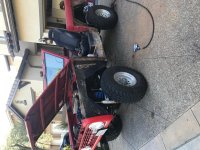
Along with this project, I just stripped my bed, there are pits but no deep creases or thin metal, there was 1/16 inch of bondo on the bed hidding the pits, can I salvage it? I have stripped it down to metal, I am planning on epoxy paint it to preserve the metal, and come back to it later for prep for paint. The attached picture is the first go at it, i was able to remove all the paint and surface rust.
IMG_8317.jpg

IMG_8318.jpg

IMG_8319.jpg

IMG_4905.jpg

Rear Drivers .jpg
 

Master Chief

Contributor
Bronco Guru
Joined
Nov 24, 2006
Messages
1,204
The tail light housings are quite simple. Use a flap wheel on a grinder to expose the factory welds along the rear, then use a spot weld cutter to drill them out. For the side, I cut down from the stake pocket to the bottom with a body saw (you can use a cutoff wheel for this or a hacksaw blade on a sawzall for this if you do not have a body saw). Finally, work carefully with an air chisel to separate the metal.

After you remove the bad housing, finish removing the metal along the edge of the rear quarter, clean up the old welds and treat everything, then place your new housing and weld it in.

Here are a few photos of mine.
 

Attachments

  • Right taillight housing installed.jpg
    Right taillight housing installed.jpg
    114.6 KB · Views: 181
  • Right taillight housing removed.jpg
    Right taillight housing removed.jpg
    108.4 KB · Views: 178
  • Upper right taillight housing.jpg
    Upper right taillight housing.jpg
    50.7 KB · Views: 178
  • Lower right taillight housing.jpg
    Lower right taillight housing.jpg
    78.4 KB · Views: 182
Last edited:

bronkenn

Contributor
Bronco Guy
Joined
Apr 27, 2017
Messages
2,662
Loc.
Southeast Ohio
Most of your taillight pillar looks good. If it isn't all rusted out, I would fix that one. Aftermarket stuff is never like original. If needed you can cut out the rusted section and replace with a piece of the replacement part. Most of the backside is accessible and can be bumped out if that is all that is needed. There are also coatings that will seal up pinholes/pits, you put tape on the back and apply the coating and remove the tape and it is sealed. I have done it on floorpans that were in good shape but had a few pinholes, worked good. Master Series Coatings claim their product will self level over pits. Ken
 
OP
OP
Jamie Chriss

Jamie Chriss

Sr. Member
Joined
Feb 28, 2015
Messages
576
Thanks for the advice, I think my bigger problem is at the base of the pilar, the flang for the tail gate holder is bent in and crushed a bit, can I just hammer back and maybe weld in a piece of metal for extra support? It is hard to see, lower part of picture one.
 

Master Chief

Contributor
Bronco Guru
Joined
Nov 24, 2006
Messages
1,204
Thanks for the advice, I think my bigger problem is at the base of the pilar, the flang for the tail gate holder is bent in and crushed a bit, can I just hammer back and maybe weld in a piece of metal for extra support? It is hard to see, lower part of picture one.

Mine appeared hit and pounded out. That and the damage from the tire carrier is why I elected to replace the corner. Well, 1/2" thick body filler aided in that decision. I made a new support angle for that lower corner when I replaced the housing.
 
OP
OP
Jamie Chriss

Jamie Chriss

Sr. Member
Joined
Feb 28, 2015
Messages
576
So the light housing is off, the pilar is bent in right at the apex of the cross support for the bed. It is off like the rest of the truck. I have not problem repalcing the pilar if needed... The fender is just as bad, with a ton of bondo.


IMG_8345.JPG

IMG_8344.jpg
 

JAFO

Bronco Guru
Joined
Dec 3, 2007
Messages
1,556
Loc.
Beaverdam
I did both lower quarters on mine. While you have the taillight pillar off, do the lower quarter. I cut all the way around, very close to the upper seam and then real close to the front where the lip of the lower quarter bends over on the rear door post. Get the big piece of the quarter out of the way. Then work at the remaining metal flanges. I kept lightly grinding all spot welds until the metal feathered away from the upper quarter and then grind all the spot welds along the rear door post to get the remainder of the quarter flange. Clean up good, treat the inner quarter for any rust with rust inhibitor. With mine, I had already replaced all the rear floor, wheel wells and inner quarter, so all that metal was new. So I painted all that, then went back with new lower quarters. The upper quarter on my tub was fine.

Used an extension and 1/4" drill chuck to drill screws up from below to attach the lower quarter to upper. Later came back and took out a screw at a time and from up top used my wire feed welder to weld each hole, welding the upper and lower together where they meet. Also had screwed screws working through the taillight housing and again removed screws and welded up the holes.

Taillight

http://classicbroncos.com/photos/showphoto.php/photo/34480/size/big/cat/7225
http://classicbroncos.com/photos/showphoto.php/photo/34483/size/big/cat/7225
http://classicbroncos.com/photos/showphoto.php/photo/34481/size/big/cat/7225
http://classicbroncos.com/photos/showphoto.php/photo/34482/size/big/cat/7225
 

JAFO

Bronco Guru
Joined
Dec 3, 2007
Messages
1,556
Loc.
Beaverdam
Speaking of salvaging your bed....is just comes down to what type of finished product you are after and how much time and money you want to shell out. I went the route of replacing all bad metal, but it is labor and cost intense.

Top of your bed doesn't look horrible. How is the underside? How bad are all the support brackets and such rusted away? It becomes a lot of work if you go for new floor and bed. Believe me, I have been there. Glad I did it, but it was work and time.
 
OP
OP
Jamie Chriss

Jamie Chriss

Sr. Member
Joined
Feb 28, 2015
Messages
576
Lucky this truck dosn't have the usual rust, I think the problem on the bed is the PO used a ton of Bondo and it obsorbed water alas all the rust pits. I have another post that has the floor boards, honestly I should replace the bed and all the front floor pans etc. My big concern here is to keep or replace the pilat. I am going to replace the panel and light housing for sure.
 
OP
OP
Jamie Chriss

Jamie Chriss

Sr. Member
Joined
Feb 28, 2015
Messages
576
After pounding on tail light pilar I decided to replace it! The truck was rear ended and the support where the two bolts go into for the tail gate hinge were just puched in too much. I laso started removing the rear fender, wow there are allot of welds.
 
OP
OP
Jamie Chriss

Jamie Chriss

Sr. Member
Joined
Feb 28, 2015
Messages
576
I eneded up removing the pilar, It was just too bent to try and salvage.
 

Attachments

  • IMG_8361.jpg
    IMG_8361.jpg
    139.4 KB · Views: 79
  • IMG_8381.jpg
    IMG_8381.jpg
    151.2 KB · Views: 71

DirtDonk

Contributor
Bronco Guru
Joined
Nov 3, 2003
Messages
47,490
...I also started removing the rear fender, wow there are allot of welds.

Yes there are! You're digging right in, aren't you...;D

I ended up removing the pillar, It was just too bent to try and salvage.

And I would have said that was one of the harder body jobs. Getting it off is somewhat straightforward, but if you plug weld or spot weld like the factory, there isn't a surface that's not awkward to get to sometimes it seems.
Does make a good learning experience for body work though.

Having fun yet?
I know I am from here! Now to check out your other body-fixing threads to see your progress.;)

Paul
 
Top