• Welcome to ClassicBroncos! - You are currently viewing the forums as a GUEST. To take advantage of all the site features, please take a moment to register. It's fast, simple and absolutely free. So please join our community today!
    If you have problems registering or can't log into your account, please contact Admin.

"Flick" build thread

OP
OP
Muddy1966Bronco

Muddy1966Bronco

Full Member
Joined
Apr 19, 2004
Messages
342
Loc.
Central PA
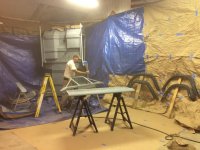
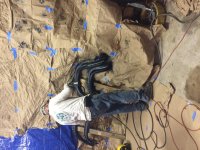
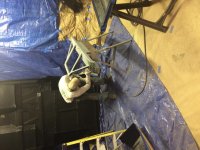
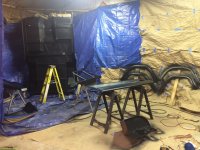
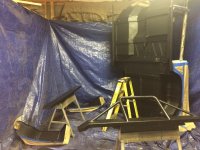
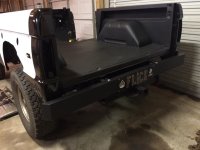
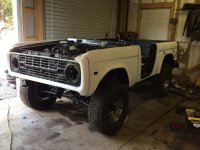
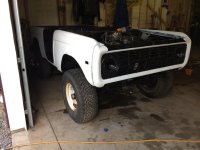
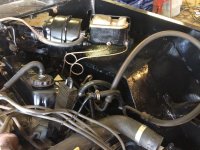
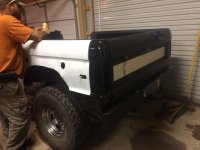
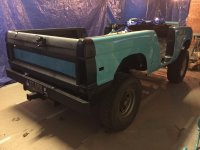
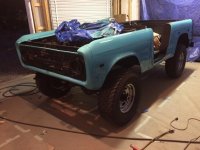
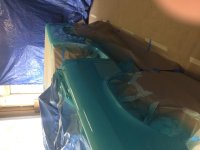
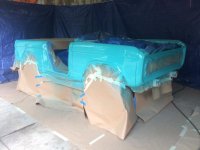
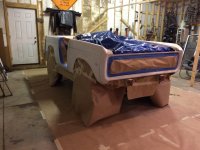
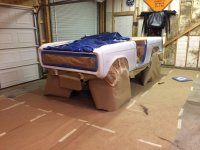
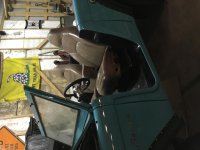
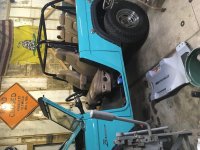
4 months! Brakes are all on. Fluid changes in the differentials. Driveshafts back on. And this weekend we finally got to the Raptor lining. Man, this stuff sprays beautifully! We really over prepped the surroundings thinking it would be a nightmare of over spray but it really wasn't bad. I kind of wanted to try it, but my husband is a painting genius. He has been called the "one coat wonder" before. This guy can perfectly repaint a room in one coat without a single drip! So I let him do it and the results are flawless! One week to fully cure, then we set the body tub down, line the inside, and then it gets set back on the frame.

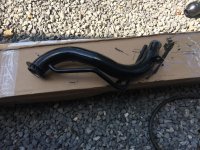
Also, a shout out to North East Bronco Parts, aka delconick. This guy is on top of shipping. And super helpful and friendly. I ordered a full hard line brake line set through him and got it within two days. Definitely give him a try, especially if you are on the NE coast.

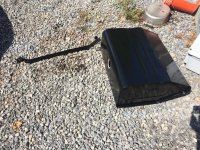
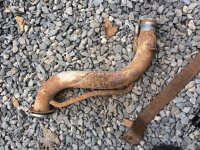
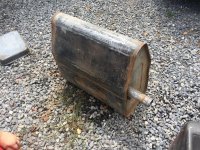
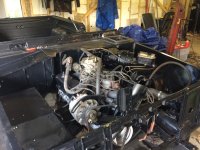
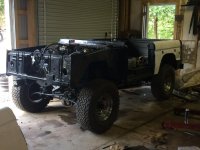
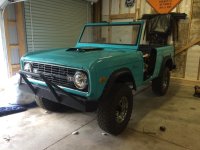
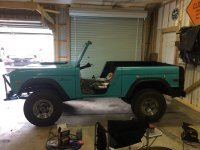
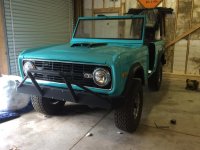
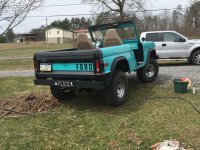
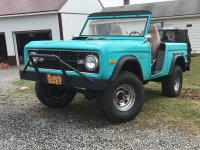
Just gotta set the gas tank in and run those brake and fuel lines. Then I'm ready to put the body back on. Flick is looking awesome.
 

Attachments

  • IMG_2563.jpg
    IMG_2563.jpg
    107.5 KB · Views: 65
  • IMG_2564.jpg
    IMG_2564.jpg
    132.7 KB · Views: 63
  • IMG_2565.jpg
    IMG_2565.jpg
    112.7 KB · Views: 64
  • IMG_2566.jpg
    IMG_2566.jpg
    123.6 KB · Views: 64
  • IMG_2567.jpg
    IMG_2567.jpg
    120.2 KB · Views: 59
OP
OP
Muddy1966Bronco

Muddy1966Bronco

Full Member
Joined
Apr 19, 2004
Messages
342
Loc.
Central PA
Week 17 - The body is back on! Fuel system is done. Things are going back together nicely.
 

Attachments

  • IMG_2604.jpg
    IMG_2604.jpg
    72.7 KB · Views: 58
  • IMG_2602.jpg
    IMG_2602.jpg
    105.6 KB · Views: 46
  • IMG_2571.jpg
    IMG_2571.jpg
    155.9 KB · Views: 40
  • IMG_2572.jpg
    IMG_2572.jpg
    254 KB · Views: 39
  • IMG_2570.jpg
    IMG_2570.jpg
    226.8 KB · Views: 34
  • IMG_2569.jpg
    IMG_2569.jpg
    239.8 KB · Views: 36
OP
OP
Muddy1966Bronco

Muddy1966Bronco

Full Member
Joined
Apr 19, 2004
Messages
342
Loc.
Central PA
Week 18 - Tailgate is on. Front clip, fenders, inserts, and grill are getting set and will soon be bolted tight. So even if you are a cheap ass like me, seriously reconsider using a body that has been in any type of wreck. Mine is off just enough to make all these parts fit like total crap. Ignore the giant lines and mismatched panels when you see Flick in person. It’s the best I could do. But I’m still really excited to see it take shape!! I’m hoping to paint in early October.

My homemade fender skirts lined up great too. I’ve been holding my breath on that.

Brake system is on and bled. Most everything but the wiring is hooked up. Flick is looking ever so handsome in his white primer.
 

Attachments

  • 3CC61E01-10BC-410F-83EB-967A8B214AAD.jpg
    3CC61E01-10BC-410F-83EB-967A8B214AAD.jpg
    101.8 KB · Views: 72
  • 0D70E7F2-A344-4910-99FF-2C9C48D482FB.jpg
    0D70E7F2-A344-4910-99FF-2C9C48D482FB.jpg
    88.1 KB · Views: 66
  • 16C9EADE-F42A-483C-A9E0-768CA1C25D05.jpg
    16C9EADE-F42A-483C-A9E0-768CA1C25D05.jpg
    126 KB · Views: 70
  • D6B57F70-657A-4A4C-A5A0-1E2CF27225E0.jpg
    D6B57F70-657A-4A4C-A5A0-1E2CF27225E0.jpg
    129.8 KB · Views: 78
  • 4E45E9DC-ECDC-4088-B4F8-660143CEDDDB.jpg
    4E45E9DC-ECDC-4088-B4F8-660143CEDDDB.jpg
    98.8 KB · Views: 69
  • D2A710FB-0A0D-4C16-9068-0F82B6075C65.jpg
    D2A710FB-0A0D-4C16-9068-0F82B6075C65.jpg
    75.6 KB · Views: 78
OP
OP
Muddy1966Bronco

Muddy1966Bronco

Full Member
Joined
Apr 19, 2004
Messages
342
Loc.
Central PA
5 months - Flick turned tropical turquoise!
 

Attachments

  • DDB2013C-F256-4C1E-A90F-313DA75DE1D9.jpg
    DDB2013C-F256-4C1E-A90F-313DA75DE1D9.jpg
    84.2 KB · Views: 78
  • 1A8CC751-09AA-4E5B-A402-F5F3C5B319E2.jpg
    1A8CC751-09AA-4E5B-A402-F5F3C5B319E2.jpg
    87.7 KB · Views: 64
  • C8B255AD-F02A-418D-9742-18C3E1BF1786.jpg
    C8B255AD-F02A-418D-9742-18C3E1BF1786.jpg
    72.7 KB · Views: 64
  • BDF65D31-CE6B-47E5-9141-D9530492279A.jpg
    BDF65D31-CE6B-47E5-9141-D9530492279A.jpg
    68.1 KB · Views: 67
  • D38B82E8-BAA8-43DD-B074-DE5ECC17E10A.jpg
    D38B82E8-BAA8-43DD-B074-DE5ECC17E10A.jpg
    72.9 KB · Views: 68
  • A87BBD76-8C7C-43B5-A5C4-190970F3BFB6.jpg
    A87BBD76-8C7C-43B5-A5C4-190970F3BFB6.jpg
    98.7 KB · Views: 57
  • 0054BEFB-FB94-48CA-8FC4-F1F735E6CF1C.jpg
    0054BEFB-FB94-48CA-8FC4-F1F735E6CF1C.jpg
    96.6 KB · Views: 53

LUBr LuvR

Contributor
Bronco Guru
Joined
Dec 31, 2015
Messages
1,968
Wow, love the color! You have made an incredible amount of progress over the summer.....must be so satisfying to see your Dad’s truck coming back to life. Bet he’s looking down and real proud of you and the transformation.
 
OP
OP
Muddy1966Bronco

Muddy1966Bronco

Full Member
Joined
Apr 19, 2004
Messages
342
Loc.
Central PA
Thanks! There’s a few big expenses that will push completion into spring, but it will be at the East Coast Roundup next year. It’s definitly a driver and the paint is not perfect, but it’s my bronco and I will be driving within a year...not waiting another 10! Dang does it look nice in person...even if it’s not a professional paint job.
 
OP
OP
Muddy1966Bronco

Muddy1966Bronco

Full Member
Joined
Apr 19, 2004
Messages
342
Loc.
Central PA
End of the weekend pic. I’m in love. Someone pinch me...is this really my Pappy’s old mountain truck???
 

Attachments

  • B50A84D8-C3A9-4A1F-AB5B-3CEA513FE120.jpg
    B50A84D8-C3A9-4A1F-AB5B-3CEA513FE120.jpg
    96 KB · Views: 75
OP
OP
Muddy1966Bronco

Muddy1966Bronco

Full Member
Joined
Apr 19, 2004
Messages
342
Loc.
Central PA
22 weeks - Got the chrome cleaned up and on. Lights in, flares on, some wiring pulled. Washed parts in the sink...the wife is gonna kill me. Oh wait, I am the wife! ;D
 

Attachments

  • FB2F45C9-AE88-4301-B750-206461B70834.jpg
    FB2F45C9-AE88-4301-B750-206461B70834.jpg
    80.8 KB · Views: 54
  • BBD191E5-21EA-4752-9ABB-FF1675309A84.jpg
    BBD191E5-21EA-4752-9ABB-FF1675309A84.jpg
    96.9 KB · Views: 57
  • 60A615A6-FE3E-4DB2-99FC-AC7804D04B55.jpg
    60A615A6-FE3E-4DB2-99FC-AC7804D04B55.jpg
    92 KB · Views: 69
OP
OP
Muddy1966Bronco

Muddy1966Bronco

Full Member
Joined
Apr 19, 2004
Messages
342
Loc.
Central PA
6 months - Got the dash installed and all the knobs on and connected. Used my Pappy’s old sport emblem to embellish the glovebox door. Tailights and marker lights are on and all the wiring from the dash back is connected. Just need to finish up the engine bay. Which might happen tonight. Painless harness made this a breeze.
 

Attachments

  • 0595DC1A-AB1F-4F09-AD63-4F5115C2B3C2.jpg
    0595DC1A-AB1F-4F09-AD63-4F5115C2B3C2.jpg
    97.8 KB · Views: 92
  • 3424E470-4F62-4B6B-AE57-6955C0E55406.jpg
    3424E470-4F62-4B6B-AE57-6955C0E55406.jpg
    106.8 KB · Views: 86
  • FE1C1D63-C9ED-4425-A063-86C2C35D36A8.jpg
    FE1C1D63-C9ED-4425-A063-86C2C35D36A8.jpg
    98.2 KB · Views: 92

Sporto

Sr. Member
Joined
Oct 10, 2005
Messages
904
Amazing build! I have Flick's doors in my garage from our trade this summer, and I am starting on them in a few weeks. I will make sure they find a new life on my family owned 70.

Keep up the progress!

Rich
 
Last edited:
OP
OP
Muddy1966Bronco

Muddy1966Bronco

Full Member
Joined
Apr 19, 2004
Messages
342
Loc.
Central PA
Great Rich! I am happy to hear that they are getting new life and I am keeping you in mind if I go EFI too. (You did the wiring setups, right?). Does that patch into the painless harness pretty easily?

The soft top will soon be test fit on the bronco. I want to get the rollbar installed first. Thanks for the trade and happy building!
 

Sporto

Sr. Member
Joined
Oct 10, 2005
Messages
904
Great Rich! I am happy to hear that they are getting new life and I am keeping you in mind if I go EFI too. (You did the wiring setups, right?). Does that patch into the painless harness pretty easily?

The soft top will soon be test fit on the bronco. I want to get the rollbar installed first. Thanks for the trade and happy building!


Yes, I rework factory EFI harnesses to match the Mustang computers (not much experience with the Explorer ones), and if properly done the harnesses are completely standalone from the Painless, aside from a few connections.

I cannot wait to see the end result of your Bronco with the soft top and doors. What soft doors did you go with?

Rich
 
OP
OP
Muddy1966Bronco

Muddy1966Bronco

Full Member
Joined
Apr 19, 2004
Messages
342
Loc.
Central PA
Great to know, thanks. I haven’t gotten to researching and buying soft doors yet. That will probably be one of the last items.
 

stout22

Contributor
Bronco Guru
Joined
Dec 13, 2006
Messages
2,702
Loc.
Athens, AL
You've done a great job documenting your build and made amazing progress! Looks like you will be on the road soon.
 

Crawdad

Bronco Guru
Joined
Feb 16, 2011
Messages
3,635
You’ve gotten more done in six months than I have in five years! Keep up the great work!
 

trailerjack

Contributor
Bronco Guru
Joined
Sep 5, 2013
Messages
1,386
Loc.
Central Texas
Did you paint FLick with single stage paint? Just wanted to see how you felt about your results and how many vehicles you had painted before.

Looks fantastic.
 
OP
OP
Muddy1966Bronco

Muddy1966Bronco

Full Member
Joined
Apr 19, 2004
Messages
342
Loc.
Central PA
Hi folks, April 28th will mark ONE YEAR since this project started! I can't believe it. Winter really slowed down my work since my garage isn't heated, but things came together slowly and surely.

Yesterday, 4/9/19, I took Flick on the first test drive on the road! It was slow and just on my dead end street, but it felt like a HUGE accomplishment. In order to get this project rolling by the June roundup, I gave up a few things. No twin stick, taking a chance that the engine and transmission have good life left, reusing the roll bar for now (upgrade will need to happen eventually as my kids grow), and no suspension upgrade yet. I was disappointed to put this all together, get it perfectly level and the radius arms perfectly set, then it sagged on the driver's side as soon as all the weight went back on. The donor I used for Flick was hit on the driver's side and it shows in the body and suspension even though it appeared to be a very minor fender bender.

So don't mind that Flick leans and is a little crooked and gappy if you look close. My father mentioned that my Pappy is probably sitting in there and enjoying it too, so that's my excuse for the lean. The other stuff I'm blaming on the accident and not my amateur rebuilding skills.

I hope to meet more of you at the Roundup this year. My family will be coming with Flick and camping there. This has been a blast and I'm already thinking of building another.
 

Attachments

  • IMG_3106.jpg
    IMG_3106.jpg
    100.6 KB · Views: 56
  • IMG_3148.jpg
    IMG_3148.jpg
    80 KB · Views: 51
  • IMG_3292.jpg
    IMG_3292.jpg
    207.5 KB · Views: 61
  • IMG_3294.jpg
    IMG_3294.jpg
    185.7 KB · Views: 68
  • IMG_3305.jpg
    IMG_3305.jpg
    117.4 KB · Views: 55
Top