• Welcome to ClassicBroncos! - You are currently viewing the forums as a GUEST. To take advantage of all the site features, please take a moment to register. It's fast, simple and absolutely free. So please join our community today!
    If you have problems registering or can't log into your account, please contact Admin.

1975 Bronco project resurrected

buckroseau

Jr. Member
Joined
Mar 15, 2017
Messages
70
New guy here. Picked up a 1975 Bronco project from a friend of mine, that he started 12 years ago and stalled out on. I found the original thread he started in 2005.

http://classicbroncos.com/forums/showthread.php?t=57597&highlight=fiberglass+1975

It had been sitting in a pole barn for the last 12 years. I wish I had pics from 12 years ago, but can't find any. I actually did the majority of the work. I'm not new to auto restorations, but new to Bronco's.

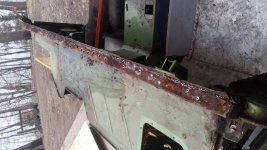
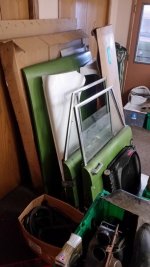
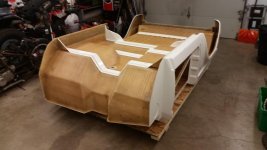
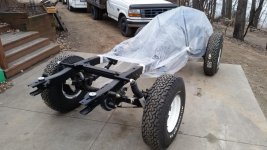
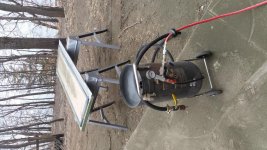
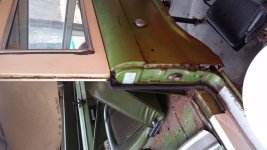
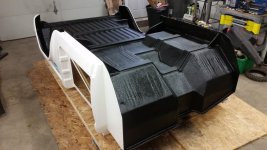
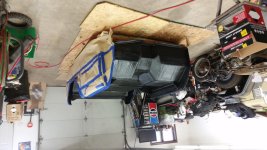
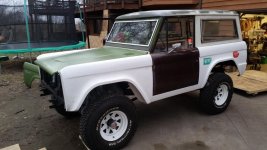
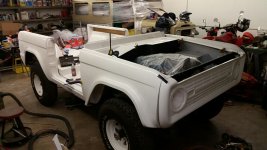
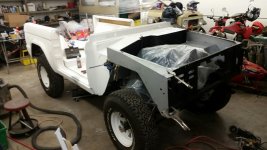
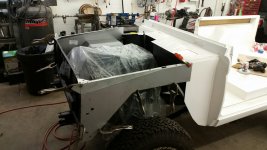
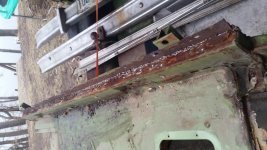
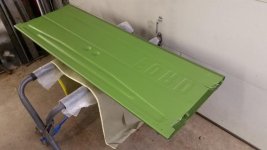
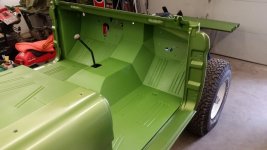
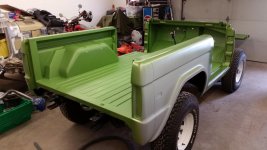
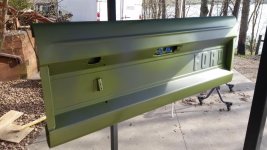
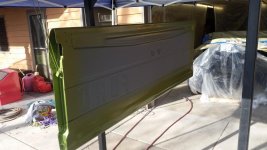
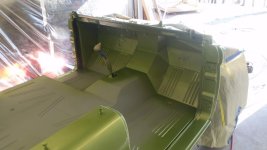
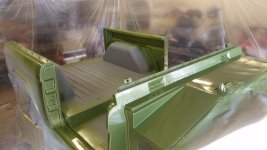
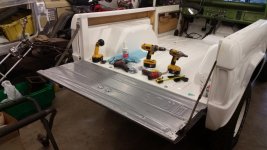
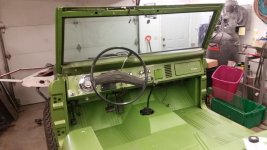
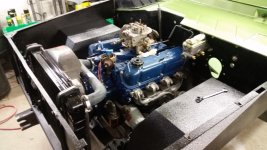
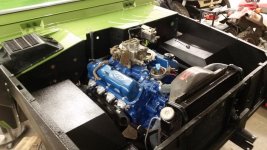
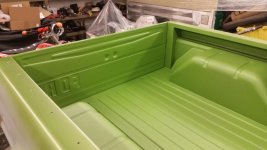
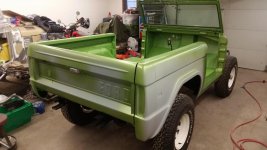
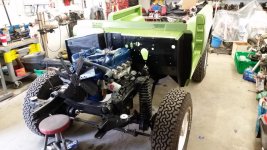
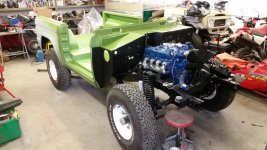
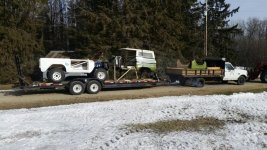
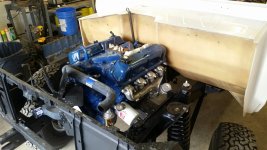
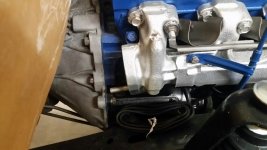
Vehicle was stripped down to the frame, sandblasted and powder coated, along with a pile of other parts, axles blasted and painted. Pile of new parts, new terracomp body, fenders, grill and hood. Motor was taken down the rotating assembly and rebuilt, never run. Few pics of yesterday after it was loaded and today in my shop.

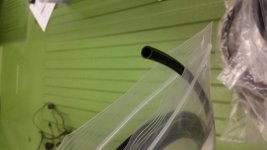
I'm gong to order a few parts tonight or tomorrow morning, specifically brake lines and I would like to get Y pipe.

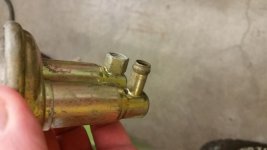
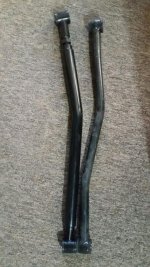
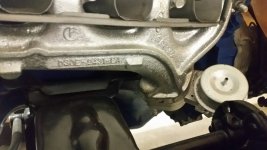
My question to the guru's is, where do I buy a Y pipe for this thing? I've been looking on some of the main websites and can't seem to find anything. I've attached a few photo's, 2 of which our my manifolds on the 302. Any help would be greatly appreciated.

Thanks, Matt
 

Attachments

  • 20170322_100312_1490232082055_resized.jpg
    20170322_100312_1490232082055_resized.jpg
    116 KB · Views: 349
  • 20170322_171540_1490232084281_resized.jpg
    20170322_171540_1490232084281_resized.jpg
    232.5 KB · Views: 316
  • 20170322_171600_1490232083215_resized.jpg
    20170322_171600_1490232083215_resized.jpg
    198.7 KB · Views: 304
  • 20170322_171544_1490232082874_resized.jpg
    20170322_171544_1490232082874_resized.jpg
    212.7 KB · Views: 331
  • 20170322_195441_1490232083519_resized.jpg
    20170322_195441_1490232083519_resized.jpg
    171.7 KB · Views: 280
  • 20170322_195502_1490232083841_resized.jpg
    20170322_195502_1490232083841_resized.jpg
    174.1 KB · Views: 282
Last edited:

sprdv1

Contributor
REBEL
Joined
Mar 8, 2007
Messages
81,747
Nice looking project Matt. Congrats and welcome aboard

And thanks for contributing to the site.
 

cldonley

Contributor
Bronco Guru
Joined
Jul 4, 2011
Messages
1,273
Loc.
Robinson, TX
I'm no exhaust guru, but I just searched all over for a y pipe and couldn't find one. I'm thinking you're going to have one made at an exhaust shop. This is something I was considering for my '69, with no joy. A lot of the folks on here are going with a 2 into 1 muffler instead of a y pipe
 

gambling209

Full Member
Joined
Apr 20, 2010
Messages
198
One of the Broncos vendors at the top of the page has a full exhaust for stock exhaust manifolds
 
OP
OP
B

buckroseau

Jr. Member
Joined
Mar 15, 2017
Messages
70
Thanks for all the responses.

I ordered an exhaust set up through this site: www.precisionexhaust.com

Supposedly Y pipe (for my 75 with the spacer) and everything else out the back, essentially a stock set up. Once I get it and installed I will post a few pics.

Doesn't look like much, but got a little more done today. Finished unloading the trailer and all the parts. Spent quite a few hours just organizing everything. The parts had been thrown fairly randomly into boxes so i was trying to get a few things laid out and semi organized. Also drilled out the spot welds on the windshield frame hinge. Now the fun of welding all those holes back in on the hinge.
 

Attachments

  • 20170324_175603.jpg
    20170324_175603.jpg
    98.8 KB · Views: 110
  • 20170324_164331.jpg
    20170324_164331.jpg
    85.2 KB · Views: 118
  • 20170324_164322.jpg
    20170324_164322.jpg
    64.4 KB · Views: 107
OP
OP
B

buckroseau

Jr. Member
Joined
Mar 15, 2017
Messages
70
Got some more done today. I spent a few hours on the windshield frame. Welded up all those holes from the spot welds. Then fired up the sandblaster and cleaned up all the rust in the hinge and bottom of the windshield frame. Sprayed a little self etching primer on the bare metal for now. Had a few friends come over to roll the chassis out to pull the body off and flip it over. Did some sanding and a little glass work on the bottom, cleaned it up. Tomorrow I plan to tape it off and spray it with bed liner.
 

Attachments

  • 20170325_171646.jpg
    20170325_171646.jpg
    56.1 KB · Views: 120
  • 20170325_171659.jpg
    20170325_171659.jpg
    105.2 KB · Views: 110
  • 20170325_165051.jpg
    20170325_165051.jpg
    45.9 KB · Views: 93
  • 20170325_150421.jpg
    20170325_150421.jpg
    100.5 KB · Views: 92
  • 20170325_150347.jpg
    20170325_150347.jpg
    137.2 KB · Views: 92
  • 20170325_130001.jpg
    20170325_130001.jpg
    68.4 KB · Views: 101
OP
OP
B

buckroseau

Jr. Member
Joined
Mar 15, 2017
Messages
70
Little further along today. Taped and sprayed the bottom with bed liner, happy with how that turned out.

Also took a pic of the data plate, I was hoping to pick up some Omni base tomorrow. Looks like color code W, Medium green glow special option, "Glamour color paint". Interesting name.
 

Attachments

  • Screenshot_2017-03-26-17-41-54_1490576642262.jpg
    Screenshot_2017-03-26-17-41-54_1490576642262.jpg
    75.4 KB · Views: 83
  • 20170326_173618_1490576642488.jpg
    20170326_173618_1490576642488.jpg
    69.6 KB · Views: 106
  • 20170326_150213_1490576642673.jpg
    20170326_150213_1490576642673.jpg
    69.5 KB · Views: 87
  • 20170326_180334_1490576642127.jpg
    20170326_180334_1490576642127.jpg
    94.6 KB · Views: 92
  • 20170326_144439_1490576641782.jpg
    20170326_144439_1490576641782.jpg
    87.3 KB · Views: 95
  • 20170326_124312_1490576641517.jpg
    20170326_124312_1490576641517.jpg
    94.7 KB · Views: 92
  • 20170325_201151.jpg
    20170325_201151.jpg
    78 KB · Views: 84
OP
OP
B

buckroseau

Jr. Member
Joined
Mar 15, 2017
Messages
70
I've been meaning to post some pics of the progress. Been doing pretty good, life is getting a little more busy right now so may slow down a bit. I have some questions for the guru's after I post up a bunch of pics.
 

Attachments

  • 20170402_182007.jpg
    20170402_182007.jpg
    85.8 KB · Views: 94
  • 20170329_173652_1490927484444_resized.jpg
    20170329_173652_1490927484444_resized.jpg
    196.3 KB · Views: 71
  • 20170329_165439_1490927485342_resized.jpg
    20170329_165439_1490927485342_resized.jpg
    188.4 KB · Views: 66
  • 20170329_165426_1490927485664_resized.jpg
    20170329_165426_1490927485664_resized.jpg
    190.8 KB · Views: 68
  • 20170325_165051.jpg
    20170325_165051.jpg
    45.9 KB · Views: 60
  • 20170325_150421.jpg
    20170325_150421.jpg
    100.5 KB · Views: 58
  • 20170325_130001.jpg
    20170325_130001.jpg
    68.4 KB · Views: 62
  • 20170324_175554.jpg
    20170324_175554.jpg
    94.6 KB · Views: 62
OP
OP
B

buckroseau

Jr. Member
Joined
Mar 15, 2017
Messages
70
More pics, trying to keep in order.
 

Attachments

  • 20170424_133654.jpg
    20170424_133654.jpg
    49.8 KB · Views: 68
  • 20170424_133650.jpg
    20170424_133650.jpg
    63 KB · Views: 80
  • 20170424_133644.jpg
    20170424_133644.jpg
    72.7 KB · Views: 76
  • 20170423_174732.jpg
    20170423_174732.jpg
    90.2 KB · Views: 73
  • 20170423_174719.jpg
    20170423_174719.jpg
    72.3 KB · Views: 71
  • 20170422_171934.jpg
    20170422_171934.jpg
    55.9 KB · Views: 73
  • 20170422_171926.jpg
    20170422_171926.jpg
    60.8 KB · Views: 78
  • 20170403_182129.jpg
    20170403_182129.jpg
    77.7 KB · Views: 75
OP
OP
B

buckroseau

Jr. Member
Joined
Mar 15, 2017
Messages
70
More pics, still trying to keep them in some orders. Next pics will be questions.
 

Attachments

  • 20170507_104431.jpg
    20170507_104431.jpg
    75.2 KB · Views: 89
  • 20170426_204959.jpg
    20170426_204959.jpg
    93.2 KB · Views: 89
  • 20170426_204949.jpg
    20170426_204949.jpg
    93.3 KB · Views: 90
  • 20170425_163733.jpg
    20170425_163733.jpg
    98.2 KB · Views: 84
  • 20170425_163721.jpg
    20170425_163721.jpg
    63.8 KB · Views: 88
  • 20170425_163714.jpg
    20170425_163714.jpg
    73.2 KB · Views: 87
  • 20170424_133718.jpg
    20170424_133718.jpg
    110.1 KB · Views: 85
  • 20170424_133705.jpg
    20170424_133705.jpg
    100.9 KB · Views: 86
OP
OP
B

buckroseau

Jr. Member
Joined
Mar 15, 2017
Messages
70
Ok, now for some questions. Keep in mind, I bought this as a project, and did not take it apart. And, I've been a landcruiser guy for the last 25 years so Brono's are a bit new to me.

Alright, in these pics you see the fuel pump, supposedly the stock 5/16" nylon / plastic fuel line and the nipple on the front of the brand new rear fuel tank. My question is how do I connect that fuel line to the tank which looks to be about a 5/16" nipple and the fuel pump, which looks to be about a 3/8" nipple? And, how do you use that nylon line? I don't understand how it would even flex over those nipples?

Matt
 

Attachments

  • 20170506_205621.jpg
    20170506_205621.jpg
    39.5 KB · Views: 52
  • 20170506_205611.jpg
    20170506_205611.jpg
    29.5 KB · Views: 48
  • 20170506_205555.jpg
    20170506_205555.jpg
    37.7 KB · Views: 53
  • 20170506_205711.jpg
    20170506_205711.jpg
    24 KB · Views: 42
OP
OP
B

buckroseau

Jr. Member
Joined
Mar 15, 2017
Messages
70
Next question. Does anyone know what this portion of the wiring harness is specifically for? And which direction does it go through the firewall? I have seen a few pics on the net and I believe the single wire on the one side of the rubber grommet goes towards the engine bay? Not sure where that single wire would connect?

Matt
 

Attachments

  • 20170429_160731.jpg
    20170429_160731.jpg
    102.7 KB · Views: 60

thegreatjustino

Contributor
Red Head Grease Monkey
Joined
Jan 23, 2002
Messages
15,678
Loc.
Stockton, CA
The nylon fuel line runs along the frame between the gas tank and fuel pump. The last 3"-6" of line is just standard rubber fuel hose. Connect one end to the nylon line with a hose clamp and the other to the fuel pump/tank also with a hose clamp.
 
OP
OP
B

buckroseau

Jr. Member
Joined
Mar 15, 2017
Messages
70
Another question, adjustable track bar. I ordered this from Jeff's and the mounting points are not parallel with the stock one, it's kinda like it's not even for this model. I emailed Jeff's and he said that is the only one they have. He also said that sometimes you have to drop the track bar bracket. I'm a little confused on that statement since it's welded to the frame? I can't imagine he was referring to cutting the track bar bracket off and re-welding it?

Matt
 

Attachments

  • 20170501_091445_resized.jpg
    20170501_091445_resized.jpg
    123.3 KB · Views: 51
OP
OP
B

buckroseau

Jr. Member
Joined
Mar 15, 2017
Messages
70
The nylon fuel line runs along the frame between the gas tank and fuel pump. The last 3"-6" of line is just standard rubber fuel hose. Connect one end to the nylon line with a hose clamp and the other to the fuel pump/tank also with a hose clamp.


Ok, thanks. Is there an insert for the nylon line, seems like it might collapse? And is there a better adapter to get from the 5/16" nylon line to the fuel pump? pretty big jump.

Thanks Matt
 

thegreatjustino

Contributor
Red Head Grease Monkey
Joined
Jan 23, 2002
Messages
15,678
Loc.
Stockton, CA
I was going to say the trac bar on the right has the larger bend to clear the front differential of the Dana 44 and the one on the left is for a Dana 30 but looking closer at the picture, the new one looks nothing like an EB trac bar. All of the vendors sell a track bar drop bracket the welds on over the bracket on the frame side. You do not cut off the OEM bracket. Alternately, there is a raising bracket you can install on the axle to bring that side up. This is generally considered much more heavy duty. The frame ones tend to crack from the added length/torque put on them.
 
OP
OP
B

buckroseau

Jr. Member
Joined
Mar 15, 2017
Messages
70
Trac bar on the left has the larger bend to clear the front differential of the Dana 44. The one on the left is for a Dana 30. All of the vendors sell a track bar drop bracket the welds on over the bracket on the frame side. You do not cut off the OEM bracket. Alternately, there is a raising bracket you can install on the axle to bring that side up. This is generally considered much more heavy duty. The frame ones tend to crack from the added length/torque put on them.

Good info. Now my next question and please excuse my ignorance on this. The one on the left, the adjustable one I got from Jeffs, is the adjustable one. Does someone make a direct bolt in one for my rig? This only has a 2.5" lift. If the bar was in the correct plain it would work fine I think? It currently doesn't even come close to lining up.

Matt
 
Top