• Welcome to ClassicBroncos! - You are currently viewing the forums as a GUEST. To take advantage of all the site features, please take a moment to register. It's fast, simple and absolutely free. So please join our community today!
    If you have problems registering or can't log into your account, please contact Admin.

Knifty 2 Build Thread

Mar1ne

Full Member
Joined
Mar 25, 2016
Messages
158
Loc.
Sierra Foothills, CA
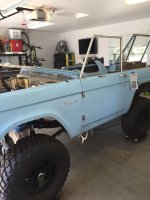
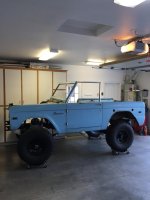
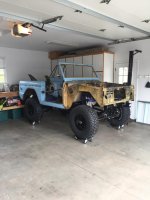
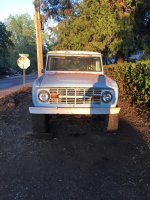
I bought this 1974 last fall and started making a plan for it. I have been driving my 66 daily since I bought it last year and plan to do the same with this one when it's done. I hope to have it finished sometime towards the end of this summer. I know how deadlines go, so I won't hold my breath, but we'll see what hiccups I run into.

I'm not from the area where I live now, but this Bronco has been here since the 80's according to local folklore. I purchased it from a guy who cut a deal with the original owner.

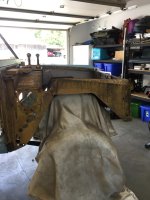
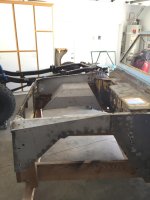
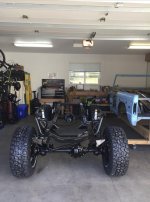
Stripped it down throughout the fall and began working on the frame. This was a mistake before the bodywork, which I'm sure a lot of you will recognize quickly. Of course there ended up being a little bit more than I thought there would be.

I cut the hitch and dual shock mounts off the rear of the frame. I should've it more of the splatter around the original welds with a flap disk before coating. I also asked for the VIN to be preserved and apparently the shop forgot. It's clearly visible with the body off, but will be a pain if someone wants to verify it in the future.

I live about an hour from Wild Horses, so luckily I can make some bulk orders and skip shipping.
2.5" Lift with Bilstein shocks
1" Body lift
Track bar
Disk brake front
New rear brakes
Brake lines
Axles all around
15x8 US Mag Wheels w/ 33x12.50 BFG KM2

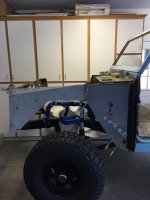
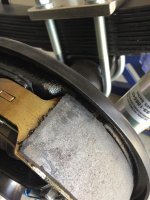
Front and rear end were built by a local shop with 4.11 gears. I had wire wheeled the housings and cleaned them to the best of my ability. Once returned I sprayed them with POR15 metal prep and followed the directions for clean metal application. I brought them into the house for a couple days to come up to temp and then painted them with two coats of Semi Gloss. I put a final layer of Top Coat in the can on so I could get a good uniform texture. I think they came out great.

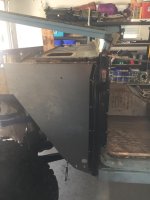
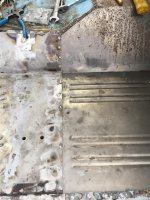
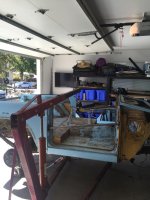
Body back on, prepping for metal work.

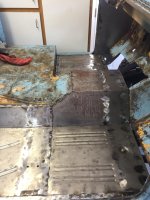
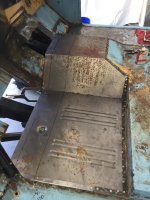
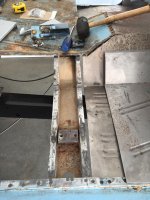
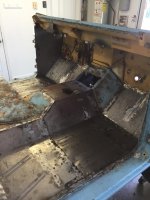
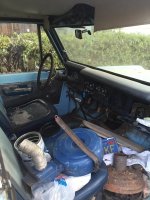
I bought a 6x8 welding blanket to drape over the frame while I'm working on it. The center floor brace had the center section removed and three separate sections removed for I'm assuming various transmissions. The bottom of the drivers door post is rotten.

I ran 2x4's down the firewall onto the frame in the engine bay and lagged them into place to keep the nose where it needed to be. Floor came out and this is where I am running into a "what do I do first?" scenario. The brace was already out, so removing the floors before the other work seemed like the right first step. The rot in the door post was due to a hole near where the brace attached to the inner rocker area. So, I took a section of the rocker out to see what I was dealing with. I put a bottle jack in there to keep that corner extra braced.

I appreciate all the advice and look forward to sharing the progress with everyone. I'll be getting the sheet metal done in the next few weeks hopefully and then sending it out to media blast and epoxy primer after confirming the rest of the metal is good to go. Once finished there it will be dropped off at the paint shop. I will be doing a 351 and AX15. I am unsure exactly what specifics on the engine, but that will come pending reading other member's posts and any suggestions for my specific use.
 

Attachments

  • Screen Shot 2020-01-13 at 7.26.09 AM.jpg
    Screen Shot 2020-01-13 at 7.26.09 AM.jpg
    116.9 KB · Views: 31
  • IMG_1507.jpg
    IMG_1507.jpg
    82.8 KB · Views: 32
  • IMG_1316.jpg
    IMG_1316.jpg
    99.1 KB · Views: 31
  • IMG_1212.jpg
    IMG_1212.jpg
    112.5 KB · Views: 25
  • IMG_1205.jpg
    IMG_1205.jpg
    167.2 KB · Views: 23
  • IMG_1206.jpg
    IMG_1206.jpg
    244.9 KB · Views: 31
  • Screen Shot 2020-01-13 at 7.27.39 AM.jpg
    Screen Shot 2020-01-13 at 7.27.39 AM.jpg
    94.6 KB · Views: 30
Last edited:

sprdv1

Contributor
REBEL
Joined
Mar 8, 2007
Messages
81,747
Congrats on that. Looks like you'll have that thing rolling in no time

Keep it up
 
OP
OP
Mar1ne

Mar1ne

Full Member
Joined
Mar 25, 2016
Messages
158
Loc.
Sierra Foothills, CA
No progress on the '74 (The Sandpiper) lately. I have school priorities that keep me out of the garage.

I did get some new wheels/ tires for my '66 (Knifty) on today. I think it looks a little funny with black wheels and flares and a white top, but that will be taken care of in a few weeks when the top comes off for summer. I'll be putting a 1" body lift in and front disc brakes as well. I'll have time this summer to get the

15x8 pro comp 51 series
33x10.50 BFG KM2
 

Attachments

  • IMG_1613.jpg
    IMG_1613.jpg
    99.6 KB · Views: 185

sprdv1

Contributor
REBEL
Joined
Mar 8, 2007
Messages
81,747
Good thinking with schooling, make that your first priority, always a pita to have to go back. I hated it, no mo for me after HS, AF then work work work..


It'll definitely look good topless.. and oh the fun you'll have
 

romegadave

Sr. Member
Joined
Jan 5, 2016
Messages
488
I agree with everyone above--you're making good progress/school will go by quick too
 
OP
OP
Mar1ne

Mar1ne

Full Member
Joined
Mar 25, 2016
Messages
158
Loc.
Sierra Foothills, CA
I made a lot of progress during winter break and things came to a screeching halt during this semester. I'll be starting a nursing program this Fall so I won't have time to do much then, either.

I'm looking at getting the new sheet metal in next month and then moving into engine, transmission, and fuel. I'm starting to think about how I'm going to run stock tanks with a Fitech. I'll start researching how others have used their auxiliary tank to refill their main. I will consider the fuel commander if it has it's offroad quirks fixed. I don't plan on wheeling this one, but it will be a possibility.
 
OP
OP
Mar1ne

Mar1ne

Full Member
Joined
Mar 25, 2016
Messages
158
Loc.
Sierra Foothills, CA
I haven't worked on this nearly as much as I planned. A few fishing trips out of state, one to Maine and one to Alaska kept me busy for a month. I've been back home and to it recently, though.

It took a lot of figuring out which metal to cut out and replace first. With the front brace out it made for only a certain way things could go back together.

I was able to get the new kick panel, door post, and front half of the inner rocker in and sheet metal screwed together after much measuring, double and triple checking.

After everything was secure, I hung the fender and door. My lines and gaps are all good, except for the front section of the door is in about a 1/4". This, I believe is due to the door post hinge plates. I put the fender and door on the other side and it lines up perfectly. The passenger hinges stick out about 1 1/4", while the driver side only sticks out 1". It seems as though the aftermarket door post's inner hinge plates wont move outward enough. I think I will be able to elongate the holes in the hinges enough to make it work. Not what I wanted to do, but better than the alternative of cutting open the door post.
 

Attachments

  • IMG_1729.jpg
    IMG_1729.jpg
    68.1 KB · Views: 153
  • IMG_1728.jpg
    IMG_1728.jpg
    84 KB · Views: 191
  • IMG_1730.jpg
    IMG_1730.jpg
    96.4 KB · Views: 156
  • IMG_1723.jpg
    IMG_1723.jpg
    110.1 KB · Views: 164
OP
OP
Mar1ne

Mar1ne

Full Member
Joined
Mar 25, 2016
Messages
158
Loc.
Sierra Foothills, CA
Yesterday and today I worked on floors. I was surprised at how long the prep work took. I slowly worked my way around the pieces with sheet metal screws and clamps where I could.

All in all I'm happy with my first welding work. I used my spot weld drill to make a lot of surface area for the plug welds. I didn't think the sheet metal screw holes were big enough, at least not for my beginner welding.

I had bought a welder to do this project and I am impressed with my new machine. Lincoln Power Mig 210 MP.

Tomorrow will entail getting the door post and kick panel welded in as well as the upper floor sections. I also have fender aprons and wells to do. That should be it for metal work...
 

Attachments

  • IMG_1759.jpg
    IMG_1759.jpg
    104.8 KB · Views: 196
  • IMG_1757.jpg
    IMG_1757.jpg
    109.2 KB · Views: 165
  • IMG_1756.jpg
    IMG_1756.jpg
    116.4 KB · Views: 158
  • IMG_1751.jpg
    IMG_1751.jpg
    118.2 KB · Views: 164
  • IMG_1755.jpg
    IMG_1755.jpg
    125.3 KB · Views: 162

Bferrari

Sr. Member
Joined
Mar 6, 2013
Messages
856
Nice work! If you have a lot more to do then look into getting a set of Cleco's. makes it a lot easier when fitting the metal in lieu of using sheet metal screws. Also, great choice on the welder, I love mine! Keep at it, looking great!
 
OP
OP
Mar1ne

Mar1ne

Full Member
Joined
Mar 25, 2016
Messages
158
Loc.
Sierra Foothills, CA
I put the upper floors in today. Both pieces were warped, the passenger side pretty bad. I couldn't get them to lay in flat, so I made a relief cut down the center. I will need to clean up those seams better, but I'm happy with how it came out.

I took my '66 on a little camping trip up off highway 88 at Silver Lake on Carson Pass. Every time I'm above 7500' elevation I wish I had EFI.
 

Attachments

  • FullSizeRender.jpg.jpg
    FullSizeRender.jpg.jpg
    105.2 KB · Views: 190
  • IMG_1770.jpg
    IMG_1770.jpg
    94.7 KB · Views: 186
OP
OP
Mar1ne

Mar1ne

Full Member
Joined
Mar 25, 2016
Messages
158
Loc.
Sierra Foothills, CA
Nice work! If you have a lot more to do then look into getting a set of Cleco's. makes it a lot easier when fitting the metal in lieu of using sheet metal screws. Also, great choice on the welder, I love mine! Keep at it, looking great!

I had been told about cleco's before the project and forgot. Just ordered a kit, thanks!
 
OP
OP
Mar1ne

Mar1ne

Full Member
Joined
Mar 25, 2016
Messages
158
Loc.
Sierra Foothills, CA
Started working on fender aprons and wells. No welding yet, but measurements and fender placement is looking good. Cutting the wells out around the shock hoops got a little close. I managed to shave a little of the welding blanket in one place, but didn't get the hoop.

My original measurements from core support to firewall:
Passenger: 34 7/8"
Driver: 35 1/16"

I'm going to get everything mocked up with these dimensions. I understand some things from factory weren't perfect, but I wonder if this is a little tweaked or is original? I need to get the other fender, grill, and hood on before I make any welds.
 

Attachments

  • IMG_1772.jpg
    IMG_1772.jpg
    77.6 KB · Views: 140
  • IMG_1774.jpg
    IMG_1774.jpg
    68.1 KB · Views: 151
  • IMG_1773.jpg
    IMG_1773.jpg
    91.1 KB · Views: 140
  • IMG_1776.jpg
    IMG_1776.jpg
    65.5 KB · Views: 177

broncoitis

Bronco Guru
Joined
Jul 23, 2010
Messages
4,449
Good work! Truck looks like it is pretty solid and gonna keep an eye on your progress. Your 66 is a sweet ride as well!
 
OP
OP
Mar1ne

Mar1ne

Full Member
Joined
Mar 25, 2016
Messages
158
Loc.
Sierra Foothills, CA
I took the last few weeks off for more fishing and summer vacation. Got back to it the other day and did my aprons and wells. I put it back on the body cart and will be bringing it to media blast Thursday. I will have the same company epoxy primer it if it is ready.

When it returns in a couple weeks I'll do the seam sealing and then it will go to the painter. I'm trying to come up with a color. I know Brittany Blue may be a fad right now, but I like it. I'm also debating Boxwood Green.

My biggest conundrum is whether I am going to sell my '66 to fund this project. It is either to sell it or strip the cage, seats, engine, exhaust, and various small items and use them, while retaining the Bronco for future restoration. I will get to keep both, but will not have the 351, 5 speed, seats, and cage that I had been planning for this project. I've had worse problems I suppose.
 

Attachments

  • IMG_1793.jpg
    IMG_1793.jpg
    73.2 KB · Views: 108
OP
OP
Mar1ne

Mar1ne

Full Member
Joined
Mar 25, 2016
Messages
158
Loc.
Sierra Foothills, CA
Body is on the trailer and off to Lodi for media blast tomorrow. I will start focusing on the drivetrain and finishing the brakes.

My left rear brake drum is binding up. Everything is new and as far as I know in correctly. With the drum tightened on I think it is binding against the top of the rear shoe. I can get a half turn out of the drum before it stops. With the tire on and turning it by hand it's almost too difficult to get a full turn out of it...
 

Attachments

  • IMG_1794.jpg
    IMG_1794.jpg
    90.6 KB · Views: 88
  • IMG_1795.jpg
    IMG_1795.jpg
    112.9 KB · Views: 76
Top