• Welcome to ClassicBroncos! - You are currently viewing the forums as a GUEST. To take advantage of all the site features, please take a moment to register. It's fast, simple and absolutely free. So please join our community today!
    If you have problems registering or can't log into your account, please contact Admin.

Popping Smoke

Rustytruck

Bronco Guru
Joined
Feb 24, 2002
Messages
10,875
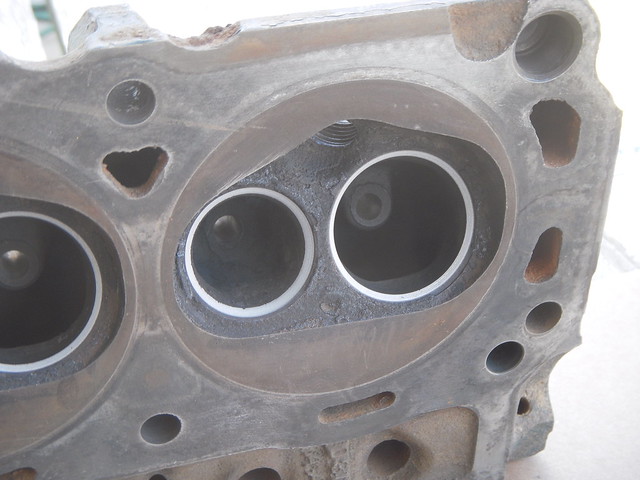
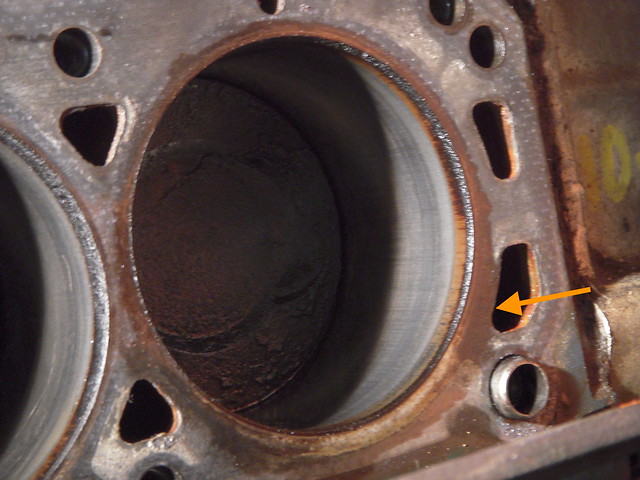
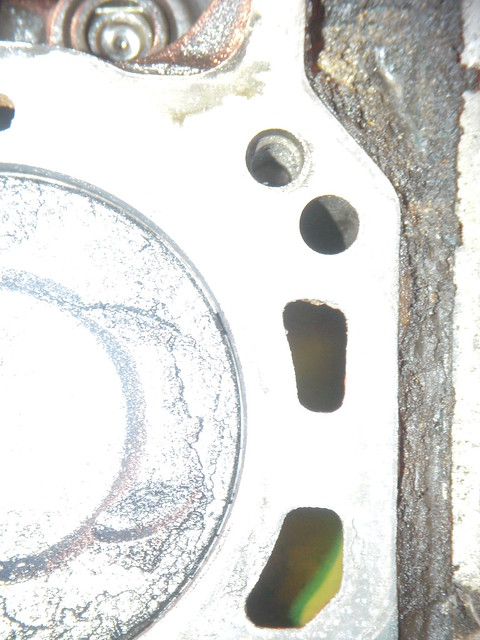
Fluid Leak down on the bore probably wont tell you any thing with the open ring end gaps. It will probably drain out very fast.

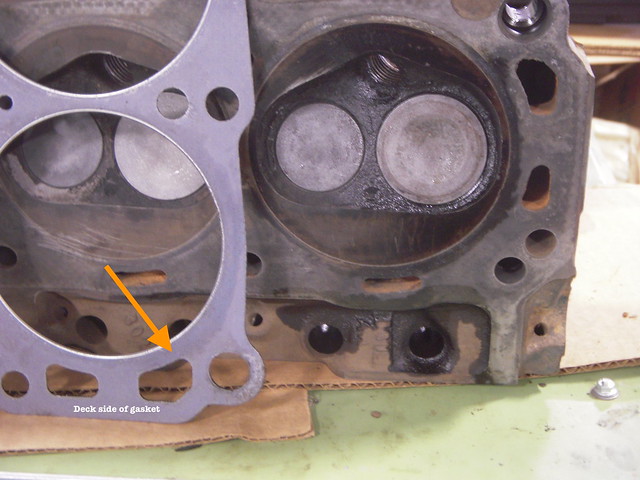
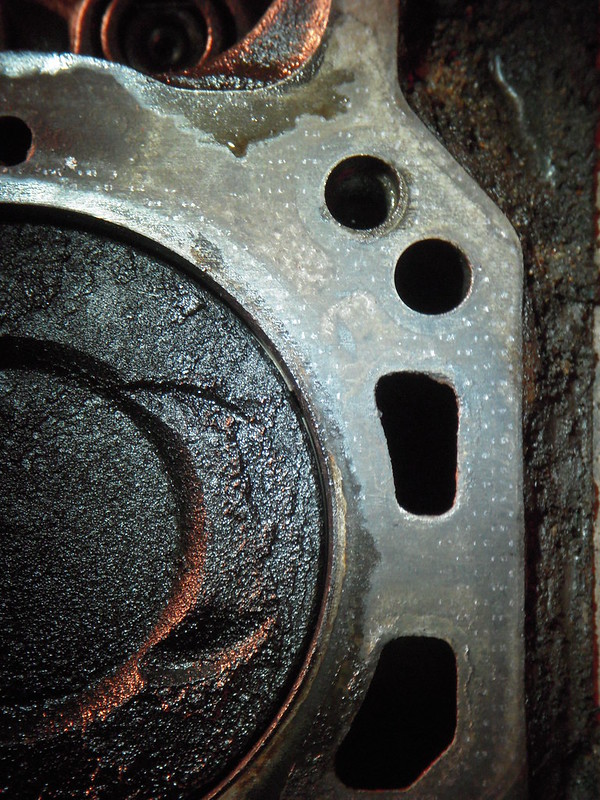
Once you get the head back on and valve train hooked up do a compression test before you put the intake back on. Saves a set of gaskets. Me I would just replace the other head gasket. What you going to do with 1 head gasket? They come in pairs. Make sure you get the head gaskets on right. The front marked on them is towards the radiator. In most cases there is a pretty side and an ugly side. When installed one side will be pretty side up and the other will be ugly side up. They will be stamped or printed front make sure both fronts are towards the front even if the gasket seems upside down and you cant read front unless you turn over the the gasket.

Look at the pictures on post 325 on this thread. properly installed head gaskets

http://classicbroncos.com/forums/showthread.php?t=287403&page=22
 
OP
OP
Lawndart

Lawndart

Sr. Member
Joined
Nov 23, 2014
Messages
838
Loc.
66030
Thanks Rusty.

I have the gaskets now - although I purchased 2 as they were sold individually.

I figure the bore test will leak fast, I was just hoping to confirm they were about the same rate. I had a small drip on the stem of #7 intake from my gas/valve test. I will probably lap the valves. before install. I will leave the intake off and test compression. If good, remove the other head and replace that gasket as well. This one looked pretty bad, guessing the other is about the same.

Edited out mistake
 
Last edited:
OP
OP
Lawndart

Lawndart

Sr. Member
Joined
Nov 23, 2014
Messages
838
Loc.
66030
Head cleaned, valves cleaned, lapped and installed new valve stem seals. The old ones were quite comical being either destroyed, cracked and rockish hard.
43401255982_e81b4bf1f2_z.jpg


Head installed. Compression tested - still 65ish.
Looking like rings now.
I am going over the options however I will take the head back off, remove the pan and pop #8 out just to take a looksie.
 

pcf_mark

Bronco Guru
Joined
Jun 11, 2010
Messages
3,580
Crap. Sorry about that. Did you run the piston up and down the bore before you put the head on? A failed ring should do some harm you can see.

Did you observe the valve operation when you did the compression test? Are they all moving the same? A worn intake lobe will give you low compression I believe.
 
OP
OP
Lawndart

Lawndart

Sr. Member
Joined
Nov 23, 2014
Messages
838
Loc.
66030
I did not rotate the engine with the head off - I will so today (head coming back off).
Engine rotated with head on, both lifters raised to same level.
 
OP
OP
Lawndart

Lawndart

Sr. Member
Joined
Nov 23, 2014
Messages
838
Loc.
66030
Head off. Engine rotated - some faint vertical lines in #8 but cannot really be felt with fingernail. Nothing visually noted. Poured some atf in #7 & #8. No noticeable difference in volume +1hr later. I'll check in the AM.
Guess I'll have to pop the piston, but damn, I am fearing addition lack of clues.
 

pcf_mark

Bronco Guru
Joined
Jun 11, 2010
Messages
3,580
Faint scratches are not important. When you did your second compression check did you lash the valves? Or did you test without the valves opening / closing?

A broken ring with some miles on it starts to chew up the cylinder wall. If that is it you caught it early. I'm not convinced it is a ring yet. If the head was still on I would have you test compression again with some atf or oil in the cylinder to see if it jumps.
 
OP
OP
Lawndart

Lawndart

Sr. Member
Joined
Nov 23, 2014
Messages
838
Loc.
66030
I connected the pushrods and tested with valves opening and closing. In hindsight, I should have also leak-down tested as well.

I did about 15-20 miles with the smoking condition, 7 or so home for the night, then 7 or so to the shop.

This AM, both cylinders had drained of ATF. Right now, I am a bit stumped and am a little hesitant to go through the pan/piston scenario.
 

pcf_mark

Bronco Guru
Joined
Jun 11, 2010
Messages
3,580
I hate to see you repeat some work but you can put the head on with the new old gasket in 30 minutes. I would repeat your compression test then add a few teaspoons of oil and repeat it again. Poor rings the oil should help seal for a few cycles.

If you have a leak down tester that will tell you something also.
 
OP
OP
Lawndart

Lawndart

Sr. Member
Joined
Nov 23, 2014
Messages
838
Loc.
66030
I forgot to mention, we added a few squirts of oil into the intake port and retested with the head on. The compression increased about 10psi.

Next day - Just my luck, the piston had stopped at the top of the deck prior to head removal (oil added, so oil was around the piston at the top of the deck of some amount of time). I removed the bolts. then waited a couple hrs for a helper for actual removal. There is some oil on the gasket and deck outside of the fire ring, but hard to say if that happened during removal or if it was getting pushed there during compression test.
42754882384_41b7518aff_z.jpg

42754874304_807f7cf0bc_z.jpg


Confirmed - ATF drains quicker in the neighboring cylinder than the offending #8 cylinder, ugh.
 

Rustytruck

Bronco Guru
Joined
Feb 24, 2002
Messages
10,875
Have you put a straight edge across the head and deck and checked for light under it with a flash light behind the straight edge?

If you have a micrometer measure the compressed gasket. Did you put the head on without gasket and make sure the bolts will actually compress the head if it does you know the head will clamp down and not being held up with bad threads or a head dowel issue.
 

Rustytruck

Bronco Guru
Joined
Feb 24, 2002
Messages
10,875
Did # 7 come up and the problem is #8 or are both still low. Put the head and new/used gasket back on and do a leak down on 5,6,7,8 with the pistons at the top of the Bore and at the bottom of the bore. with no valve train hooked up it will be easy. Especially with #8 you have easy access to the open water jacket and if you have a mechanics stethoscope you can probe in the water jacket and see if air is getting through.

Is there no sealer on that head gasket? No printo o sealer? who made the gasket.
When we use to use uncoated head gaskets in the old days we use to paint them with aluminium or copper paint and let it cure. And then spray them again and assemble wet and put the heads on. Then Felpro came up with the printo seal and permatorque gaskets and all that BS went away.

https://www.summitracing.com/parts/...MIkqf8vNSm3AIVg6_sCh1K2g3wEAQYASABEgI48vD_BwE
 
OP
OP
Lawndart

Lawndart

Sr. Member
Joined
Nov 23, 2014
Messages
838
Loc.
66030
Only #8 was low. I was just using #7 as a ATF in the cylinder leak-down control.

The gasket was a Fel-Pro 8548PT2 permablow or permatorque or something.
I did a straight edge test with a 0.004" feeler gauge - all seemed well.
I did not test fit the head without gasket.

Could this be a candidate??
42569001665_9c043436d7_c.jpg

43473771451_834c9fe817_z.jpg


I was able to fashion a crude gauge with the cardboard from a 12-pack (I know, whiskey tango) and measure the gap at approx 4mm (0.160"). Might have to check the end-gap spec, but I am a thinkin' it may be excessive %)
 
OP
OP
Lawndart

Lawndart

Sr. Member
Joined
Nov 23, 2014
Messages
838
Loc.
66030
Well, my strong friend came by today. We repeated all just for confirmation.
Head on, blah, blah. Turned #8 to TDC and proceeded with lead-down. #8 won't hold shite!

Listened with a leak detector and the leak is escaping into the crankcase. Having the intake off helps ease locating. Nothing in exhaust, intake port or water jacket. Played with a couple other cylinders for additional baseline.

I was able to trim down a 0.004 feeler gauge and run it around the piston. It does not seem like I can find and additional break in the #8 ring. I was able to find the ring gap locations in the other cylinders.

When desperate, desperate thoughts. Could the gaps have aligned??? This Bronco was driven quite a bit, +40k in the last 3+ years. I'm struggling with the all off a sudden ring issue.

Any-a-way, plan is to remove pan and pop #8 piston. If all reasonably OK, I will ring it and run until the salt comes in November. Then a complete rebuild. The thought of long block or a pulled lump has come into my mind. However the thought of pans, pickups, timing covers... ugh.
 

pcf_mark

Bronco Guru
Joined
Jun 11, 2010
Messages
3,580
I've never seen a ring fail without a lot of knock or overly tight end gaps and an overheated engine. I am very interested in what you find sorry for your labors!
 
OP
OP
Lawndart

Lawndart

Sr. Member
Joined
Nov 23, 2014
Messages
838
Loc.
66030
No noise, no knock, no overheating, no increased oil usage
Just the sudden smoke and found the #8 loss of compression.
 

Rustytruck

Bronco Guru
Joined
Feb 24, 2002
Messages
10,875
There is nothing saying it was assembled properly in the first place. Some times things happen I broke a new ring once and had to buy a new set to replace a single broken ring. After that I bought a set of ring expander pliers. I'm sure an unscrupless person might slip an old ring back in. Any pistons marked for over bore?
 
Top