• Welcome to ClassicBroncos! - You are currently viewing the forums as a GUEST. To take advantage of all the site features, please take a moment to register. It's fast, simple and absolutely free. So please join our community today!
    If you have problems registering or can't log into your account, please contact Admin.

Floor Pan and Other Half Done Metal Work

OP
OP
Jamie Chriss

Jamie Chriss

Sr. Member
Joined
Feb 28, 2015
Messages
576
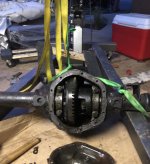
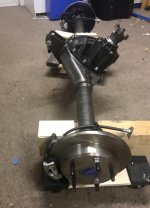
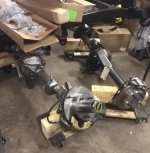
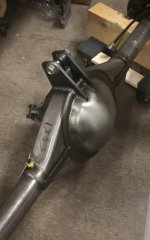
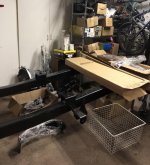
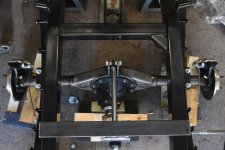
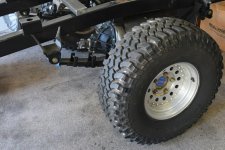
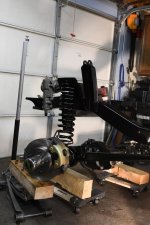
Plugging away, this stuff is way beyond my ability! A little good news the front gears look really clean and I think will match up with my new rear gears, crossing my fingers but it looks good so far. I have no idea how to take the gears out to clean up and send to powder coating...
 

Attachments

  • image2.jpg
    image2.jpg
    214.7 KB · Views: 93
  • image1.jpg
    image1.jpg
    117.9 KB · Views: 95

Rustytruck

Bronco Guru
Joined
Feb 24, 2002
Messages
10,875
Mark the the bearing caps and the housing if their not marked already so the left cap and the right cap wont get swapped on reasembly. My dana 44 was marked from the factory so I didnt have to mark it. Then remove the 4 cap bolts. And pry out the differential. You may have to rotate the the pinion yoke as you remove the diferential on each end of the differential the bearing races will come out and fall off. Once its out, tie wrap the bearing race and bearing cap to its origional side of the differential . Do the same on the other side and stuff it all in a heavy plastic bag. Loosen the pinion nut before you take the ring gear carrier out. Let the gears help you hold the yoke. Would have ben better to loosen when the front axle is locked up sitting on its tires. After you get it all apart there are axle seals inside where where the carrier bearings were. You may also find tapered tube sections inside the axle tube. Which are guides when you put the axles back in.
 

Rustytruck

Bronco Guru
Joined
Feb 24, 2002
Messages
10,875
Forgot, wear good gloves when disassembling this stuff. Allot of sharp edges and heavy parts. One slip can lead to a bad day. Work over a couple pieces of heavy cardboard. The fingers you save may be yours.
 

SDBMtber

Jr. Member
Joined
May 20, 2018
Messages
130
Also make sure you save the carrier and pinion shims. Should be able to re-use as is if only changing bearings. If you’re putting a new carrier in for locker, or different gears, you’ll still want measure old shims as starting place for setting up new gears.
 
OP
OP
Jamie Chriss

Jamie Chriss

Sr. Member
Joined
Feb 28, 2015
Messages
576
I also want to remove the Knuckles, not sure how to get those bolts out, both my pittman tools are too small, any advice?
 
OP
OP
Jamie Chriss

Jamie Chriss

Sr. Member
Joined
Feb 28, 2015
Messages
576
Google addiction, thanks thought about that after I asked the question. What about removing the pivoting screw attached to the knuckle?
 

DirtDonk

Contributor
Bronco Guru
Joined
Nov 3, 2003
Messages
47,490
What do you mean by pivoting screw? The limiting bolt that's got a bit of a tack weld on it?

Paul
 
OP
OP
Jamie Chriss

Jamie Chriss

Sr. Member
Joined
Feb 28, 2015
Messages
576
Stuck in wait mode! Awhile back I started amassing Coyote parts, everything I need to move forward is still on back order so I have taken this time to do some much neglected home projects. I should have my axels back in a few weeks then I can start with the chassis. Thanks for asking!!!!
 
OP
OP
Jamie Chriss

Jamie Chriss

Sr. Member
Joined
Feb 28, 2015
Messages
576
Moving day, moved the tub out and the frame in!
 

Attachments

  • IMG_4902.jpg
    IMG_4902.jpg
    227.6 KB · Views: 78
  • IMG_4905.jpg
    IMG_4905.jpg
    176.7 KB · Views: 102
  • IMG_4907.jpg
    IMG_4907.jpg
    154.6 KB · Views: 79
OP
OP
Jamie Chriss

Jamie Chriss

Sr. Member
Joined
Feb 28, 2015
Messages
576
Picked up my axles from Currie Enterprises yesterday, extremely happy with the quality of their work! Waiting to weld on spring perches and shock mounts tell I figure out the right pinion angle. Based on expected tire size of 33 I went with 4:56 gearing.
 

Attachments

  • IMG_5317.jpg
    IMG_5317.jpg
    84 KB · Views: 66
  • IMG_5312.jpg
    IMG_5312.jpg
    128.7 KB · Views: 70
  • IMG_5311.jpg
    IMG_5311.jpg
    74 KB · Views: 71

bronkenn

Contributor
Bronco Guy
Joined
Apr 27, 2017
Messages
2,662
Loc.
Southeast Ohio
Glad to hear your still at it. Haven't heard from you I awhile. It is nice to take a hiatus once in a while and clear your head, especially with as big a chunk as you bit off. That will be a nice truck when your done. Your still young enough to be able to enjoy it for a long time. Ken
 
OP
OP
Jamie Chriss

Jamie Chriss

Sr. Member
Joined
Feb 28, 2015
Messages
576
My biggest issue so far is all the back orders, BC just can't keep up and Atlas had a two month back log. I am hoping to start putting the chassis together this weekend. I have never done anything to this extreme so I am a bit nervous. Many thanks to all my Bronco mentors along the way, we are all so fortunate to have this resource!
 

Attachments

  • IMG_5018.jpg
    IMG_5018.jpg
    117 KB · Views: 49
  • IMG_5019.jpg
    IMG_5019.jpg
    138.4 KB · Views: 56
OP
OP
Jamie Chriss

Jamie Chriss

Sr. Member
Joined
Feb 28, 2015
Messages
576
Slowly coming together. Bolted the rear end up, still need to weld on the perches and the shock mounts. Waiting to get the engine and trans in to figure out the perfect spot.
 

Attachments

  • DSC_1854.jpg
    DSC_1854.jpg
    116.9 KB · Views: 136
  • DSC_1868.jpg
    DSC_1868.jpg
    101.4 KB · Views: 134
  • DSC_1878.jpg
    DSC_1878.jpg
    125.7 KB · Views: 128
OP
OP
Jamie Chriss

Jamie Chriss

Sr. Member
Joined
Feb 28, 2015
Messages
576
Racing to get a rolling chassis for next week, I have a fellow CB coming up to help me set in my motor...
 

Attachments

  • DSC_2875.jpg
    DSC_2875.jpg
    85.5 KB · Views: 124

mattyq17

Bronco Guru
Joined
Jul 11, 2007
Messages
1,597
Looking good!!! I love the old BFG Muds, that is my favorite tread pattern, sad they don't make them any more. Keep up the progress!
 
Top