


Community
Message Forum
Photo Gallery
Event Calendar
Book Reviews
Bronco Wallpaper
Bronco FAQ
Link Back to CB!
Photo Gallery
Event Calendar
Book Reviews
Bronco Wallpaper
Bronco FAQ
Link Back to CB!
Buy / Sell


Bronco Tech
3 Arm Wiper Setup
Fix Motor Mount
Roll Cage Braces
Throttle Body 65mm
Wheel Alignment
Heat Riser Replacement
Vent Window Repair
Center Console Mount
Straighten Bumper
Ford 6R80 6 spd
More Tech...
Fix Motor Mount
Roll Cage Braces
Throttle Body 65mm
Wheel Alignment
Heat Riser Replacement
Vent Window Repair
Center Console Mount
Straighten Bumper
Ford 6R80 6 spd
More Tech...

Install the app
-
Welcome to ClassicBroncos! - You are currently viewing the forums as a GUEST. To take advantage of all the site features, please take a moment to register. It's fast, simple and absolutely free. So please join our community today!If you have problems registering or can't log into your account, please contact Admin.
You are using an out of date browser. It may not display this or other websites correctly.
You should upgrade or use an alternative browser.
You should upgrade or use an alternative browser.
ARA A/C Rebuild
- Thread starter JaxLax
- Start date
OP
OP
JaxLax
Bronco Guru
And at the end of the day; it's not really for me.A lot of effort for AC
Wife/kids item.
But it wouldn't make me sad if it starts blowing cold soon.
OP
OP
JaxLax
Bronco Guru
Also, it is difficult to get parts for anything any more.
I need to replace the arms/louvers for the passenger/driver side.
The Toms Kit has the similar design/arms so I contacted them.
They sent me to their supplier.
I contacted Toms supplier AND THEY DON'T HAVE THE ARMS AVAILABLE so THEY ARE CONTACTING THEIR SUPPLIER ?:? FOR ME.
So I'm 3 suppliers deep and no one seems to know who actually manufactures them. Starting to lean towards making my own plastic to hose adapter and installed single vents.
I like the look/sturdiness of the hard plastic versus the soft hose (even if hidden), but someone out there actually makes them and I will pay you actual dollars for a set. Sell them to me. I don't understand how it's so hard and/or these vendors don't have some laying around that were returned or part of a damaged shipment in a warehouse somewhere.
I can get JUST the louver itself, but I have to order 2 and ackits.com sells them for $21/per w/o shipping. %) And they don't ship under UPS std; so I'd end up spending $60 for (2) 4.5" louvers.
I need to replace the arms/louvers for the passenger/driver side.
The Toms Kit has the similar design/arms so I contacted them.
They sent me to their supplier.
I contacted Toms supplier AND THEY DON'T HAVE THE ARMS AVAILABLE so THEY ARE CONTACTING THEIR SUPPLIER ?:? FOR ME.
So I'm 3 suppliers deep and no one seems to know who actually manufactures them.
Starting to lean towards making my own plastic to hose adapter and installed single vents. I like the look/sturdiness of the hard plastic versus the soft hose (even if hidden), but someone out there actually makes them and I will pay you actual dollars for a set. Sell them to me. I don't understand how it's so hard and/or these vendors don't have some laying around that were returned or part of a damaged shipment in a warehouse somewhere.
I can get JUST the louver itself, but I have to order 2 and ackits.com sells them for $21/per w/o shipping. %) And they don't ship under UPS std; so I'd end up spending $60 for (2) 4.5" louvers.
OP
OP
JaxLax
Bronco Guru
The battle continues....
Wife picked up a vacuum pump, gauge set, and a pulley puller (power steering pulley seemed a little loose and I was already getting a bunch of stuff) this afternoon and I headed home a little early to get started.
Get the gauges and pump setup and start to pull.
I can only get about 10 in/Hg. Ugh. But she’s throwing off steam like I was in a sauna; so maybe I just need to give it a little time. This system probably hasn’t been touched in at least 4 years! So I go ahead and take off the power steering pump belt and go to work on the pulley.
About 45 minutes later I’m cleaning up the pulley stuff and she’s still throwing smoke that a competitive vaper would envy, but still only in the teens for negative pressure. Ugh.
Close the valves and the pressure near immediately goes to 0. I’ve got a fairly large (or multiple) leaks. As one does, I toss the boy in and we head to the auto store for some UV dye. Get the low side can sprayer and shoot some in. Go out for a little over half hour drive and return.
Nothing. Nada. Blank canvas. Yes, I have a light. Yes, I know what I’m looking for since the end of the low pressure valve is highlighter neon where it went in.
What am I doing wrong? The speed that it went back to zero pressure indicates a severe leak, but I can’t find one. Perhaps the system isn’t developing enough pressure to force the dye out? I ran the engine and the clutch was engaged with the ac running when I introduced the dye which SEEMED to get sucked in.
Any thoughts out there? Go get a recharge kit and pressurize the system (and watch for leaks) Is there a way to use a tire pump/mini compressor to fill the system safely?
Also, how noises should the compressor be? Mine had a noticeable knock, but only with hood up and standing in front of it. Does that mean I’m short oil? Could the compressor be shot and not producing pressure as it should?
Right now my plans are to let it sit overnight and check again in the morning. Probably try to find a way to pressurize the system and force the dye out. I feel like I could hear a hiss with the vacuum on (pulling in atmospheric air making a whistle) but couldn’t really pin point it to well.
I would put a couple of cans of cheap Freon in it. Fire it up and check the gauges to see if you are getting any pressure on the high side port. Then check again for leaks. No pressure means a really big leak on the high side, or a bad compressor.
OP
OP
JaxLax
Bronco Guru
I would put a couple of cans of cheap Freon in it. Fire it up and check the gauges to see if you are getting any pressure on the high side port. Then check again for leaks. No pressure means a really big leak on the high side, or a bad compressor.
Even without an effective evacuation? At some point I was just bringing in atmospheric air and, well, FL isn’t exactly dry right now.
Even without an effective evacuation? At some point I was just bringing in atmospheric air and, well, FL isn’t exactly dry right now.
Yes. It’s just a test to see if the compressor is functioning and to help find the leak. I doubt that the dye is going to circulate thru the system without some Freon to push it.
Once you find and seal the leak, and verify the compressor is working, then do a full evacuation. The evacuation you are doing now is just sucking in air....
charlie6976
Sr. Member
I just did a/c. Read the directions for the gauges carefully. As I remember, the evacuation should go to 10 in/Hg as you found. After about ten minutes, if it is still at 10 in/Hg you should have no leaks. However, if the vacuum goes down below 10 in/Hg you have a leak.
Also, once you turn off the gauge set valves, they no longer read the system, so they will go to zero even though still being connected.
Also, once you turn off the gauge set valves, they no longer read the system, so they will go to zero even though still being connected.
OP
OP
JaxLax
Bronco Guru
Got a friends compressor. Gonna run the system and push the low side to 30 psi for a half hour and see if I can’t force out the dye. If that fails I’ll go grab some Freon and pressurize it that way.
OP
OP
JaxLax
Bronco Guru
Success and failures!
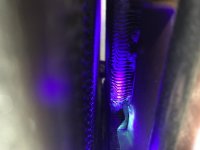
Found the leak!
That’s good!
It’s on the condenser where it’s contacting other metal!
That’s bad!
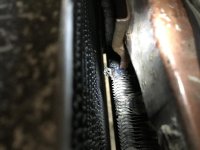
Ok, now how do I patch this? JB Weld? Should I remove the whole thing first? (Ugh) or just get it made and use a toothpick/kabob to get it down and in between the fins?
Found the leak!
That’s good!
It’s on the condenser where it’s contacting other metal!
That’s bad!
Ok, now how do I patch this? JB Weld? Should I remove the whole thing first? (Ugh) or just get it made and use a toothpick/kabob to get it down and in between the fins?
Attachments

OP
OP
JaxLax
Bronco Guru
OP
OP
JaxLax
Bronco Guru
More success and failures!
Evacuation and filled it and WOOOOOO 46F air!!!!
That’s good!
Pin hole leaks at sight glass on drier!
That’s bad!
Found a local replacement!
That’s good!
Another evacuation and fill and now I’m only getting 60F air!
That’s bad!
And now I’ve found it created a new leak in the condenser!
That’s super bad!
I might be giving up on this. I need to step away for a week and regroup and locate the new leak.
Rollercoaster of emotions today has soured me on this pretty hard. I’ll run it hard to and from work on Monday and then hook the gauges and see what’s still in there.
Also got some oil coming out the high side? Is this the sludge that forms when the two types mix?
Luckily a member here has reached out with a sanden replacement that he doesn’t need/want so depending on the hole and my ability to patch it; maybe I’ll just get it and flush the system and stop with ester and go full pag oil.
And now I’m rambling. I’ll stop.
OP
OP
JaxLax
Bronco Guru
Had an evening to talk things over with dad and some other people.
Going to keep at it. I'm still way under on $ budgeted and time (although my wife disagress on the second one) spent trying.
Hopefully meeting another member next week with a pag Sanden compressor and conversion bracket/pulleys that he removed when going to an Explorer front end dress (if he wishes to speak up, but I don't toss names out) and is using the exploerer compressor now.
Going to borrow the compressor again and keep searching for the leaks. Will put in another shot of UV dye and run around town blowing uncooled air to try and get it through the system again as I can't/don't have any showing in the area I hear the leak? (can you run out? has it not made it that far? thoughts?)
Been a tough one to deal with when you get everything working, cold air, good pressures, no squeals, clean work only to discover an issue that derails everything and the second attempt (using the same steps) results don't match up.
I'm hoping that a new compressor and not having to worry about finding ester oil products and the sludge I've encountered in the oil (common when mineral oil meets r134a apparently) means that I've just got to change directions and go a notch up from 'just get it to work at any cost' to 'do it mostly right'. This is still meant to be a temporary fix as I'll have to break the system apart in a few years anyways.
And now that I will be going full PAG oil, I guess I'll need to fully flush the system again right?
OP
OP
JaxLax
Bronco Guru
Ok,
gonna get the compressor and stuff from the member.
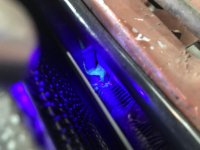
The boy spent a half hour crawling in and over the engine/front end looking for the dye (while I laid some sod) and BAM FOUND IT!
It's on the very bottom coil under the R in Ford and there's maybe 2-3 fins with some obvious pooling. Not sure exactly where the leak is, but I'll get it cleaned up, pressurized with compressed air and blow smoke at it until I see the swirls.
Now to get THAT done and figure out the hose situation and possibly a new belt; then we can try the whole charging thing over again. @Yay@
gonna get the compressor and stuff from the member.
The boy spent a half hour crawling in and over the engine/front end looking for the dye (while I laid some sod) and BAM FOUND IT!
It's on the very bottom coil under the R in Ford and there's maybe 2-3 fins with some obvious pooling. Not sure exactly where the leak is, but I'll get it cleaned up, pressurized with compressed air and blow smoke at it until I see the swirls.
Now to get THAT done and figure out the hose situation and possibly a new belt; then we can try the whole charging thing over again. @Yay@
OP
OP
JaxLax
Bronco Guru
Sounds like you are making good progress. You might consider replacing that condenser if it has multiple leaks and fin damage. You finds universal replacements for about $50. They are probably more efficient as well....
We continue to approach all new under hood parts.
%)
OP
OP
JaxLax
Bronco Guru
Well, spent a few minutes over lunch looking for a replacement condenser.
Walked outside and did some quick measuring (not super accurate as it's raining and it's awkward to get into there).
Height.current: 10"
Height.max: 10.5"
Width.current: 17"
Width.max: 22"
Depth.current: 1.25"
Depth.max: ? I mean, it can stick out the front as it already does a little.
So a cursory search and investigation gives two quick options:
4 Pass Parallel Flow (21 fins/in) 11" high, 20" wide, .71" core depth - UAC Part CN 20000XC SPACE and here's an amazon link $40
Serpentine Single Flow (16 fins/inch) 10" high, 18" wide, 7/8" core depth - UAC Part CN 70007C SPACE again with an amazon link $29
Quick perusal says that the parallel flow design > serp flow for R134a and it's design pressures. The issue becomes the mounting height (11v10 with current at 10). Otherwise seems like a better/more effective condenser with a higher fin count and such. I'll spend a few minutes tonight and really see the max height dimension or what I'll have to alter to get the unit in cleanly. Or just find another one, but it seems that there are very few options for condensers UNDER 12" in height.
I'll keep updating this thread even when no one else is commenting [he screams into the internet void]! Maybe someone will find all this information helpful one day.
OP
OP
JaxLax
Bronco Guru
OP
OP
JaxLax
Bronco Guru
OOOOOOOOOOOK who's ready for my normal overthinking post of the week!
[every closes the tab in unison]
Great! For those of you still here:
As always, I'm probably overthinking things since it's my job.
So new compressor and tensioner will probably result in a new belt. That's a wait and see. And not really something I'm worried about at the moment since I'll have to measure for it anyways.
By my calculations and estimations if I get this ebay 'kit' ; I'll still need a few more things.
Need: (2) 3/8" straight barb type connectors for the drier connections, some crimp/screw clamps/whatever you call them, the (Low/High) service ports and various new hoses. I don't have nor know of anyone with a crimper I could use/borrow hence the general use of the barb type connectors going forwards. And some firewall grommets.
I guess I should go ahead and replace ALL the hoses, right? Adding new fittings and moving the connection points (old comp is side, new will be top) and the condenser is the same. If I didn't I'd be cutting off the frayed ends to make sure I got the fittings on and it's a small investment to ensure that I don't contaminate the new system [yes, I know and will add an oz of extra oil for both the new lines and condenser to the total needed for the new compressor]. And I'd need to get to the evap unit and double check those ends for sizes too. And while I'm at it, grab some new firewall grommets! The previous owner/installer didn't bother with them %)
The question becomes where to get/put the service ports. My initial thought was to get a 90 deg fitting with the service port on it already to go right on the compressor fittings, but how much clearance will I have when I close the hood? I could get an inline port on a T-style barb fitting and put it in the most convenient spot. Which would be nice, but I also want to minimize penetrations into the system.
As always, give me your thoughts/lessons learned/observations on your own systems. Anything and everything is appreciated.
I'm going to head over to my local parts store and see what they've got in stock and see if they've got any suggestions (and how much more it's going to cost).
And again, it's fun approaching an almost full system replacement