


Community
Message Forum
Photo Gallery
Event Calendar
Book Reviews
Bronco Wallpaper
Bronco FAQ
Link Back to CB!
Photo Gallery
Event Calendar
Book Reviews
Bronco Wallpaper
Bronco FAQ
Link Back to CB!
Buy / Sell


Bronco Tech
3 Arm Wiper Setup
Fix Motor Mount
Roll Cage Braces
Throttle Body 65mm
Wheel Alignment
Heat Riser Replacement
Vent Window Repair
Center Console Mount
Straighten Bumper
Ford 6R80 6 spd
More Tech...
Fix Motor Mount
Roll Cage Braces
Throttle Body 65mm
Wheel Alignment
Heat Riser Replacement
Vent Window Repair
Center Console Mount
Straighten Bumper
Ford 6R80 6 spd
More Tech...

Install the app
-
Welcome to ClassicBroncos! - You are currently viewing the forums as a GUEST. To take advantage of all the site features, please take a moment to register. It's fast, simple and absolutely free. So please join our community today!If you have problems registering or can't log into your account, please contact Admin.
You are using an out of date browser. It may not display this or other websites correctly.
You should upgrade or use an alternative browser.
You should upgrade or use an alternative browser.
Barn Find Restomod Build
- Thread starter AZ73
- Start date
76Bronco302
Full Member
No idea if you've done this, but your going to want to slide the plastic defrost ducts back up into place and see how things line up. It's really tight back there once the ducts are back in place.
I agree with doing this before you get too set on things. If its a BC dash then he's good as they have their own defrost with inlets higher up built into the dash. Also what AC system are you running? I tried using 4 vents with the vintage air gen 2 and there is not enough power.
OP
OP
- Joined
- Mar 28, 2012
- Messages
- 3,542
I agree with doing this before you get too set on things. If its a BC dash then he's good as they have their own defrost with inlets higher up built into the dash. Also what AC system are you running? I tried using 4 vents with the vintage air gen 2 and there is not enough power.
BC dash so that should be ok. Vintage Air (BC). Don't understand "enough power" What does that mean?
76Bronco302
Full Member
The BC kit which is the vintage air gen 2 only has 3 outlets for the vents. If you use a Y fitting to turn it into 4 vents one will suffer and not get any air movement. Most likely being the driver side vent. You may have a different idea though.
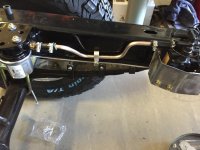
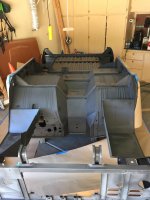
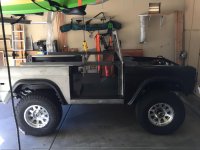
I used 3/16th 3 inch angle iron. WAY overkill. 1/8 inch is fine and will cut the weight (and drill time) by 33%. All the long pieces (sides and center support) are 6 feet. The verticals are 25 inches. (pix 1). I built it before I got my welder so I used grade 8 bolts (way overkill) with 8 inch angle supports bolted between the horizontals and verticals. The horizontal is off-set about 1/2 inch to make room for the dash. (pix 2). The verticals needed about 10 washers on the bolts to reach the door posts and brace them. I lined it up first then held in place with vice grips while I drilled and bolted the horizontals together. I held the cross brace in place with vice grips until I found the center of gravity, then drilled and bolted. I bolted to the quarter panels through 3 hardtop holes on each side. The holes were easy to mark from under with a marker, then drill when the jig was off the truck. The door post holes were a PITA to line up and took MANY tries to get the first one, then I used a cardboard stencil to line up the rest.
AZ,
Curios, how big of a plate did you use for the triangle pieces?
Thanks
OP
OP
- Joined
- Mar 28, 2012
- Messages
- 3,542
AZ,
Curios, how big of a plate did you use for the triangle pieces?
Thanks
1/8th. My metal supplier had a tray fill of them already cut.
1/8th. My metal supplier had a tray fill of them already cut.
Why bolts rather than weld the bracing?
Also you said drilling the holes for the door pillar brace was a pain. Anything you would have done different for this?
Sorry for questions, i just want to make sure I do this with the least amount of issues.
OP
OP
- Joined
- Mar 28, 2012
- Messages
- 3,542
Why bolts rather than weld the bracing?
Also you said drilling the holes for the door pillar brace was a pain. Anything you would have done different for this?
Sorry for questions, i just want to make sure I do this with the least amount of issues.
I used bolts because I didn't know how to weld when I was disassembling the bronco. As I progressed with the build and it got close to doing the body work, I took classes and bought a welder. Now that I could weld it, I still wouldn't. It holds up fine, is easy to dissemble to save space when not in use, and I can leave the vertical piece on the door posts while taking the horizontal pieces off to do other work. (windshield won't go all the way up with the horizontal piece on). The only thing I would change is to use thinner angle iron which is easier to drill. I used cobalt drill bits to make it easier to put holes in it.
It was slightly difficult to line up the door hinge holes with the vertical piece. After messing up, I ended up getting the bottom hole correct by putting a bolt in the door post with paint on the end, pressed the vertical to it, then measured the other holes in the door post from that first reference hole and marked the spots on the vertical. You'll also need to add maybe 6-8 washers between the hinge post and the vertical to make up for the gap.
One you have the bracket bolted to the door post and rear quarters, you run another piece of L or other bracket underneath and between them to create the lifting point. I used vice grips to hold it in place as I tested for the center of gravity and just kept adjusting until it lifted even. Then I drilled a hole on each side and bolted it in place.
Good luck!
OP
OP
- Joined
- Mar 28, 2012
- Messages
- 3,542
Every time I come here to post on this build it reminds me how long it's taking. Doesn't help I've been working non-stop starting a new company since February, but it's humming along now and the weather has turned so I'm motivated to get it done in time for the stampede. I've decided to just pay someone to paint it, since that's the hold up - making sure the body panels are perfect, or I'll never get it done. It's scheduled to go in around Thanksgiving as the painter is backed up, so I'm finishing up the last of the work on the chassis so I can put the body back on to take it over.
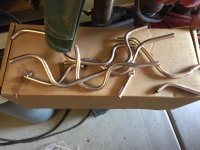
I'll be running a dual tank set-up to a Holley Sniper. I'll use a Carter 4070 low pressure high pump to pull from the rear tank and feed into a Pollak 6 port switch. The Aux tank will gravity feed to the switch. After the switch is a Bosch high pressure pump to feed the Holley (and help pull from the aux tank. 20u filter before the Carter and 10u after the Bosch, per Holley specs. The Pollak switch will control the Carter and shut it off when I'm using the aux tank.
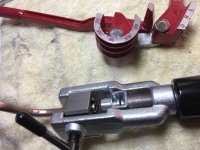
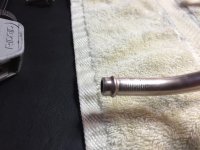
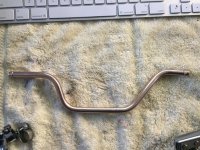
I've discovered the joys of tube bending. After many trial and errors, I watched some Youtube videos and learned all about the R and L on the tool. That, and putting grease on the tool to avoid kinks. Then I had to practice with the flair tool. Now the tubes are coming out nice. I debated running AN fittings, but decided to use NICOOP line and EVAP hose from Earls to make trail repairs easier. Also I didn't want to use a AN to plastic nipple on the 6 port switch. So it's not all aircraft looking, but it doesn't need AN for the pressures I'm running.
Also read about cleaning out new fuel tanks before installing. That meant uninstalling, cleaning it, and putting it back in. I recommend that after seeing all the white junk come out.
I'll be running a dual tank set-up to a Holley Sniper. I'll use a Carter 4070 low pressure high pump to pull from the rear tank and feed into a Pollak 6 port switch. The Aux tank will gravity feed to the switch. After the switch is a Bosch high pressure pump to feed the Holley (and help pull from the aux tank. 20u filter before the Carter and 10u after the Bosch, per Holley specs. The Pollak switch will control the Carter and shut it off when I'm using the aux tank.
I've discovered the joys of tube bending. After many trial and errors, I watched some Youtube videos and learned all about the R and L on the tool. That, and putting grease on the tool to avoid kinks. Then I had to practice with the flair tool. Now the tubes are coming out nice. I debated running AN fittings, but decided to use NICOOP line and EVAP hose from Earls to make trail repairs easier. Also I didn't want to use a AN to plastic nipple on the 6 port switch. So it's not all aircraft looking, but it doesn't need AN for the pressures I'm running.
Also read about cleaning out new fuel tanks before installing. That meant uninstalling, cleaning it, and putting it back in. I recommend that after seeing all the white junk come out.
Attachments


OP
OP
- Joined
- Mar 28, 2012
- Messages
- 3,542
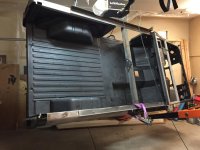
Seam sealed the top. Tub flipped to KBS/ceramic microsphere and seam seal the bottom. After second coat, flipped back and put second coat on top. Going in for paint next Thursday. Hustling to get everything done before it goes in.
Attachments
Last edited:
OP
OP
- Joined
- Mar 28, 2012
- Messages
- 3,542
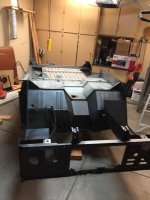
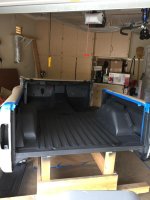
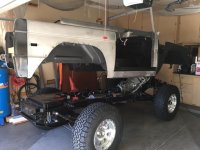
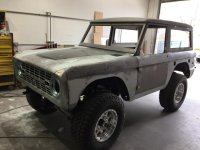
OMG. It happened! Body back on the frame. Going in for paint Thursday!
I temporarily tossed on the fender flares to see if I like my choices - 2.5 SL, 1 BL, 35's. I couldn't be happier with the stance.
I temporarily tossed on the fender flares to see if I like my choices - 2.5 SL, 1 BL, 35's. I couldn't be happier with the stance.
Attachments
BucksNBroncs
Full Member
Just read the whole thread. Phenomenal work! Can't wait to see more...
- Joined
- Mar 8, 2007
- Messages
- 81,747
OMG. It happened! Body back on the frame. Going in for paint Thursday!
I temporarily tossed on the fender flares to see if I like my choices - 2.5 SL, 1 BL, 35's. I couldn't be happier with the stance.
Wooohoo
") Good deal
Good dealkburandt
New Member
OMG. It happened! Body back on the frame. Going in for paint Thursday!
I temporarily tossed on the fender flares to see if I like my choices - 2.5 SL, 1 BL, 35's. I couldn't be happier with the stance.
Just read entire thread - fantastic work! Which flares are you using?
OP
OP
- Joined
- Mar 28, 2012
- Messages
- 3,542
Just read entire thread - fantastic work! Which flares are you using?
WH's Gorilla Warflares. You're in luck, they just went on sale.
https://www.wildhorses4x4.com/product/WH_Gorilla_Warflares_Set/Bronco_Fender_Flares
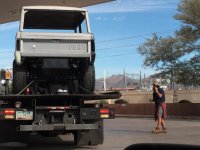
Everyone loves a Bronco. The Flatbed stopped for gas and some guy runs up to talk about it and snap a picture.
Attachments

OP
OP
- Joined
- Mar 28, 2012
- Messages
- 3,542
what did you use to suspend your body from garage ceiling? Hoist?
https://www.harborfreight.com/1300-lb-electric-hoist-with-remote-control-69739.html
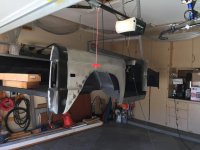
Up in the attic. Load spread with a 4x4 across several rafters, and hanging from a steel pipe. It's all hidden behind a access panel that matches the one to the attic.
I designed my jig to hold the front and back of the bronco together, and to allow for a moveable cross beam. The cross beam was intentially made longer with connecting holes on the ends so I could use the winch and an engine hoist to flip the body by myself. Worked great, although I had to use a strap to attach the engine hoist so the arm would clear the body when upside down.
It was perfectly balanced before I seam sealed and painted it. Afterwards, I has to add 2 pieces of 4X10 as counterweights by the tailgate. It was easier than resetting the balance point with the cross beam.
I installed the hoist because it will be used in the future to remove the top when the weather is nice. The front of the top, and the rear quarters have "nuts" welded to them on the insides so I can just undo the bolts. The ceiling has eye bolts and chains to insert 2X4s to hold the top up next to the ceiling when removed.

Similar threads
- Replies
- 2
- Views
- 559
- Replies
- 17
- Views
- 2K
- Replies
- 0
- Views
- 1K