• Welcome to ClassicBroncos! - You are currently viewing the forums as a GUEST. To take advantage of all the site features, please take a moment to register. It's fast, simple and absolutely free. So please join our community today!
    If you have problems registering or can't log into your account, please contact Admin.

Explorer EFI Mass Buy Feeler.

904Bronco

Contributor
Bronco Guru
Joined
Sep 28, 2004
Messages
5,758
Loc.
San Martin, CA
Nice job on the bracket!

Rotating the IAC may give you problems though. I know that the Mustang IAC requires vacuum on the correct port for the valve to close properly. Flipping it can cause the IAC to hang open and results in high idle.

I don't know if that's the case with the Explorer IAC, I've never tried, but I suspect it might.

Guess we will find out soon ;D Thanks Garry
 

904Bronco

Contributor
Bronco Guru
Joined
Sep 28, 2004
Messages
5,758
Loc.
San Martin, CA
Mine ran today... ;D started on the first spin.

I did have to rotate the IAC back to the normal position, then rotate the solenoid body so the connector would clear the oil fill tube. I also had to lower it with Ford's Air bleed spacer.

Now I need to make up a Throttle cable set up... Then road trip!
 

akirshbom

Full Member
Joined
Feb 12, 2006
Messages
240
Great job! Sounds great. EFIGUY does it again!
Do you have a body lift? Was curious about keeping the elbow and intake tube as you have it above the Alt. I don't think it would have cleared my hood without a body lift.
 

904Bronco

Contributor
Bronco Guru
Joined
Sep 28, 2004
Messages
5,758
Loc.
San Martin, CA
Great job! Sounds great. EFIGUY does it again!
Do you have a body lift? Was curious about keeping the elbow and intake tube as you have it above the Alt. I don't think it would have cleared my hood without a body lift.

Yes I have a 1 inch body lift.
Factory hose will not clear... I used it just to get the rig started. I have a 3" AEM aluminum 45* elbow that I am going to squeeze down as it passes over the ALT.
So many final touches to do... Next is a throttle cable.
 

akirshbom

Full Member
Joined
Feb 12, 2006
Messages
240
i used the factory cable, modded factory bracket from the coluumn and the factory bracket at the trans. on my 4r70w swap. Works like a charm. Requires a bit of fab, but overall VERY happy with it.
 

904Bronco

Contributor
Bronco Guru
Joined
Sep 28, 2004
Messages
5,758
Loc.
San Martin, CA
i used the factory cable, modded factory bracket from the coluumn and the factory bracket at the trans. on my 4r70w swap. Works like a charm. Requires a bit of fab, but overall VERY happy with it.

Can you post some pictures?

Fab work does not bother me... Trying to keep things simple and not have parts and pieces from every make and model.
 

akirshbom

Full Member
Joined
Feb 12, 2006
Messages
240
Pics are bit rough and some from underneath, but essentially from the Explorer steering column I removed the bracket that retains the cable and cut off a 90 degree section. That is bolted to firewall. Cut off the Ball from the shift lever and welded that to the EB shift lever. Used existing bracket on transmission to retain the other end of the cable. This uses the explorer cable in tact attached by it's original ball and sockets pieces. One thing I over looked and could easily be corrected is to reverse the shift lever on the Transmission from upward position to 180 degree downward position. Then relocate the cable retaining bracket to accommodate the new orientation routing of the cable.

It's not necessary reorient the trans shift lever, but if you don don't (like in my case) the lowest downward position is now Park, then up one to reverse, up one for Neutral, up one for Drive, up one for 2, up one for 3. I plan to do a custom made indicator bezel with the reverse pattern. It will look stock. Idea is to see who notices.

one last item. Finding where to weld the cable ball piece to the bronco shifter takes a bit of trial and error. We used vice grip to lengthen and shorten the proposed location while shifting the at the column in order to sync up column detents with Transmission detents.

Hope this helps, I think it came out pretty cool.
 

Attachments

  • 20140526_103949.jpg
    20140526_103949.jpg
    116.1 KB · Views: 337
  • 20140526_104006.jpg
    20140526_104006.jpg
    111.7 KB · Views: 315
  • 20140526_104010.jpg
    20140526_104010.jpg
    106.3 KB · Views: 283

904Bronco

Contributor
Bronco Guru
Joined
Sep 28, 2004
Messages
5,758
Loc.
San Martin, CA
Pics are bit rough and some from underneath, but essentially from the Explorer steering column I removed the bracket that retains the cable and cut off a 90 degree section. That is bolted to firewall. Cut off the Ball from the shift lever and welded that to the EB shift lever. Used existing bracket on transmission to retain the other end of the cable. This uses the explorer cable in tact attached by it's original ball and sockets pieces. One thing I over looked and could easily be corrected is to reverse the shift lever on the Transmission from upward position to 180 degree downward position. Then relocate the cable retaining bracket to accommodate the new orientation routing of the cable.

It's not necessary reorient the trans shift lever, but if you don don't (like in my case) the lowest downward position is now Park, then up one to reverse, up one for Neutral, up one for Drive, up one for 2, up one for 3. I plan to do a custom made indicator bezel with the reverse pattern. It will look stock. Idea is to see who notices.

one last item. Finding where to weld the cable ball piece to the bronco shifter takes a bit of trial and error. We used vice grip to lengthen and shorten the proposed location while shifting the at the column in order to sync up column detents with Transmission detents.

Hope this helps, I think it came out pretty cool.

Yes it did... very nice ;D

I guess I misunderstood, I was asking about how you did your Throttle cable, since that is what I am working on next. I used the Lokar kit for my 4R70W trans
 

akirshbom

Full Member
Joined
Feb 12, 2006
Messages
240
No pics of the pedal assembly but I used a simple cable adapter with socket clip was probably from lokar or some other leftover. I used the explorer throttle cable. Made slight mods to the retaining clip to fasten onto the stock bronco pedal bracket on the firewall. One of the easiest parts of the build
 

chuzie

Bronco Guru
Joined
Jul 21, 2006
Messages
2,697
I pulled a harness from a 97 and didn't look yet if the range sensor is 8 or 12 pin. Since I am running 351w and post 97 4R70W (digital) range sensor, I would have no choice but to swap range sensors, right?

Also, since I am going to have to use the cam sensor from a 3.8 T-bird, what computer code do I want to snag?
 
OP
OP
EFI Guy

EFI Guy

Sponsor/Vendor
TheEFIguy@gmail
Joined
Apr 14, 2013
Messages
1,049
Loc.
BFE
I pulled a harness from a 97 and didn't look yet if the range sensor is 8 or 12 pin. Since I am running 351w and post 97 4R70W (digital) range sensor, I would have no choice but to swap range sensors, right?

Also, since I am going to have to use the cam sensor from a 3.8 T-bird, what computer code do I want to snag?


If you are running a 98 or newer trans I'll need to re-pin the solenoid connector on the trans harness, but that's easy enough. You will need to run the 12 pin range sensor and a 3 pin cam sensor.

Your PCM will need to be a 98. Look for either an NRT1 or PCC1 code on the PCM.
 

chuzie

Bronco Guru
Joined
Jul 21, 2006
Messages
2,697
If you are running a 98 or newer trans I'll need to re-pin the solenoid connector on the trans harness, but that's easy enough. You will need to run the 12 pin range sensor and a 3 pin cam sensor.

Your PCM will need to be a 98. Look for either an NRT1 or PCC1 code on the PCM.
I thought the 3.8 cam sensor was 2 pin. I will hit the yard again tomorrow. Just don't want to run around looking for a ghost.

Thx for the quick reply.
 
OP
OP
EFI Guy

EFI Guy

Sponsor/Vendor
TheEFIguy@gmail
Joined
Apr 14, 2013
Messages
1,049
Loc.
BFE
I'm sure there is probably a year split on the 3.8 between 2 pin or 3 pin. I personally have only seen 3 pins, but IIRC Lars used a 2 pin when designing the collar.

Anyway, the 98 PCM will require a 3 pin sensor and your 97 harness is already setup for 3 pin.
 

chuzie

Bronco Guru
Joined
Jul 21, 2006
Messages
2,697
I'm sure there is probably a year split on the 3.8 between 2 pin or 3 pin. I personally have only seen 3 pins, but IIRC Lars used a 2 pin when designing the collar.

Anyway, the 98 PCM will require a 3 pin sensor and your 97 harness is already setup for 3 pin.

Thanks again.

I got fried today. Spent 3.5 hours in a hot Florida junkyard extracting that harness. Here are some suggestions for y'all.

Remove the hood. It gets in the way and is annoying.

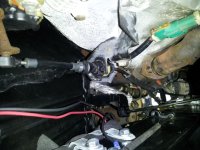
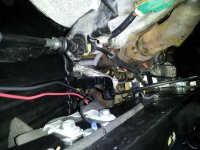
As previously stated, remove the center console to reveal the access port above the transmission.

Remove the fan and the tensioner to get to the crank position sensor easier.

If you don't take a cordless sawzall, make sure you have fuel disconnect tool. Moving some of the fuel lines around will help make extraction easier.

The huge square connector over the transmission is almost impossible to fish up into the engine bay. I ended up removing the passenger wheel well cover. This allowed me to pull the connector over the exhaust pipe and then up to the engine compartment. The heater lines will get in the way so they will need to be cut too.

Use pliers and a flathead to gently separate connectors.

The biggest take away, make your life simple by removing components that are in the way instead of going around them because you don't need them. Save your knuckles and your sanity.

I went with the following tools.

Torx set
Phillips + flathead
hammer
pry bar
cordless sawzall
diagonal cutters
nut driver set
metric sockets (shallow) Deep well would have been nice though
metric wrenches
vice grip pliers
box cutter (carpet)
 
Top