


Community
Message Forum
Photo Gallery
Event Calendar
Book Reviews
Bronco Wallpaper
Bronco FAQ
Link Back to CB!
Photo Gallery
Event Calendar
Book Reviews
Bronco Wallpaper
Bronco FAQ
Link Back to CB!
Buy / Sell


Bronco Tech
3 Arm Wiper Setup
Fix Motor Mount
Roll Cage Braces
Throttle Body 65mm
Wheel Alignment
Heat Riser Replacement
Vent Window Repair
Center Console Mount
Straighten Bumper
Ford 6R80 6 spd
More Tech...
Fix Motor Mount
Roll Cage Braces
Throttle Body 65mm
Wheel Alignment
Heat Riser Replacement
Vent Window Repair
Center Console Mount
Straighten Bumper
Ford 6R80 6 spd
More Tech...

Install the app
-
Welcome to ClassicBroncos! - You are currently viewing the forums as a GUEST. To take advantage of all the site features, please take a moment to register. It's fast, simple and absolutely free. So please join our community today!If you have problems registering or can't log into your account, please contact Admin.
You are using an out of date browser. It may not display this or other websites correctly.
You should upgrade or use an alternative browser.
You should upgrade or use an alternative browser.
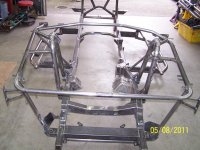
4 link, ORI's, narrowed D60w/only 2.5" lift, 5"+WB stretch, 2" floor lower, P/S....,
- Thread starter nvrstuk
- Start date
OP
OP
- Joined
- Jul 31, 2001
- Messages
- 8,674
Incomplete to do list: ... (I've got a month and I've already revised this 2x since 5am)
MASTER Front end list-- already see this is missing a bunch...
-cut out remaining inner fenders and supports
-trim core support pass side for tire clearance almost to headlight
-build new drag link
-replace 4x4x2 sector shaft with stock sector shaft from '79 F150/Bronco for correct rotation
-strengthen core support now that it’s hacked
-integrate/build new body mounts into core support... somewhere
-move m/c over full width of unit and mount at appr. 3deg to clear ORI
-build new bracket and swing arm for brake pedal assbly
- build short support tube bracing off of frame to ORI’s (needed?)
-install shortened modified JBA shorty headers (just not short enough!)
-build ORI strut mount support crossover tube... over or behind the upper plenum
-relocate wiring that I had to move when inner fenders came off
-relocate radiator over flow
-relocate p/s reservoir
-relocate OBA valving and wiring
-relocate air horn, relay and valve
...winch fuse block and re-wiring
...175amp CB relocation
relocate all other wiring that was on pass fender
-re-plumb all line locks from m/c
- pwr strg pump hyd lines to hydroboost and pump then later to D60 hydraulic ram
-mock up and fit new tranny cooler mounting location
-fill tranny
-adjust tranny range sensor with shifter
-measure for driveshaft length
-pull the D60 out and weld it all up
-weld in the new gusset kit for weak link on this build...the Ford Kingpin knuckle...
-clean inside of D60 housing
-re-route EFI intake tubing...-plan eventually is cold air induction thru the hood
- weld in the cross member stiffener by oil filter and opposite side with D60 removed
-weld in stiffner cap for existing frt crossmember
-route flexible ss brake line and ARB line to diff down the track bar
-route hoses from frame to engine (brakes, fuel lines in one flexible cover wrap for clean look)
-plumb the ram cylinder to the strg box, hydroboost and pump
-install brake caliper and pads find fittings out of calipers
-rebuild/replace all D60 mock up parts-brgs, bushings, kingpin parts, brake brkts, brakes
-pack wheel brgs, install seals, mount hubs
-install new RCV axles
-connect heater core up for late fall SW wheeling
MASTER Rear end list- already know this is missing many build items!
-finish rear upper axle 4 link bracket
-weld on all axle brackets
- cut out rear fender wells
- mock up new ORI mounts (upper and lower)
-modify and clamp in rear wheel housings from Jaromy
-ORI cross brace allowing seat installation (mock up)
-clock rear disc brake bracket to allow clearance for ORI and strut brackets (hopefully bleed screw at top!)
-mock up gas tank- measure and determine whether I should keep this tank or build another
-rear bumper attachment mods for mounting tank- move it back 1”? move it up 1” (remember moved axle back 4”...bumper can move too)
-mock up new rear cross member—can it be against floor with vert bracing from frame rails to prevent twisting? This would allow more tank room? allow 1/4” for housing and gas tank clearance
-mount high pressure fuel filter w/ ice protecting shield for it and wires
-route HP and LP gas lines
-reroute wiring (again!!)
-plumb in new brake line from m/c to rear brake caliper along axle housing (weld on brackets)
-check out possibly order rear disc t-case ebrake assembly from PartsMike or AA, check length mods
-mount air cylinder to operate rear disc ebrake
- mount small slider to join frt radius arm and rear lower 4 link to allow sliding on rocks, etc
-remove rear housing
-prep for POR or clearcoat
-weld in holes in rear floor
-weld spindles to axle tubing
-weld on disc bracket by centering of rotor/caliper when caliper is mounted on rotor and use screwdrivers to jam pads tight in place
-order flex ss brake lines for front & rear housings, down 4 link tube etc
- drill/tap and weld in oil deflector for breather vent
-notch 1/4” diff supports for ARB line clearance at bottom of housing
-weld or braze in lowest NUT for draining diff
-install oil scraper inside diff
-adjust load bolt on TruHi9
-design and weld up ARB line protector rod (protects ARB fitting and hose coming out of diff)
-finish welding all brackets on axle housing
-clean inside of housing again
-install inner 9” rear axle tube seals
-set housing aside .... before installing housing permanently -
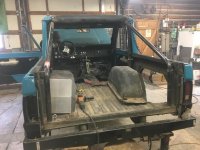
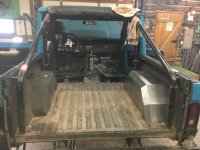
-weld in door post sheet metal
-mount new seat belts (WH?)
-weld in NP205 tranny mount
-install center console – cut bottom off 2” lower, attach angle iron inside to mount seat belt for direct bolt to floor thru console, don’t weld in place till exact height is determined due to seats lowered 2”
-shorten some and lengthen others 8” so Baumann wiring are same length and velcro controller inside console
-seal and prime floor pans
-install brake caliper and pads find fittings out of calipers
-build new gas tank filler neck and mock up/finalize my tail light mods
-pack wheel brgs, install seals, mount hubs
-install new RCV axles and FF hub
- Weld in two 02 bungs in pipe on pass side close to vertical... narrow band up close, wide band farther away. WideBand is “Innovate Bosch”, must be at least double the pipe size (6”) from any bend
Move upper plenum to pass side if needed
Exhaust w/heat shielding from firewall entire length past seats
MASTER Front end list-- already see this is missing a bunch...
-cut out remaining inner fenders and supports
-trim core support pass side for tire clearance almost to headlight
-build new drag link
-replace 4x4x2 sector shaft with stock sector shaft from '79 F150/Bronco for correct rotation
-strengthen core support now that it’s hacked
-integrate/build new body mounts into core support... somewhere
-move m/c over full width of unit and mount at appr. 3deg to clear ORI
-build new bracket and swing arm for brake pedal assbly
- build short support tube bracing off of frame to ORI’s (needed?)
-install shortened modified JBA shorty headers (just not short enough!)
-build ORI strut mount support crossover tube... over or behind the upper plenum
-relocate wiring that I had to move when inner fenders came off
-relocate radiator over flow
-relocate p/s reservoir
-relocate OBA valving and wiring
-relocate air horn, relay and valve
...winch fuse block and re-wiring
...175amp CB relocation
relocate all other wiring that was on pass fender
-re-plumb all line locks from m/c
- pwr strg pump hyd lines to hydroboost and pump then later to D60 hydraulic ram
-mock up and fit new tranny cooler mounting location
-fill tranny
-adjust tranny range sensor with shifter
-measure for driveshaft length
-pull the D60 out and weld it all up
-weld in the new gusset kit for weak link on this build...the Ford Kingpin knuckle...
-clean inside of D60 housing
-re-route EFI intake tubing...-plan eventually is cold air induction thru the hood
- weld in the cross member stiffener by oil filter and opposite side with D60 removed
-weld in stiffner cap for existing frt crossmember
-route flexible ss brake line and ARB line to diff down the track bar
-route hoses from frame to engine (brakes, fuel lines in one flexible cover wrap for clean look)
-plumb the ram cylinder to the strg box, hydroboost and pump
-install brake caliper and pads find fittings out of calipers
-rebuild/replace all D60 mock up parts-brgs, bushings, kingpin parts, brake brkts, brakes
-pack wheel brgs, install seals, mount hubs
-install new RCV axles
-connect heater core up for late fall SW wheeling
MASTER Rear end list- already know this is missing many build items!
-finish rear upper axle 4 link bracket
-weld on all axle brackets
- cut out rear fender wells
- mock up new ORI mounts (upper and lower)
-modify and clamp in rear wheel housings from Jaromy
-ORI cross brace allowing seat installation (mock up)
-clock rear disc brake bracket to allow clearance for ORI and strut brackets (hopefully bleed screw at top!)
-mock up gas tank- measure and determine whether I should keep this tank or build another
-rear bumper attachment mods for mounting tank- move it back 1”? move it up 1” (remember moved axle back 4”...bumper can move too)
-mock up new rear cross member—can it be against floor with vert bracing from frame rails to prevent twisting? This would allow more tank room? allow 1/4” for housing and gas tank clearance
-mount high pressure fuel filter w/ ice protecting shield for it and wires
-route HP and LP gas lines
-reroute wiring (again!!)
-plumb in new brake line from m/c to rear brake caliper along axle housing (weld on brackets)
-check out possibly order rear disc t-case ebrake assembly from PartsMike or AA, check length mods
-mount air cylinder to operate rear disc ebrake
- mount small slider to join frt radius arm and rear lower 4 link to allow sliding on rocks, etc
-remove rear housing
-prep for POR or clearcoat
-weld in holes in rear floor
-weld spindles to axle tubing
-weld on disc bracket by centering of rotor/caliper when caliper is mounted on rotor and use screwdrivers to jam pads tight in place
-order flex ss brake lines for front & rear housings, down 4 link tube etc
- drill/tap and weld in oil deflector for breather vent
-notch 1/4” diff supports for ARB line clearance at bottom of housing
-weld or braze in lowest NUT for draining diff
-install oil scraper inside diff
-adjust load bolt on TruHi9
-design and weld up ARB line protector rod (protects ARB fitting and hose coming out of diff)
-finish welding all brackets on axle housing
-clean inside of housing again
-install inner 9” rear axle tube seals
-set housing aside .... before installing housing permanently -
-weld in door post sheet metal
-mount new seat belts (WH?)
-weld in NP205 tranny mount
-install center console – cut bottom off 2” lower, attach angle iron inside to mount seat belt for direct bolt to floor thru console, don’t weld in place till exact height is determined due to seats lowered 2”
-shorten some and lengthen others 8” so Baumann wiring are same length and velcro controller inside console
-seal and prime floor pans
-install brake caliper and pads find fittings out of calipers
-build new gas tank filler neck and mock up/finalize my tail light mods
-pack wheel brgs, install seals, mount hubs
-install new RCV axles and FF hub
- Weld in two 02 bungs in pipe on pass side close to vertical... narrow band up close, wide band farther away. WideBand is “Innovate Bosch”, must be at least double the pipe size (6”) from any bend
Move upper plenum to pass side if needed
Exhaust w/heat shielding from firewall entire length past seats
Last edited:
JSmall
Bronco Guru
- Joined
- Feb 18, 2004
- Messages
- 3,223
Should have just built this , Brian
Very close to your specs
Is there a thread for this build? Looks killer
Is this it http://classicbroncos.com/forums/showthread.php?t=259113
Is there a thread for this build? Looks killer
That thread is of my personal truck.
I didn't run a build thread of that truck since it was a customers.
OP
OP
- Joined
- Jul 31, 2001
- Messages
- 8,674
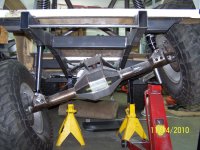
Today I finished my rear upper axle 4 link bracket. It's tack welded on the housing.
I removed the 9" TrueHi9 and the rear housing with all brackets, 14 bolt hubs, no RCV axles and no 3rd member weighs in at 208#. Sorry Paul, I'll get all those weights together soon... : )
I removed the 9" TrueHi9 and the rear housing with all brackets, 14 bolt hubs, no RCV axles and no 3rd member weighs in at 208#. Sorry Paul, I'll get all those weights together soon... : )
OP
OP
- Joined
- Jul 31, 2001
- Messages
- 8,674
Real time!! Did this work today...
Temporary bracket....") CB site issues....wow, 3 pics but only 1 downloaded. Lost some text, won't let me view a pic, ...etc...
CB site issues....wow, 3 pics but only 1 downloaded. Lost some text, won't let me view a pic, ...etc...
I'll try a couple more times...maybe later...
Temporary bracket....
CB site issues....wow, 3 pics but only 1 downloaded. Lost some text, won't let me view a pic, ...etc... I'll try a couple more times...maybe later...
Last edited:
OP
OP
- Joined
- Jul 31, 2001
- Messages
- 8,674
OP
OP
- Joined
- Jul 31, 2001
- Messages
- 8,674
Back to where I was in March!!!
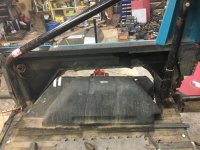
Looks like progress even if it's PVC...
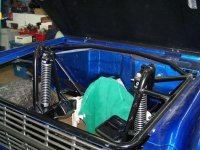
Mounted up another 40 on a beadlock last night so I can do some stuffing and look at potential ORI mount locations and see how far back I want to move everything...need a fuel tank so I can't move it much farther!! Need to work this all around a rear seat...that will impact my goal for getting 100% efficiency out of the ORI. I got that in the front but the rear struts will be leaning .... Gotta do what ya gotta do is what all the ORI techs say...
Looks like progress even if it's PVC...
Mounted up another 40 on a beadlock last night so I can do some stuffing and look at potential ORI mount locations and see how far back I want to move everything...need a fuel tank so I can't move it much farther!! Need to work this all around a rear seat...that will impact my goal for getting 100% efficiency out of the ORI. I got that in the front but the rear struts will be leaning ...
. Gotta do what ya gotta do is what all the ORI techs say...Attachments


I really like the 4 link numbers...my lower links are 5degrees at ride height...
Me too
OP
OP
- Joined
- Jul 31, 2001
- Messages
- 8,674
Looking really good
I think I'm going to move them back from the original front opening location about 4"
OP
OP
- Joined
- Jul 31, 2001
- Messages
- 8,674
{QUOTE= Originally Posted by nvrstuk ]Quote]
I really like the 4 link numbers...my lower links are 5 degrees at ride height...
They'd better be buddy!!. Thanks again...!
I really like the 4 link numbers...my lower links are 5 degrees at ride height...
Me too
They'd better be buddy!!
. Thanks again...!
Last edited:
- Joined
- Mar 8, 2007
- Messages
- 81,747
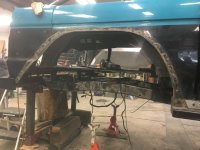
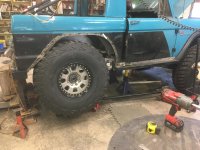
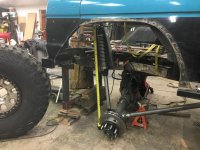
Next step...fitting 40" tires IN the wheel well... 6" up travel on a 2 1/2" susp lift... this means I need bigger holes for the tires to stuff into...
Here we go...
Oh yeah.. make it happen. Should be fun right
OP
OP
- Joined
- Jul 31, 2001
- Messages
- 8,674
Making room!!
They fit in the opening pretty good...
When stuffed I'll have to have the ORI intrude into the floor about 1" and then bracket will intrude appr 2+".
One inch more than I'd hoped for (since I couldn't measure the angle and ORI mount till now)...eliminates my old ugly rear seat but Jaromy found one that should slip in there.
Attachments


OP
OP
- Joined
- Jul 31, 2001
- Messages
- 8,674
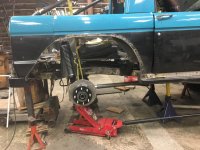
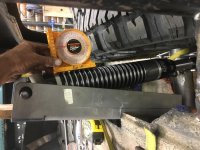
Spent all day moving upper and lower brackets on the axle tube and on the frame to get the desireable combination of 5-7 deg tilt leaning in at the top of the ORI mount, under 10 deg for forward back tilt as I'm at 7 1/2deg, not hitting the tire at full articulation (4 link rears really swing from side to side), and fought this several times also-not hitting the frame with the ORI strut at full droop as the axle swings to the other side...
Tack welded and cut brackets several times even after mock-up!!
Tack welded and cut brackets several times even after mock-up!!
Attachments
Last edited:
Similar threads
- Replies
- 74
- Views
- 16K
- Replies
- 18
- Views
- 434
- Replies
- 31
- Views
- 1K