• Welcome to ClassicBroncos! - You are currently viewing the forums as a GUEST. To take advantage of all the site features, please take a moment to register. It's fast, simple and absolutely free. So please join our community today!
    If you have problems registering or can't log into your account, please contact Admin.

TX SS – 1973 Ford Bronco Build

OP
OP
TX SS

TX SS

Contributor
Sr. Member
Joined
Aug 29, 2013
Messages
753
Loc.
Houston
Thanks Justafordguy, svastano and green61bug.

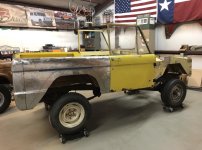
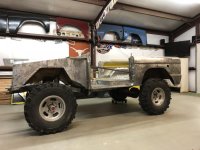
Green61bug, thanks I like the TX truck you’ve been working on and I noticed the brown one you have for sale. I don’t drive my brown one as much as I should but like having it in the garage regardless. Only thing I wish it had is auto transmission, and I have all the parts for the conversion from the yellow truck, but I don’t want to have them both torn down at the same time. So depending on build direction of yellow I’ll put something else in it and convert brown to auto.
 
OP
OP
TX SS

TX SS

Contributor
Sr. Member
Joined
Aug 29, 2013
Messages
753
Loc.
Houston
Bolted up passenger door and set some of the rest of body parts back in place. Having bought this in pieces was curious if anything was majorly out of whack.
 

Attachments

  • 755A89E4-0E87-45B4-9E71-0088EB49B7EB.jpg
    755A89E4-0E87-45B4-9E71-0088EB49B7EB.jpg
    90.4 KB · Views: 104
OP
OP
TX SS

TX SS

Contributor
Sr. Member
Joined
Aug 29, 2013
Messages
753
Loc.
Houston
Finally decided to cut the rear quarters this weekend. In the process was able to trim the rest of the bottom of door posts, inner rockers and some excess around the rear wheel tubs. Still need to decide how high to cut the lower quarter corners, probably level with midsection to start with. Using Wild Horses warflares and will do final quarter panel trim once I can get a bigger tire in place. Next up is bracing body for removal.
 

Attachments

  • CB0FCCBD-6F9B-49A0-8DEC-367782DC38E4.jpg
    CB0FCCBD-6F9B-49A0-8DEC-367782DC38E4.jpg
    95.3 KB · Views: 50
  • 3119E97F-5A58-48EC-AEAE-B7073B35B7B8.jpg
    3119E97F-5A58-48EC-AEAE-B7073B35B7B8.jpg
    105.7 KB · Views: 59
OP
OP
TX SS

TX SS

Contributor
Sr. Member
Joined
Aug 29, 2013
Messages
753
Loc.
Houston
Received Marti report for project 1973 today.
 

Attachments

  • B4C125FA-2C95-4990-9130-8D725B7CC9D9.jpg
    B4C125FA-2C95-4990-9130-8D725B7CC9D9.jpg
    117.9 KB · Views: 42

trailerjack

Contributor
Bronco Guru
Joined
Sep 5, 2013
Messages
1,386
Loc.
Central Texas
Glad to see you are building another one! I still have those dog dish hubcaps you sent to me forever ago if you want them! What did you ever do with your slot wheels on the other Bronco?
 
OP
OP
TX SS

TX SS

Contributor
Sr. Member
Joined
Aug 29, 2013
Messages
753
Loc.
Houston
Thanks, this one is going to be a little different when done. No thanks on caps and the slots were sold to a guy here on the forum from somewhere in West Texas.
 
OP
OP
TX SS

TX SS

Contributor
Sr. Member
Joined
Aug 29, 2013
Messages
753
Loc.
Houston
Updates on the tampico yellow Bronco project back to October 2018. Braced the body through the doors and then built a wood crate around it. Not as sophisticated as some of the other projects here but works for my situation. Before pulling the tub borrowed a set of bigger wheels and tires to see where the fender cut put me.
 

Attachments

  • IMG_1963.jpg
    IMG_1963.jpg
    100.8 KB · Views: 41
  • IMG_1991.jpg
    IMG_1991.jpg
    114.1 KB · Views: 43
  • IMG_1995.jpg
    IMG_1995.jpg
    120.5 KB · Views: 42
  • IMG_2128.jpg
    IMG_2128.jpg
    132.2 KB · Views: 40
  • IMG_1967.jpg
    IMG_1967.jpg
    106.7 KB · Views: 48
  • IMG_1975.jpg
    IMG_1975.jpg
    93.2 KB · Views: 44
  • IMG_1968.jpg
    IMG_1968.jpg
    102.7 KB · Views: 42
OP
OP
TX SS

TX SS

Contributor
Sr. Member
Joined
Aug 29, 2013
Messages
753
Loc.
Houston
Next up was fitting the reproduction bulkhead. Out of the box the spare tire bracket was busted at the spot welds so I just removed it. Had to trim some of the corners to fit as well but overall a decent aftermarket part.
 

Attachments

  • IMG_2161.jpg
    IMG_2161.jpg
    107 KB · Views: 20
  • IMG_2159.jpg
    IMG_2159.jpg
    120.6 KB · Views: 22
OP
OP
TX SS

TX SS

Contributor
Sr. Member
Joined
Aug 29, 2013
Messages
753
Loc.
Houston
Before pulling the tub I noticed my prior repair to the floor between the seat pan and the bed was not strong enough and sagging. So ended up having to cut out part of the first repair and weld in another patch panel. After the bed patch I turned to welding/patching up some of the other small areas throughout the tub. Last work (for now) on inside of tub was painting with Rust Bullet Automotive. Used their metal blast product first and then applied two coats of paint as instructed. Next is seam sealer and then will use dynamat type product inside the cab and raptor liner in the bed.
 

Attachments

  • IMG_1961.jpg
    IMG_1961.jpg
    159.1 KB · Views: 31
  • GONM6616.jpg
    GONM6616.jpg
    136.9 KB · Views: 30
  • IMG_2146.jpg
    IMG_2146.jpg
    139.3 KB · Views: 26
  • IMG_2365.jpg
    IMG_2365.jpg
    110.2 KB · Views: 23
  • IMG_2576.jpg
    IMG_2576.jpg
    127.7 KB · Views: 24
  • IMG_2569.jpg
    IMG_2569.jpg
    107.4 KB · Views: 22
  • IMG_2570.jpg
    IMG_2570.jpg
    100.1 KB · Views: 20
  • IMG_2575.jpg
    IMG_2575.jpg
    122.2 KB · Views: 21
  • IMG_2574.jpg
    IMG_2574.jpg
    117.8 KB · Views: 19
  • IMG_2586.jpg
    IMG_2586.jpg
    113.4 KB · Views: 26
OP
OP
TX SS

TX SS

Contributor
Sr. Member
Joined
Aug 29, 2013
Messages
753
Loc.
Houston
Frame was stripped, cleaned up and then painted with two coats of Rust Bullet Automotive and two coats of Rust Bullet Black Shell. Black Shell turned out more glossy than I like but not going back. Made sure to maintain the two VIN stampings. Also have been painting smaller parts as I have time.
 

Attachments

  • IMG_2356.jpg
    IMG_2356.jpg
    104.7 KB · Views: 28
  • IMG_2358.jpg
    IMG_2358.jpg
    115.7 KB · Views: 26
  • IMG_2378.jpg
    IMG_2378.jpg
    99.2 KB · Views: 25
  • IMG_2516.jpg
    IMG_2516.jpg
    113.1 KB · Views: 27
  • IMG_2530.jpg
    IMG_2530.jpg
    70.5 KB · Views: 27
  • IMG_2400.jpg
    IMG_2400.jpg
    108.1 KB · Views: 24
  • IMG_2399.jpg
    IMG_2399.jpg
    77.1 KB · Views: 29

broncobsession

Bronco Guru
Joined
Aug 12, 2001
Messages
4,049
Looks nice. You can’t possibly live in Houston or that bare metal would be flash rusted to hell ;)

Or you have AC in the shop! :cool:
 
OP
OP
TX SS

TX SS

Contributor
Sr. Member
Joined
Aug 29, 2013
Messages
753
Loc.
Houston
Looks nice. You can’t possibly live in Houston or that bare metal would be flash rusted to hell ;)

Or you have AC in the shop! :cool:

Thanks. I am in Houston, and surprisingly the metal hasn't flash rusted too bad at all. I do have insulation and HVAC in the shop but don't run it except during summer. I know I'm creating some extra work for myself but nothing too bad so far.
 
OP
OP
TX SS

TX SS

Contributor
Sr. Member
Joined
Aug 29, 2013
Messages
753
Loc.
Houston
Last update of some random parts I've acquired for when it is time to go back together. Picked up a set of Recaro bucket seats, which are almost a direct match for the Wildhorses steering wheel that comes in their tilt column kit. 16x8 Wheel Vintiques wheels, Hellwig front and rear sway bars and Dakota Digital gauge cluster.
 

Attachments

  • IMG_2504.jpg
    IMG_2504.jpg
    138.8 KB · Views: 44
  • IMG_2505.jpg
    IMG_2505.jpg
    123.2 KB · Views: 35
  • IMG_2286.jpg
    IMG_2286.jpg
    150.7 KB · Views: 35
  • IMG_2289.jpg
    IMG_2289.jpg
    193.3 KB · Views: 31
  • IMG_2483.jpg
    IMG_2483.jpg
    78 KB · Views: 34

Scoop

Contributor
Have Bronco, Will Travel
Joined
Feb 1, 2006
Messages
10,601
Loc.
Cuchara, CO
Looks good. I like the seats. Are you going with any center caps on the wheels?
 
OP
OP
TX SS

TX SS

Contributor
Sr. Member
Joined
Aug 29, 2013
Messages
753
Loc.
Houston
Looks good. I like the seats. Are you going with any center caps on the wheels?

Thanks. I am not currently planning on running any center caps but will see once it all goes together.
 

bsquared

Contributor
Sr. Member
Joined
Dec 4, 2010
Messages
961
Looking great, Scott! Keep up the work and I need to slide by sometime to check out the progress! Cheers, B2
 
OP
OP
TX SS

TX SS

Contributor
Sr. Member
Joined
Aug 29, 2013
Messages
753
Loc.
Houston
Update time. In process chassis. Using Wild Horses 1.5" coil springs, Bilstein shocks and Wilwood front disc brake kit.
 

Attachments

  • IMG_2555.jpg
    IMG_2555.jpg
    85.5 KB · Views: 33
  • IMG_2554.jpg
    IMG_2554.jpg
    95.9 KB · Views: 31
  • IMG_2690.jpg
    IMG_2690.jpg
    90.3 KB · Views: 27
  • IMG_2832.jpg
    IMG_2832.jpg
    126.4 KB · Views: 27
  • IMG_2935.jpg
    IMG_2935.jpg
    130.4 KB · Views: 27
  • IMG_3002.jpg
    IMG_3002.jpg
    164.5 KB · Views: 24
  • IMG_3005.jpg
    IMG_3005.jpg
    110.2 KB · Views: 26
  • IMG_3125.jpg
    IMG_3125.jpg
    113.3 KB · Views: 27
  • IMG_3123.jpg
    IMG_3123.jpg
    98.7 KB · Views: 22
  • IMG_3120.jpg
    IMG_3120.jpg
    98.6 KB · Views: 22
  • IMG_3119.jpg
    IMG_3119.jpg
    95.8 KB · Views: 27
  • NSBT1067.jpg
    NSBT1067.jpg
    105.7 KB · Views: 30
Last edited:
OP
OP
TX SS

TX SS

Contributor
Sr. Member
Joined
Aug 29, 2013
Messages
753
Loc.
Houston
More chassis. Wild Horses 10 pack stock height leaf springs, Wild Horses extreme duty u bolt kit, Hellwig front and rear sway bars, stock power steering.
 

Attachments

  • IMG_3095.jpg
    IMG_3095.jpg
    124 KB · Views: 30
  • IMG_3096.jpg
    IMG_3096.jpg
    106.1 KB · Views: 31
  • IMG_3098.jpg
    IMG_3098.jpg
    127.6 KB · Views: 30
  • IMG_3131.jpg
    IMG_3131.jpg
    120.2 KB · Views: 28
  • IMG_3132.jpg
    IMG_3132.jpg
    97.7 KB · Views: 31
  • IMG_3127.jpg
    IMG_3127.jpg
    133.8 KB · Views: 29
  • IMG_3102.jpg
    IMG_3102.jpg
    117 KB · Views: 27
  • IMG_3100.jpg
    IMG_3100.jpg
    132.6 KB · Views: 29
  • IMG_3249.jpg
    IMG_3249.jpg
    92.9 KB · Views: 25
  • IMG_3251.jpg
    IMG_3251.jpg
    111 KB · Views: 26
  • IMG_3253.jpg
    IMG_3253.jpg
    117.9 KB · Views: 25
  • IMG_3258.jpg
    IMG_3258.jpg
    139.8 KB · Views: 31
Top