


Community
Message Forum
Photo Gallery
Event Calendar
Book Reviews
Bronco Wallpaper
Bronco FAQ
Link Back to CB!
Photo Gallery
Event Calendar
Book Reviews
Bronco Wallpaper
Bronco FAQ
Link Back to CB!
Buy / Sell


Bronco Tech
3 Arm Wiper Setup
Fix Motor Mount
Roll Cage Braces
Throttle Body 65mm
Wheel Alignment
Heat Riser Replacement
Vent Window Repair
Center Console Mount
Straighten Bumper
Ford 6R80 6 spd
More Tech...
Fix Motor Mount
Roll Cage Braces
Throttle Body 65mm
Wheel Alignment
Heat Riser Replacement
Vent Window Repair
Center Console Mount
Straighten Bumper
Ford 6R80 6 spd
More Tech...

Install the app
-
Welcome to ClassicBroncos! - You are currently viewing the forums as a GUEST. To take advantage of all the site features, please take a moment to register. It's fast, simple and absolutely free. So please join our community today!If you have problems registering or can't log into your account, please contact Admin.
You are using an out of date browser. It may not display this or other websites correctly.
You should upgrade or use an alternative browser.
You should upgrade or use an alternative browser.
73 Explorer Rebuild: year 8/9/10/11
- Thread starter 73azbronco
- Start date
OP
OP
- Joined
- Nov 11, 2007
- Messages
- 7,805
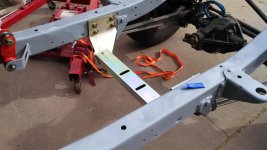
Thanks to StnePny I have the two fuel one brake line brackets on the way so the frame can go together, hopefully this week.
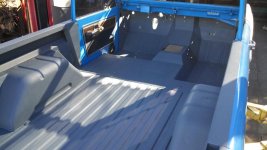
Picture of freshly Linexed interior, completed by our friends at Driven Auto.
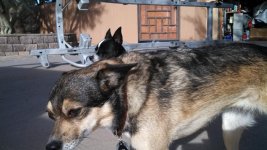
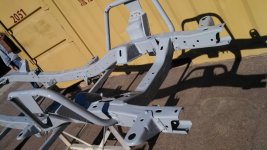
Picture of frame before trip to painter after last 60 grit sanding, and gratuitous shot of guard dogs prowling their front yard.
Picture of freshly Linexed interior, completed by our friends at Driven Auto.
Picture of frame before trip to painter after last 60 grit sanding, and gratuitous shot of guard dogs prowling their front yard.
Attachments
OP
OP
- Joined
- Nov 11, 2007
- Messages
- 7,805
Glad to see you are back at the build. how did you get the inside of the rails prepped for the Eastwood treatment?
Well, it was pretty clean, except around engine bay. I stopped off at self clean auto wash and used two cans of oven cleaner, inside and outside of frame. I let it sit for ten minutes, then pressure washed it out then took it to sand blaster dude.
Spray cans of frame paint came with two foot hose and special 360 degree nozzle which coated everything very well.
OP
OP
- Joined
- Nov 11, 2007
- Messages
- 7,805
That air conditioner will look good in mine if your not going to use it when your done!!;D
engine
What was the reasoning behind going 347 from 351 this time.Pros/cons.What does sandblasting a frame in your area cost?Just trying to budget a future build.The picture showing the green paint is inside the frame, it's done! It is even still a little wet. The spray can came with a two foot hose with a four holed nozzle which evenly sprayed everything inside.
I would be afraid to try the por on a rope/swab through the frame, that stuff sets up pretty fast (where I am) and all the mess from the frame holes to boot. That and I have frame strengtheners/spacers at points the steering box connects to the frame so its pretty blocked off. The Eastwood stuff worked great.
The changes are really the result of waiting so long to start. I had the luxury of not needing this as a driver. If I would have kept going 7 years ago, I would have only done the valve cover leak and driven it as is waiting for the chance to pull everything off. But as the house needed my Bronco cash, time slipped, kids went to college and finally graduated, it morphed into this version.
As time kept moving, so did the idea of what I wanted, I started pulling more and more off the truck. Pretty soon, I rebuilt the engine (302), then another (351) then finally went all in with a custom 347, rebuilt the D20, a C4 which is gone to another member, and picked up an NV4500. I like rebuilding motors so it's more hobby than anything, and I came out even because I did most of the work myself.
I had no real intention of off-roading it, but then I bought a new jeep and found out it was pretty capable, I figured to do the same to this to have two trucks on the trail as back-up for each other, so no more resto, and off I went into full trail rig. Even with that idea came changes as time passed: paint, interior, tires, etc.
So I would not be afraid of what I did, I would be sure to have an idea of what you want, and as long as you stick to the plan it all works out, even if the plan changes five times.
OP
OP
- Joined
- Nov 11, 2007
- Messages
- 7,805
The original one? Sure, but It has not run in 8 years, but did blow cold air when it did. To busy to get into that right now but ill PM you when I can get the parts together. You need A/C in PA? I', actually thinking NOT putting a kit into mine, seeing as I don't run it during the "sunny season".That air conditioner will look good in mine if your not going to use it when your done!!;D
OP
OP
- Joined
- Nov 11, 2007
- Messages
- 7,805
What was the reasoning behind going 347 from 351 this time.Pros/cons.What does sandblasting a frame in your area cost?Just trying to budget a future build.
Sandblast $250, folks doing it are very trusted in the refinish business.
Boy,.... 347 or 351 is a thread on it's own, biggest reason, because I could, second, weight, third because I wanted too. And I build motors as a hobby so there you go. A 347 is NOT cheap, nor for the faint of heart.
If all you want is a simple motor to get best bang for buck, go 351, BUT, it's not as plug play as folks tout, I had a 351. You need to consider it will probably need a body lift, or body massage by valve covers to clear, you will need a real good cooling system (same for 347), it may not fit under the hood unless you use the right intake, carb and air cleaner. Other odds and ends with front dress depending on what you have up front.
347 is a 302 and drops right into place. For a price.
The original one? Sure, but It has not run in 8 years, but did blow cold air when it did. To busy to get into that right now but ill PM you when I can get the parts together. You need A/C in PA? I', actually thinking NOT putting a kit into mine, seeing as I don't run it during the "sunny season".
Sounds good, let me know. Yes it does get a bit hot here in the summer.
OP
OP
- Joined
- Nov 11, 2007
- Messages
- 7,805
OP
OP
- Joined
- Nov 11, 2007
- Messages
- 7,805
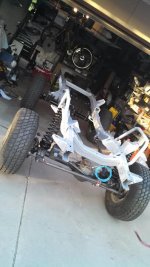
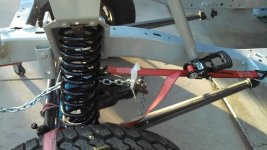
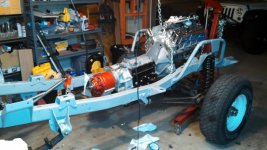
Today, installed anti axle wrap device, and reset springs because I had to pull springs out using a strap and then drop frame enough to allow radius arm bushings to fit into frame mount properly. I thought they would slide in, but with 3.5 inch lift with zero frame weight, they are too flexed.
Installed Front track bar, torqued all nuts to spec for last time.
Next up, transfer/NV4500.
Motor.
Brake/Fuel lines.
Body install for last time.
Installed Front track bar, torqued all nuts to spec for last time.
Next up, transfer/NV4500.
Motor.
Brake/Fuel lines.
Body install for last time.
Attachments
OP
OP
- Joined
- Nov 11, 2007
- Messages
- 7,805
Parts start to go on... Wifey rejoices at 10 more sq/ft in house/garage
Today was up and down, realized brake flare tool was crap, tried to find a descent one, had to order an SK set from amazon overnight. 4hrs wasted.
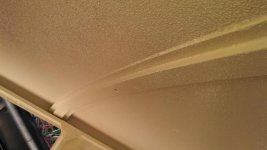
While out, stopped by paint shop and previewed top, here is picture of inside after repair (holes from roof rack and dents. They linexed the top using Wimbledon white color. Final body color will be Grabber Blue.
Moved to option two, installed NV4500 and D20 using advance adapters kit.
Sneak peek of 347 ci stroker.
Waiting to find right clutch cover bolts. Also, had wrong flywheel bolts, bought flexplate ones instead of flywheel. Found right ones, just need to get right flexplat bolts to mount motor.
Today was up and down, realized brake flare tool was crap, tried to find a descent one, had to order an SK set from amazon overnight. 4hrs wasted.
While out, stopped by paint shop and previewed top, here is picture of inside after repair (holes from roof rack and dents. They linexed the top using Wimbledon white color. Final body color will be Grabber Blue.
Moved to option two, installed NV4500 and D20 using advance adapters kit.
Sneak peek of 347 ci stroker.
Waiting to find right clutch cover bolts. Also, had wrong flywheel bolts, bought flexplate ones instead of flywheel. Found right ones, just need to get right flexplat bolts to mount motor.
Attachments


OP
OP
- Joined
- Nov 11, 2007
- Messages
- 7,805
Today was slow, rained again all night.
Found rest of bolts to mate drivetrain, flare tool arrived to late for brake/fuel lines.
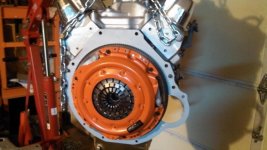
Performed bellhousing runout check, well within spec at about 0.0001
Installed Ford motorsport M6375-K302 flywheel balanced for 28oz with 164 teeth. Motor is balanced at 28oz. This is not standard for a 302/5.0 folks.
Installed centerforce diaphragm clutch, very nice looking piece if I say so myself.
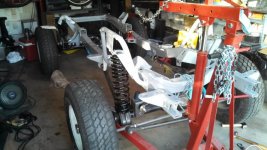
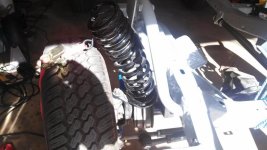
Installed motor onto tranny and mounted into frame. As noted by others, I am more than glad I had body off and hoist with adjustable motor plate. This just did not want to got the last 1/4 inch with the NV4500 into the bearing, then walla, it fit. What helped was wife pushing the hoist for and aft while I gently rotated crank with tranny in 1st gear. That is in no way an innuendo...
On every build I keep one or two pieces untouched in honor of the original, other than cleaning off the grease, on this one it was the clutch fork, as new condition, not bad for years of use.
Bluish ting is flash, frame is light grey. Oh, yes, and that's the wife's jeep in the background, yes, her jeep...
Back to real world and work for a few days.
Next up, torq the motor down, install starter, headers, clutch bar and bracket. Test fit Explorer serp dress for clearance (no, that's one thing I forgot to do before paint).
When done, frame back to Randy at Driven to install body and rollcage.
Edit: added pic of explorer pulley common interference issue, not here though, I have over an inch of clearance using extreme motor mounts. Did have an issue of engine leaning on mounts, had to use some pulley straps to align it back to levelish.
Found rest of bolts to mate drivetrain, flare tool arrived to late for brake/fuel lines.
Performed bellhousing runout check, well within spec at about 0.0001
Installed Ford motorsport M6375-K302 flywheel balanced for 28oz with 164 teeth. Motor is balanced at 28oz. This is not standard for a 302/5.0 folks.
Installed centerforce diaphragm clutch, very nice looking piece if I say so myself.
Installed motor onto tranny and mounted into frame. As noted by others, I am more than glad I had body off and hoist with adjustable motor plate. This just did not want to got the last 1/4 inch with the NV4500 into the bearing, then walla, it fit. What helped was wife pushing the hoist for and aft while I gently rotated crank with tranny in 1st gear. That is in no way an innuendo...
On every build I keep one or two pieces untouched in honor of the original, other than cleaning off the grease, on this one it was the clutch fork, as new condition, not bad for years of use.
Bluish ting is flash, frame is light grey. Oh, yes, and that's the wife's jeep in the background, yes, her jeep...
Back to real world and work for a few days.
Next up, torq the motor down, install starter, headers, clutch bar and bracket. Test fit Explorer serp dress for clearance (no, that's one thing I forgot to do before paint).
When done, frame back to Randy at Driven to install body and rollcage.
Edit: added pic of explorer pulley common interference issue, not here though, I have over an inch of clearance using extreme motor mounts. Did have an issue of engine leaning on mounts, had to use some pulley straps to align it back to levelish.
Attachments


Last edited:
OP
OP
- Joined
- Nov 11, 2007
- Messages
- 7,805
Slow month, bad WX kept me away, and bolt nighmare raises it's ugly head.
Just finished front serp install, water pump, 3G Alt, uprated PS pump install, Denso AC comp in Monday. Or however long it takes them to get one, another semi nightmare.
Brake lines, fuel line and fuel pump in then back to get body.
Bolt nightmare: ARP DOES NOT, repeat DOES NOT make a one size fits all engine accessory front dress/water pump bolt kit. I bought three kits, and none of them worked. I needed to buy another ten packages of bolts to get the front end to work right. ARP even admits when they package their Ford products, they are throwing a dart at a dart board.
Picture of Ford Explorer driver side serpentine bracket cutout for Duraspark dizzy/vacuum bracket. No interference allowing full rotation of dizzy, but I wish I thought about vacuum line, now I need to make a 120 degree section to prevent the line from rubbing the idler pulley.
Attachments
OP
OP
- Joined
- Nov 11, 2007
- Messages
- 7,805

OP
OP
- Joined
- Nov 11, 2007
- Messages
- 7,805
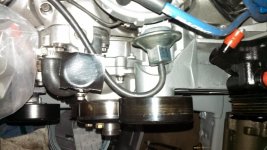
AC compressor heat shield. I saw this at the junkyard on a stock explorer and thought it a great idea, it's a simple multi layer heat shield behind the compressor to keep the header heat off the compressor. I'm glad I got it as the header is only 1/2 inch away from heat shield.
Picture taken from behind driver side motor looking forward to back side of AC Comp. BCB headers.
Picture taken from behind driver side motor looking forward to back side of AC Comp. BCB headers.
Attachments

OP
OP
- Joined
- Nov 11, 2007
- Messages
- 7,805
Slower than slow month, flu, on my back for three weeks, waiting for last of brake parts. Hopefully I can brake it and get to Driven Fri for body install.
I'm hating my work schedule lately, when I go to work, I go for three to four days on the road. When I get home I'm dead for a day or two, and then can only get about 4-6hrs after the honey do's before I have to go back to work again. I sort of envy folks who can come home after a 9-5 job and put in a few hrs everyday, with more on the weekends. Makes it easier to plan parts. Right now when I realize I need a widget, it takes me out of the loop for 1 week waiting for parts.
I'm hating my work schedule lately, when I go to work, I go for three to four days on the road. When I get home I'm dead for a day or two, and then can only get about 4-6hrs after the honey do's before I have to go back to work again. I sort of envy folks who can come home after a 9-5 job and put in a few hrs everyday, with more on the weekends. Makes it easier to plan parts. Right now when I realize I need a widget, it takes me out of the loop for 1 week waiting for parts.
Rox Crusher
Bronco Guru
- Joined
- Dec 13, 2008
- Messages
- 2,772
That is really turning out nice
Keep up the great work down the backstretch
Keep up the great work down the backstretch
Similar threads
- Replies
- 2
- Views
- 521
- Replies
- 7
- Views
- 2K
- Replies
- 7
- Views
- 2K