• Welcome to ClassicBroncos! - You are currently viewing the forums as a GUEST. To take advantage of all the site features, please take a moment to register. It's fast, simple and absolutely free. So please join our community today!
    If you have problems registering or can't log into your account, please contact Admin.

Vintage Air in 351W

PGreenlawMD

Jr. Member
Joined
Mar 16, 2014
Messages
114
Loc.
New Bern
I have taken the plunge to AC for the 67 bronco. As I get older and fatter I guess I am less tolerant of the North Carolina coastal heat and humidity. My wife assures me my days of driving topless no longer impresses the babes and my bald head gets sun burned!!!

A few questions, observations, etc

1. 351 Windsor and was sold the “modified” hose kit which truly means find/buy a beadlock crimper, agonize over cutting and crimping the hoses to the proper length and hope fo the best! Is there that much difference between the standard kit with hoses already crimped and measured?? I would gladly pay for the standard hose kit at this point if it can fit the 351W setup.

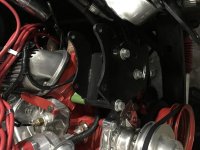
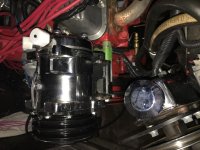
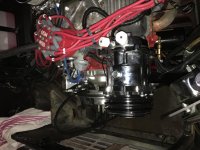
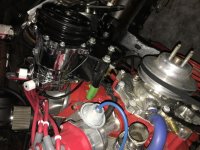
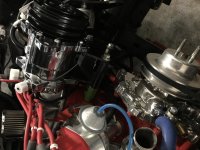
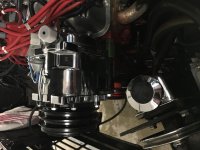
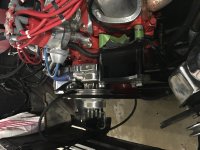
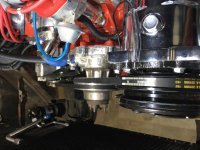
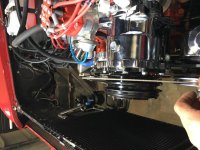
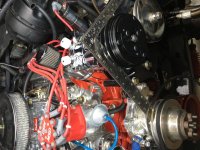
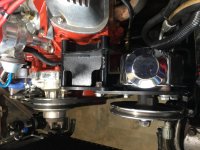
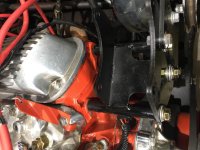
2. The compressor and power steering bracket. Surely with the popularity of the early bronco, the brains and engineering/manufacturing of the commercial enterprises that comprise the early bronco SOMEONE MUST BE ABLE TO COME UP WITH A BRACKET!!!! Why the heck can’t someone build a bracket that actually fits a Sanden compressor and lines the pulleys up for all three without having to remanufacture every companies brackets. I have seen the video by TBP and Phil does a great job of explaining how madifications can be made. My question is why is there not a bracket set up for this out of the box, knowing some minor shimming and adjusting with some washers or spacers may be needed for some unusual applications.

All in all installation is progressing along with a few hours of work after work each day.
 

bronconut73

Bronco Guru
Joined
Aug 7, 2012
Messages
9,916
BC has a bracket in their kit for the compressor and power steering pump (Thompson or Saginaw).

I have ran it for over a decade.
 
OP
OP
P

PGreenlawMD

Jr. Member
Joined
Mar 16, 2014
Messages
114
Loc.
New Bern
I have a bracket that looks virtually identical based on BC website pictures. Cannot tell exactly. It pushes my compressor well forward of the other pulleys. I will look at it again. Thanks for the response!
 
OP
OP
P

PGreenlawMD

Jr. Member
Joined
Mar 16, 2014
Messages
114
Loc.
New Bern
Might not be the same. It pushes the compressor a good 5/8” forward for the rear groove of the compressor to match the rear groove of the water pump and crankshaft pulley. Concerned I will be hitting fan/ shroud with compressor.

I will buy the BC brackets and see if they work. Wish me luck.
 
OP
OP
P

PGreenlawMD

Jr. Member
Joined
Mar 16, 2014
Messages
114
Loc.
New Bern
Some pics to help illustrate difficulty. Power steering bracket off but the bracket combo lines up PS pulley perfect with no shims/washer adjustments
 

Attachments

  • BD43ABBB-9803-428D-9E25-8E98DDF424FA.jpg
    BD43ABBB-9803-428D-9E25-8E98DDF424FA.jpg
    90.8 KB · Views: 113
  • 3C5B2B4F-C341-405C-ADDF-CF4AD08F5640.jpg
    3C5B2B4F-C341-405C-ADDF-CF4AD08F5640.jpg
    107.1 KB · Views: 72
  • 9FF2C7D3-F1C2-4C06-849B-1BC3C9455906.jpg
    9FF2C7D3-F1C2-4C06-849B-1BC3C9455906.jpg
    110.7 KB · Views: 78
  • 5BD6B867-7CA5-4954-82CF-05C450BCBD63.jpg
    5BD6B867-7CA5-4954-82CF-05C450BCBD63.jpg
    122.8 KB · Views: 81
  • C1DBF04D-0BB1-4314-A2C1-72C956B5D07B.jpg
    C1DBF04D-0BB1-4314-A2C1-72C956B5D07B.jpg
    105.9 KB · Views: 85
  • 9F7BB079-8302-4F65-80B8-4EB171F512CF.jpg
    9F7BB079-8302-4F65-80B8-4EB171F512CF.jpg
    88.9 KB · Views: 84
  • ECDB8EDA-8F3D-4F8C-9C09-6DA57506ADC0.jpg
    ECDB8EDA-8F3D-4F8C-9C09-6DA57506ADC0.jpg
    106.3 KB · Views: 94
  • DFCDFFBF-6376-432B-9961-8177A1C3D3EC.jpg
    DFCDFFBF-6376-432B-9961-8177A1C3D3EC.jpg
    98.5 KB · Views: 106

bronconut73

Bronco Guru
Joined
Aug 7, 2012
Messages
9,916
Mine was hitting the fan shroud with the BC bracket. I have a JBG fiberglass shroud so it was easy to modify to make room for the compressor snout.

If the clutch didn't come with a dual groove pulley it would help a little with shroud and fan clearance,
 
OP
OP
P

PGreenlawMD

Jr. Member
Joined
Mar 16, 2014
Messages
114
Loc.
New Bern
Great progress with vintage air. Condenser install completed and quick check shows 3 core aluminum radiator from TBP fits fine with clearance for all hard lines. Fan and shroud fit fine but will not reinstall until after compressor bracket issue is resolved. Ordered new VA brackets and BC bronco brackets. Time will tell how much work it will be to make something work. Will finish interior work this weekend including new defrost ducts, wiring, and rough fit hoses but cannot fine tune until compressor placement determined.

Any tips for putting in new defrost ducts.p? Is it possible to do without freeing up dash?
 

bronconut73

Bronco Guru
Joined
Aug 7, 2012
Messages
9,916
I did not need to replace the factory defrost ducts. But I was able to put the VA/BC hoses onto my stock defrost ducts without removing the dash.
 
OP
OP
P

PGreenlawMD

Jr. Member
Joined
Mar 16, 2014
Messages
114
Loc.
New Bern
Vintage Air bracket arrived from summit racing. No bueno. Have done all the things Phil fromTBP explained on the install video except for grinding down valve cover. But nervous on that one but will bite the bullet tomorrow. Waiting for BC brackets. I can get the rear pulley of the AC compressor pretty well lined up with the water pump and crankshaft rear pulley. That leaves alternator to the front pulley for water and crank. Even then the back flange of the compressor is only a couple of mm from the valve cover/ engine and no room to adjust the compressor position for pulley tension.

I cut one of the spacer rods almost an inch to see what it would take to get front pulley of compressor to line up with rear pulley on water/crank and then back flange of compressor hard against valve cover and has to fully rotate so no connection to rotational slot for tension adjustment.

Could possibly get rear pulley on compressor to front water/ crank pulley but would then have to adjust alternator set up with new brackets. Also clearance from fan would be about 2mm which is worrisome.

I will add pics tomm for anyone’s review and help. Will take original bracket and get friend to cut with band saw see if I can get it to fit better. At least that bracket system adjust tension through PS so if compressor can fit in any position that clears and a pulley lines up I can adjust tension with PS bracket.
 

bronconut73

Bronco Guru
Joined
Aug 7, 2012
Messages
9,916
I am not able to use my outer pulley.
I have to use my inner pulley or like you my compressor would hit the valve cover.

My fan was miserably close to my compressor too so I ground the fan down in that area. Not a good solution.

Blu here on CB had his bracket modified to push the compressor further away from the fan. That worked great for him.

I will be going to the Explorer Serp Swap soon. It creates a ton of room.
 
OP
OP
P

PGreenlawMD

Jr. Member
Joined
Mar 16, 2014
Messages
114
Loc.
New Bern
Further progress. Abandoned vintage air brackets for installation. Did some trimming and grinding of my existing bracket setup which is going to work. Everything lining up nicely now. Got to get a 54” belt. Fan clears nicely and hopefully shroud will need minimal if any trim since it is stainless.

Hoses crimped really easily with mastertool bead lock crimper $150 from Amazon. 4 other antique cars all of which but one need AC installed so I figure I will get my use out of it in the future

Took off dash to replace defrost ducts. Only problem is vintage air connectors don’t fit the heavier thicker plastic vents of the defrost ducts. Now getting more defrost duct hose with clamps.

Slow process. Trying to be patient waiting for parts I realize I need as the process moves along
 

Attachments

  • C4F31945-5B66-4EA3-8B0E-9DBF253C92A6.jpg
    C4F31945-5B66-4EA3-8B0E-9DBF253C92A6.jpg
    107.6 KB · Views: 13
  • 7D77EB0B-77BC-4886-994C-4292AD8E9CB7.jpg
    7D77EB0B-77BC-4886-994C-4292AD8E9CB7.jpg
    111.2 KB · Views: 13
  • 25B03539-E637-43EB-800E-0530B1DC370C.jpg
    25B03539-E637-43EB-800E-0530B1DC370C.jpg
    122 KB · Views: 14
  • AC2D33A8-0FB4-42CC-AFA0-D1E846EB5834.jpg
    AC2D33A8-0FB4-42CC-AFA0-D1E846EB5834.jpg
    146 KB · Views: 15
  • BF588325-05DC-4A5E-B173-3DD7AF21A344.jpg
    BF588325-05DC-4A5E-B173-3DD7AF21A344.jpg
    104.7 KB · Views: 18
  • CF5BAB5A-6067-4E18-AD50-4EB71BDB0982.jpg
    CF5BAB5A-6067-4E18-AD50-4EB71BDB0982.jpg
    118.9 KB · Views: 17
  • A9F1C1C2-A0C7-4F36-817F-3DBC6769F36C.jpg
    A9F1C1C2-A0C7-4F36-817F-3DBC6769F36C.jpg
    115 KB · Views: 17
Top