• Welcome to ClassicBroncos! - You are currently viewing the forums as a GUEST. To take advantage of all the site features, please take a moment to register. It's fast, simple and absolutely free. So please join our community today!
    If you have problems registering or can't log into your account, please contact Admin.

289 bell housing crack - repair or replace

Redbark

Full Member
Joined
Sep 5, 2016
Messages
177
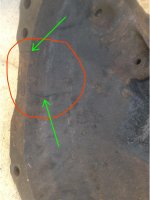
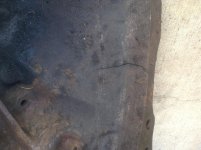
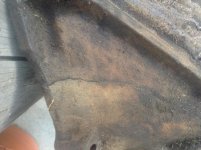
I'm in the early stages of a frame off on my 68 289 Bronco. I've discovered a 3" crack in the bell housing. I'm a newby MIG welder and I'd like some advice on repairing the crack. Is welding recommeded? I understand the importance of making sure it's super clean. I'll have to grind out the crack to clean metal as its fully impregnated with grease, grit and oil.

If replacement is advised, are all the early V8 bell housings the same or do I need a specific one for this truck?
 

Broncobowsher

Total hack
Joined
Jun 4, 2002
Messages
34,884
Replacment is advised. You will want a truck bellhousing. The car bellhousing is too small for the bigger truck clutch.

Are you planning on any transmission swaps? I ask because you may not even need that bellhousing. A ZF or Mazda 5-speed has a built in bellhousing so your old one isn't needed.

New at wleding? Go ahead and use it for pratice material. Give you something to play with. Thick metal can be interesting to weld. getting good penatration and not just putting stuff on the surface. Warpage and damaging machined surfaces are big challenges. Thus I wouldn't recomend trying to repair it to use. But try to repair it to see what happens. The bellhousing is a precision machined part even if it doesn't look like it. It locates the transmission perfectly in line with the crankshaft of the engine.

All this is assuming it really is a crack. It could just be a casting flash. And a cracked bellhousing generally goes toward an edge, which is a machined surface.

Thinking of it, post some pictures of said crack. But I really doubt it is fixable.
 
OP
OP
R

Redbark

Full Member
Joined
Sep 5, 2016
Messages
177
It's definitely cracked. There are two cracks actually. I'll look for a replacement. Thanks.
 

Attachments

  • IMG_0688.jpg
    IMG_0688.jpg
    76.4 KB · Views: 59
  • IMG_0689.jpg
    IMG_0689.jpg
    100.3 KB · Views: 53
  • IMG_0690.jpg
    IMG_0690.jpg
    111.1 KB · Views: 45

Broncobowsher

Total hack
Joined
Jun 4, 2002
Messages
34,884
After seeing pictures, I stand by what I said. Get another one.

But no reason not to play with what you have. try different things with the welder. That is how you get better. You are going to be throwing it out anyway. Good to practice with. It's not like you are going to be able to screw it up. Weld it, check with a straight edge and see how much it warps. Gives you an idea of how things warp while welding. Grind it a little and try welding it. Keep cranking up the heat and see how it changes. Grind the next crack a lot deeper and go at it again. This is the time to learn. On something you can't screw up. Worst time to learn is on something expensive. Having an idea of what you are doing on scrap will put you ahead for later.
 

ntsqd

heratic car camper
Joined
Jan 30, 2005
Messages
3,239
Loc.
Upper SoKA
Looks ferrous (as opposed to aluminum), always thot those were cast iron and not cast steel?
 

Broncobowsher

Total hack
Joined
Jun 4, 2002
Messages
34,884
Cast iron, just like the block, heads, crank and most everything else. Actual alloy varies. You can still practice MIG welding on it. Not correct, not going to fix it right, but still practice.
 

blubuckaroo

Grease Monkey
Joined
Jun 11, 2007
Messages
11,795
Loc.
Ridgefield WA
You all are assuming the bell housing is aligned to the pilot bearing. With a Small Block Ford that isn't always true. Always measure!
It usually shows up with a worn tranny input bearing or tube, but it can also break the bell housing and/or flywheel.
 

ntsqd

heratic car camper
Joined
Jan 30, 2005
Messages
3,239
Loc.
Upper SoKA
The way to fix such a crack for real is to figure out where the end of the crack is, then drill a small hole all of the way thru just a tiny bit beyond the end. At both ends if it happens to be that sort of crack. Then 'V' it out. With big castings you want it to be at least all warm if not almost too hot to touch.
[The exception to this is if you're using Rockmount Jupiter rod on cast iron, then the welding process is totally different. Since that rod is horribly expensive I doubt many will have access to any of it.]
I would back-stitch it rather than seam weld it, regardless of weld process used. For cast iron the filler rod needs to be nickel based, and it needs to be peened frequently as it cools. I propose that a small needle scaler is perfect for the peeening process.

The real question is did it crack because of external or internal forces? A mag base and a dial indicator stuck on the flywheel and set to measure the b/h's pilot bore for concentricity will answer that question. If the bore is concentric to the crank then it cracked from mishandling or internal forces (casting stress).
 

Boss Hugg

Contributor
Bronco Guru
Joined
Jun 8, 2010
Messages
2,142
I'd suggest using that bell on a np435/planetary doubler/t case combo behind a 460CI Windsor. ;D
 
Top