


Community
Message Forum
Photo Gallery
Event Calendar
Book Reviews
Bronco Wallpaper
Bronco FAQ
Link Back to CB!
Photo Gallery
Event Calendar
Book Reviews
Bronco Wallpaper
Bronco FAQ
Link Back to CB!
Buy / Sell


Bronco Tech
3 Arm Wiper Setup
Fix Motor Mount
Roll Cage Braces
Throttle Body 65mm
Wheel Alignment
Heat Riser Replacement
Vent Window Repair
Center Console Mount
Straighten Bumper
Ford 6R80 6 spd
More Tech...
Fix Motor Mount
Roll Cage Braces
Throttle Body 65mm
Wheel Alignment
Heat Riser Replacement
Vent Window Repair
Center Console Mount
Straighten Bumper
Ford 6R80 6 spd
More Tech...

Install the app
-
Welcome to ClassicBroncos! - You are currently viewing the forums as a GUEST. To take advantage of all the site features, please take a moment to register. It's fast, simple and absolutely free. So please join our community today!If you have problems registering or can't log into your account, please contact Admin.
You are using an out of date browser. It may not display this or other websites correctly.
You should upgrade or use an alternative browser.
You should upgrade or use an alternative browser.
1977 SC Bronco Build
- Thread starter Crawdad
- Start date

gambling209
Full Member
- Joined
- Apr 20, 2010
- Messages
- 198
I would think the only thing that matters, is the tag states it is a 3:50 open. if it were track lok it would have an L between the 3&5.
OP
OP
Crawdad
Bronco Guru
- Joined
- Feb 16, 2011
- Messages
- 3,635
I would think the only thing that matters, is the tag states it is a 3:50 open. if it were track lok it would have an L between the 3&5.
That's what I was wanting to know. I appreciate the info.

OP
OP
Crawdad
Bronco Guru
- Joined
- Feb 16, 2011
- Messages
- 3,635
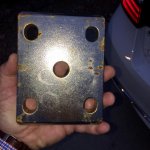
I've had these WH Extreme Duty u-bolt plates for about a year now. I placed them outside with my rear leaf springs about two months ago and this is how they look. The zinc coating was thought to be a great coating. I will be re-coating these plates once I'm done machining them.
Attachments
OP
OP
Crawdad
Bronco Guru
- Joined
- Feb 16, 2011
- Messages
- 3,635
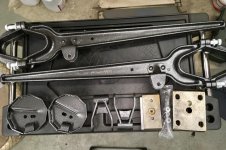
Got these back a few weeks ago. Finally pulled them out of the box. Did them in silver vein to kinda break up all the semi black underneath. I hope Migs like the color choice of his coil cups and first generation shackles. Will be getting the DIY4X Easy-Inch blocks and WH Extreme Spring plates done real soon in semi gloss blk to match most everything else underneath.
Attachments
Mill KNOB
Bronco Guru
Looks great! Like the look.
BluebroncoNC
Bronco Guru
You need to hurry if it is going to ready for SC... ")
That powder coating looks great! Can't wait to see it on.
That powder coating looks great! Can't wait to see it on.
OP
OP
Crawdad
Bronco Guru
- Joined
- Feb 16, 2011
- Messages
- 3,635
You need to hurry if it is going to ready for SC...
That powder coating looks great! Can't wait to see it on.
Ha! As much as I would like to be at SC with my build it definitely won't be this year or the next. I have a whole bunch of pretty parts, but that's all it is right now. I hope in the next few weeks I can start installing some of these parts but Turkey Season starts next Monday, just bought a pond boat for me and my dad, I'm finishing up a disc harrow planter thingy for my dad, AND I'm a Tee Ball Coach again this spring. I love my bronco parts, but I love making memories with my family too! I promise I'll start glueing some of these parts together soon!
Attachments


Aw Matt, you making a bunch of progress!!! Looking good!!!;D;D;D
OP
OP
Crawdad
Bronco Guru
- Joined
- Feb 16, 2011
- Messages
- 3,635
Aw Matt, you making a bunch of progress!!! Looking good!!!;D;D;D
Thx Ben! It's taken 3 1/2 years and 91 posts to get the first thing put back on. It's a marathon, not a race!
OP
OP
Crawdad
Bronco Guru
- Joined
- Feb 16, 2011
- Messages
- 3,635
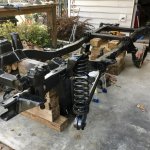
Made some progress today and yesterday. I have strep throat says the doc so he wants me home. I'm not going to argue with a smart man. He wants me to stay inside and rest. My idea of rest is outside in the garage doing something. My air compressor pressure switch went out so I fixed that, pretty straight forward fix. Got around to throwing more parts on my bronco. Got the radius arms on and the power steering box on. Spent the rest of the afternoon on installing the EZ Inch blocks to the rear leaf springs. I spent a week looking for my shackle bushing and I finally found them.
Attachments
OP
OP
Crawdad
Bronco Guru
- Joined
- Feb 16, 2011
- Messages
- 3,635

OP
OP
Crawdad
Bronco Guru
- Joined
- Feb 16, 2011
- Messages
- 3,635
Mill KNOB
Bronco Guru
Good Job! Coming together nicely.
OP
OP
Crawdad
Bronco Guru
- Joined
- Feb 16, 2011
- Messages
- 3,635
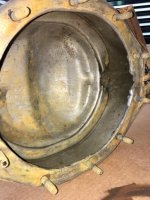
Rear axle rebuild
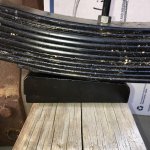
Took my rear axle housing to the galvanizer guy last week. When I bought the axle it looked really good from the inside but once I opened it runny rust colored water mixed oil came puking out. I cleaned it out as best as I could but the tubes had rust caked all inside making it hard to clean out. My contact at the galvanizer said he could give it an acid bath and "pickle" it for a day. I picked it up this past Friday and he said to wash it really good with mild soap. He said dry it quick as surface will kick in very quickly. Well he was right, surface rust is getting worse each day but the inside was coated with some gear oil. I was told to not worry about the surface rust on the inside once I rebuild the axle. Once I get some miles on the bronco it was advised to me to change the axles gear oil to remove junk including rust colored gear oil. Seems like a good rule of thumb to follow. I'm. It too concerned with the surface rust on the outside as I will have it sandblasted and either have it powdercoated or me painting it.
I will start a thread on rebuilding my 77 rear axle. It will be picture heavy and I'll have lots of questions to ask the gurus.
Attachments

OP
OP
Crawdad
Bronco Guru
- Joined
- Feb 16, 2011
- Messages
- 3,635
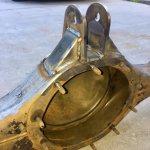
Anti Wrap brackets welded on
Now that I have rear axle cleaned up I can start integrating my version of WH's Wrap Trap. I don't plan to have a 400 HP motor in this bronco but if I do I want to be ready. I'm not a huge fan of HP but I do love some torque. I asked Our local fab guy, Migs, to cut me up two brackets that would sit on top of the axle housing. I had to buy the rod end first before I started welding any parts. BroncosbyBart suggested I add some bracing to distribute the footprint so spent some time making those to fit the small curvature of the axle. Once all the pieces were together I started tacking away. Once I felt good about looks I started to weld with my PowCon. I'm not the greatest of welder (11 years welding for AF) but I feel the penetration is good and some grinding of booger welds will be minimal. A 30-40 yr old welder can be set in its ways as me so I have to deal with its ups and downs. Check this off the list of things to do.
Now that I have rear axle cleaned up I can start integrating my version of WH's Wrap Trap. I don't plan to have a 400 HP motor in this bronco but if I do I want to be ready. I'm not a huge fan of HP but I do love some torque. I asked Our local fab guy, Migs, to cut me up two brackets that would sit on top of the axle housing. I had to buy the rod end first before I started welding any parts. BroncosbyBart suggested I add some bracing to distribute the footprint so spent some time making those to fit the small curvature of the axle. Once all the pieces were together I started tacking away. Once I felt good about looks I started to weld with my PowCon. I'm not the greatest of welder (11 years welding for AF) but I feel the penetration is good and some grinding of booger welds will be minimal. A 30-40 yr old welder can be set in its ways as me so I have to deal with its ups and downs. Check this off the list of things to do.
Attachments
Similar threads
- Replies
- 22
- Views
- 2K
- Replies
- 12
- Views
- 2K
City: Houston
Price: $79K
- Replies
- 0
- Views
- 145