So. I've told a few people I'd post a build thread here, and I've been slacking. However, today is Jan 1, 2019...so I'm starting this now with the idea that one year from today I'm driving the Bronco again on a regular basis! (Haha...fail!) We'll see if I can pull it off...I have three other vehicle 'projects', so I'm trying hard to not get distracted! I've been working on this for a while, so first I'll try to catch you up. I always love reading other's build threads, so this is my attempt at contributing something back...
The back story:
My involvement in Bronco's goes back quite a few years. I picked up my first one when I was 14, hit college around the time the internet became more mainstream...and the EBML was the place to be. Someone got Durabak on their hootus, and squirrel squeezin's were everywhere. I feel like I have a bunch of Bronco brothers (and sisters!) around the country, most of whom I've never met. I used to be pretty active in various forums, but these days not quite so much...though I've always been lurking...and planning.
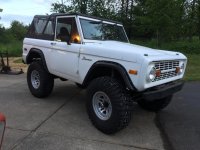
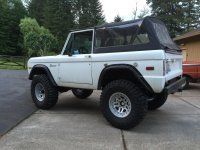
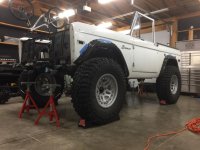
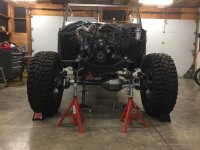
The '74 I'm working on now has been with me since 1996 or so, and was my daily driver after a frame off resto (well, a college kid level frame off!). Over the years I changed a lot of things - the first two pics attached are what I started with right before I gutted it. Good from far, but it was a ~20+ year old resto, there was rust leaking from the seams...and I had big dreams. I've been collecting parts and planning what I was wanted to build for years...finally just did a giant cannon ball into the deep end!
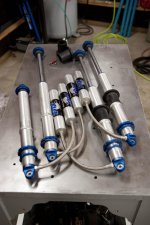
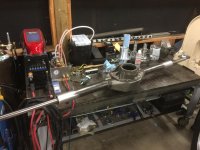
The third pic is the only other one I'll attach for now. I've had a set of 14" Fox 2.0 coilovers since...uhh...2004. I was an engineer for Fox in the powersports group from ~2000-2004, and bought these with my employee discount just before I left. They've been on the shelf, patiently waiting. Not my wisest investment considering how long I held onto them, but who knew it'd be 14 years before I finally designed a suspension around them?!?
Where am I going:
I'm not sure I'm really doing anything that hasn't been done before, but here's the plan:
-1974 Bronco
-331 SEFI Engine, R-block based (purchased from BMC69 here, and installed in ~2006...SEFI conversion at the same time)
-363 EFI Engine, FMS Boss block (changed direction in 2022 - 331 went into different project)
-700R4 Transmission (installed in ~2009)
-4R70W Transmission (changed direction in 2022)
-Atlas 3.8 (Installed in ~2002, then a new one in 2009)
- 37" Cooper SST Pro's on Hutchinson beadlocks (37's in ~2016, Hutchinsons in 2014)
-14" Fox 2.0 coilovers
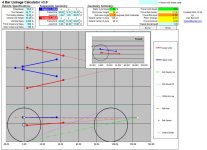
-3 Link Front
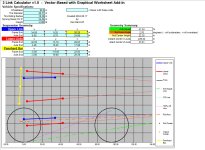
-4 Link Rear
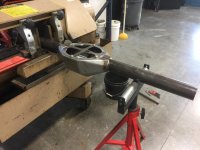
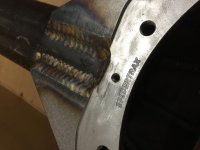
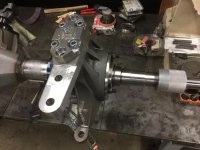
-Custom 609's front and rear, Spidertrax housings, Solid Industries D60 wheel end components
-35 spline axles, ARB's at both ends
-Wheel based extended 3" up front, 2" in the rear
- Viewfinder windshield frame (bought in 2016)
-The rest...TBD! I'll likely update this as things take shape...
I'll be the first to say I'm not a particularly hardcore off-road guy. At least not today. The title of this build thread is a bit tongue-in-cheek. It is definitely NOT cheaper than therapy, but like many of you, spending time in the shop is the best therapy I can get. I'm building this because it's something I've always wanted to do, and I love it. Everything is a compromise in vehicle design, and that's even more true in the off road world. I'm trying to build a jack of all trades sort of Bronco - I put a bunch of street miles on this truck when it is drive-able, and that won't change...but it also needs to be capable. I want to be able to drive it down to Moab, wheel with nvrstuk (can I come along Brian?!), and drive it home. We'll see if I succeed...
(Lastly...I am not great at taking photos while I'm working, and lost a bunch I had of previous work. I also don't work fast. Have patience ;D)
The back story:
My involvement in Bronco's goes back quite a few years. I picked up my first one when I was 14, hit college around the time the internet became more mainstream...and the EBML was the place to be. Someone got Durabak on their hootus, and squirrel squeezin's were everywhere. I feel like I have a bunch of Bronco brothers (and sisters!) around the country, most of whom I've never met. I used to be pretty active in various forums, but these days not quite so much...though I've always been lurking...and planning.
The '74 I'm working on now has been with me since 1996 or so, and was my daily driver after a frame off resto (well, a college kid level frame off!). Over the years I changed a lot of things - the first two pics attached are what I started with right before I gutted it. Good from far, but it was a ~20+ year old resto, there was rust leaking from the seams...and I had big dreams. I've been collecting parts and planning what I was wanted to build for years...finally just did a giant cannon ball into the deep end!
The third pic is the only other one I'll attach for now. I've had a set of 14" Fox 2.0 coilovers since...uhh...2004. I was an engineer for Fox in the powersports group from ~2000-2004, and bought these with my employee discount just before I left. They've been on the shelf, patiently waiting. Not my wisest investment considering how long I held onto them, but who knew it'd be 14 years before I finally designed a suspension around them?!?
Where am I going:
I'm not sure I'm really doing anything that hasn't been done before, but here's the plan:
-1974 Bronco
-363 EFI Engine, FMS Boss block (changed direction in 2022 - 331 went into different project)
-4R70W Transmission (changed direction in 2022)
-Atlas 3.8 (Installed in ~2002, then a new one in 2009)
- 37" Cooper SST Pro's on Hutchinson beadlocks (37's in ~2016, Hutchinsons in 2014)
-14" Fox 2.0 coilovers
-3 Link Front
-4 Link Rear
-Custom 609's front and rear, Spidertrax housings, Solid Industries D60 wheel end components
-35 spline axles, ARB's at both ends
-Wheel based extended 3" up front, 2" in the rear
- Viewfinder windshield frame (bought in 2016)
-The rest...TBD! I'll likely update this as things take shape...
I'll be the first to say I'm not a particularly hardcore off-road guy. At least not today. The title of this build thread is a bit tongue-in-cheek. It is definitely NOT cheaper than therapy, but like many of you, spending time in the shop is the best therapy I can get. I'm building this because it's something I've always wanted to do, and I love it. Everything is a compromise in vehicle design, and that's even more true in the off road world. I'm trying to build a jack of all trades sort of Bronco - I put a bunch of street miles on this truck when it is drive-able, and that won't change...but it also needs to be capable. I want to be able to drive it down to Moab, wheel with nvrstuk (can I come along Brian?!), and drive it home. We'll see if I succeed...
(Lastly...I am not great at taking photos while I'm working, and lost a bunch I had of previous work. I also don't work fast. Have patience ;D)
Attachments
Last edited:


 . Those are my dream axles. Impressive build