• Welcome to ClassicBroncos! - You are currently viewing the forums as a GUEST. To take advantage of all the site features, please take a moment to register. It's fast, simple and absolutely free. So please join our community today!
    If you have problems registering or can't log into your account, please contact Admin.

Knifty 2 Build Thread

OP
OP
Mar1ne

Mar1ne

Full Member
Joined
Mar 25, 2016
Messages
158
Loc.
Sierra Foothills, CA
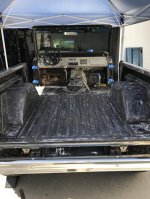
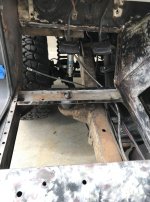
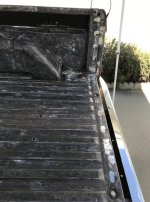
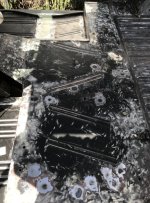
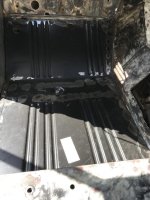
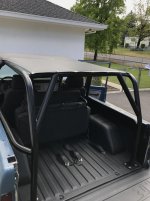
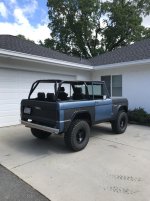
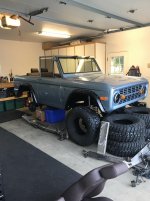
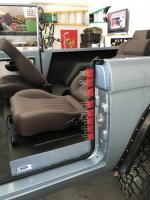
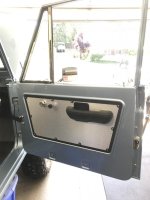
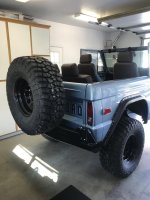
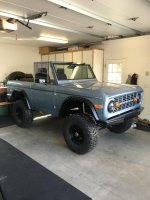
Another 4 hours or so today with the wire wheel with just a little clean up left. I took an hour at the end of the day to remove the passenger rear panel. I'll patch the seat brace and por15 the crossmember and put the new panel in tomorrow.
 

Attachments

  • Screen Shot 2019-04-26 at 5.03.50 PM.jpg
    Screen Shot 2019-04-26 at 5.03.50 PM.jpg
    119.8 KB · Views: 71
  • Screen Shot 2019-04-26 at 5.03.24 PM.jpg
    Screen Shot 2019-04-26 at 5.03.24 PM.jpg
    132.7 KB · Views: 79
OP
OP
Mar1ne

Mar1ne

Full Member
Joined
Mar 25, 2016
Messages
158
Loc.
Sierra Foothills, CA
Should have the driver's floor in later today. I have the 1 piece from TBP and will trim the overlapping edges down to appear more stock. As long as it will work I plan on keeping the water catch at the top. It will be a pain to remove those spot welds with the dash in. I started welding in all the extra holes throughout the floor and bed rails too. Ordered a new tailgate yesterday.

I'm also waiting on my 3rd Champion radiator. They have a lifetime warranty when ordered through Ledfoot Racing, but it costs $60 each time. The first and second leaked in the same general area about 12 months in. I will be opting out of aluminum for the new build.
 

Attachments

  • Screen Shot 2019-04-28 at 6.16.27 AM.jpg
    Screen Shot 2019-04-28 at 6.16.27 AM.jpg
    137.6 KB · Views: 48
  • Screen Shot 2019-05-01 at 6.43.30 AM.jpg
    Screen Shot 2019-05-01 at 6.43.30 AM.jpg
    124.6 KB · Views: 45
OP
OP
Mar1ne

Mar1ne

Full Member
Joined
Mar 25, 2016
Messages
158
Loc.
Sierra Foothills, CA
Floor panels all in and done. The panel fit really well and went in with no issues. I still need to put the e-brake support bracket in.

I'm going to take a dremel with a cutoff disc and remove some old seam sealer tomorrow. I'll tape and seam seal after a good rub down with acetone.
 

Attachments

  • Screen Shot 2019-05-01 at 4.32.33 PM.jpg
    Screen Shot 2019-05-01 at 4.32.33 PM.jpg
    105.4 KB · Views: 54
  • Screen Shot 2019-05-01 at 4.32.25 PM.jpg
    Screen Shot 2019-05-01 at 4.32.25 PM.jpg
    153.5 KB · Views: 55
  • Screen Shot 2019-05-01 at 4.32.16 PM.jpg
    Screen Shot 2019-05-01 at 4.32.16 PM.jpg
    98.5 KB · Views: 54
OP
OP
Mar1ne

Mar1ne

Full Member
Joined
Mar 25, 2016
Messages
158
Loc.
Sierra Foothills, CA
Taped, UPOL #8, Raptor.

Overall a fun process. I cleaned up the bottom plates and engraved their position in them for whenever the cage comes out. I spent some time cleaning up and painting all the little stuff that came out (pedals, brackets, e-brake, etc). Stripped the cage and painted it today, no pics. I'll get some Friday when I get it back in. New radiator from Champion came in as well. Picked up a new tailgate from WH and painted it flat black as it was raw steel. Stripped and painted all the hardware off the old tailgate.
 

Attachments

  • Screen Shot 2019-05-08 at 4.44.21 PM.jpg
    Screen Shot 2019-05-08 at 4.44.21 PM.jpg
    92.5 KB · Views: 103
  • Screen Shot 2019-05-08 at 4.44.31 PM.jpg
    Screen Shot 2019-05-08 at 4.44.31 PM.jpg
    87.2 KB · Views: 92
  • Screen Shot 2019-05-08 at 4.44.41 PM.jpg
    Screen Shot 2019-05-08 at 4.44.41 PM.jpg
    118.4 KB · Views: 110
  • Screen Shot 2019-05-08 at 4.44.11 PM.jpg
    Screen Shot 2019-05-08 at 4.44.11 PM.jpg
    88.7 KB · Views: 112
OP
OP
Mar1ne

Mar1ne

Full Member
Joined
Mar 25, 2016
Messages
158
Loc.
Sierra Foothills, CA
Nutserts in for the center console. I was going to do reinforced nutserts for the seats as some bolts are in factory locations and others are drilled holes, but it wouldn't be safe. I like being able to strip the furniture quickly to hose it out better. Pedals etc painted and back in. I painted the cage and bottom plates.

I had read somewhere recently that a cure for door seals was to cut the inner flap that the retainers go through off and adhere them to the rocker with either a bonding agent or the pins. I made 1" incisions in the bottom and pushed the retainers through in the correct locations to go through the rockers. I think using a product would allow a cleaner appearance as the strip is indented from the pins in spots, but it doesn't bother me. The doors close much easier and are no longer bulging out in the rear corners.
 

Attachments

  • Screen Shot 2019-05-13 at 8.08.45 AM.jpg
    Screen Shot 2019-05-13 at 8.08.45 AM.jpg
    63 KB · Views: 97
  • Screen Shot 2019-05-13 at 8.08.53 AM.jpg
    Screen Shot 2019-05-13 at 8.08.53 AM.jpg
    129.1 KB · Views: 94
  • Screen Shot 2019-05-13 at 8.04.41 AM.jpg
    Screen Shot 2019-05-13 at 8.04.41 AM.jpg
    116.1 KB · Views: 81
  • Screen Shot 2019-05-09 at 3.53.16 PM.jpg
    Screen Shot 2019-05-09 at 3.53.16 PM.jpg
    180.7 KB · Views: 79
  • Screen Shot 2019-05-09 at 3.52.42 PM.jpg
    Screen Shot 2019-05-09 at 3.52.42 PM.jpg
    162.8 KB · Views: 84

sprdv1

Contributor
REBEL
Joined
Mar 8, 2007
Messages
81,747
Making great progress.. "semper fi"

air force here, desert storm.
 

stout22

Contributor
Bronco Guru
Joined
Dec 13, 2006
Messages
2,701
Loc.
Athens, AL
I ended up cutting a slice out of the bottom of my door seals. They close better but still harder that I would like.
 
OP
OP
Mar1ne

Mar1ne

Full Member
Joined
Mar 25, 2016
Messages
158
Loc.
Sierra Foothills, CA
I have gone as far as I will with the '66. It's now for sale.

The '74 will be ready by the end of the week. The color is Windveil Blue. I have started organizing the small parts (brackets, door interior, etc...) and will see if I can get them cleaned up on my own.
 

Attachments

  • Screen Shot 2019-05-15 at 7.42.01 AM.jpg
    Screen Shot 2019-05-15 at 7.42.01 AM.jpg
    94 KB · Views: 91
  • Screen Shot 2019-05-20 at 11.27.11 AM.jpg
    Screen Shot 2019-05-20 at 11.27.11 AM.jpg
    107 KB · Views: 87
  • Screen Shot 2019-05-20 at 11.26.51 AM.jpg
    Screen Shot 2019-05-20 at 11.26.51 AM.jpg
    114.9 KB · Views: 84
  • Screen Shot 2019-05-20 at 11.26.46 AM.jpg
    Screen Shot 2019-05-20 at 11.26.46 AM.jpg
    92.7 KB · Views: 100
OP
OP
Mar1ne

Mar1ne

Full Member
Joined
Mar 25, 2016
Messages
158
Loc.
Sierra Foothills, CA
The '66 sold a few weeks ago. Sad to see it go, but it went to a great home.

Picked up the '74 from the painter a few weeks ago and made a big order from Toms. Drove 7 hours up to Medford and got half the needed stuff, the other half I need to order from WH and pick up next week. Waiting on backordered wheels, powder coat for bumpers and small parts on Monday. I dropped off the '96 explorer engine for rebuild a few weeks ago, should be done soon. I stripped the wiring harnesses and have my name on the list with EFI Guy.
 

Attachments

  • Screen Shot 2019-07-05 at 6.15.30 AM.jpg
    Screen Shot 2019-07-05 at 6.15.30 AM.jpg
    100.1 KB · Views: 110
OP
OP
Mar1ne

Mar1ne

Full Member
Joined
Mar 25, 2016
Messages
158
Loc.
Sierra Foothills, CA
Bumpers test fit and then to powder coating, back yesterday.
33x12.50 15's on pro comp steel wheels.
Gentex mirror mounted/ wired in.
James Duff door panels.
TBP seats in dark brown.

Waiting on engine, send harness to EFI Guy, Centech harness backordered, build fuel/ main brake line, pedal assemblies, order cage, driveshafts. Lots of little stuff to do in there as well, but those are the main concerns now.
 

Attachments

  • Screen Shot 2019-07-25 at 6.10.33 AM.jpg
    Screen Shot 2019-07-25 at 6.10.33 AM.jpg
    100.2 KB · Views: 103
  • Screen Shot 2019-07-25 at 6.14.48 AM.jpg
    Screen Shot 2019-07-25 at 6.14.48 AM.jpg
    73.2 KB · Views: 89
  • Screen Shot 2019-07-25 at 6.20.16 AM.jpg
    Screen Shot 2019-07-25 at 6.20.16 AM.jpg
    74.5 KB · Views: 90
  • Screen Shot 2019-07-25 at 6.10.51 AM.jpg
    Screen Shot 2019-07-25 at 6.10.51 AM.jpg
    86.8 KB · Views: 101
  • Screen Shot 2019-07-25 at 6.10.39 AM.jpg
    Screen Shot 2019-07-25 at 6.10.39 AM.jpg
    95.3 KB · Views: 97
  • Screen Shot 2019-07-25 at 6.10.59 AM.jpg
    Screen Shot 2019-07-25 at 6.10.59 AM.jpg
    89.1 KB · Views: 107

sprdv1

Contributor
REBEL
Joined
Mar 8, 2007
Messages
81,747
Looking real good....

Bumpers test fit and then to powder coating, back yesterday.
33x12.50 15's on pro comp steel wheels.
Gentex mirror mounted/ wired in.
James Duff door panels.
TBP seats in dark brown.

Waiting on engine, send harness to EFI Guy, Centech harness backordered, build fuel/ main brake line, pedal assemblies, order cage, driveshafts. Lots of little stuff to do in there as well, but those are the main concerns now.
 
OP
OP
Mar1ne

Mar1ne

Full Member
Joined
Mar 25, 2016
Messages
158
Loc.
Sierra Foothills, CA
Thanks guys. Hopefully the stance will remain the same level front to rear with the addition of the cage, engine/ transmission, and spring settling.

I got the ax15/ twin stick/ B&M shifter and D20 setup for the eventual install. Tapped and plugged the weep hole with a 3/8 24 set screw.

I'm hoping I can run a single din with flip up screen that has apple carplay. Does anyone have one that doesn't interfere with the heater controls while they are in? This looks like it will cut it close.
 

Attachments

  • Screen Shot 2019-07-29 at 7.55.21 AM.jpg
    Screen Shot 2019-07-29 at 7.55.21 AM.jpg
    130.1 KB · Views: 55
  • Screen Shot 2019-07-29 at 7.59.44 AM.jpg
    Screen Shot 2019-07-29 at 7.59.44 AM.jpg
    72.5 KB · Views: 56
  • Screen Shot 2019-07-29 at 7.59.48 AM.jpg
    Screen Shot 2019-07-29 at 7.59.48 AM.jpg
    67.7 KB · Views: 54
Top