• Welcome to ClassicBroncos! - You are currently viewing the forums as a GUEST. To take advantage of all the site features, please take a moment to register. It's fast, simple and absolutely free. So please join our community today!
    If you have problems registering or can't log into your account, please contact Admin.

Rebuild: Bronco the Debilitated

OP
OP
T

tirewater

Contributor
Sr. Member
Joined
Jan 28, 2011
Messages
1,040
Loc.
San Francisco Bay Area
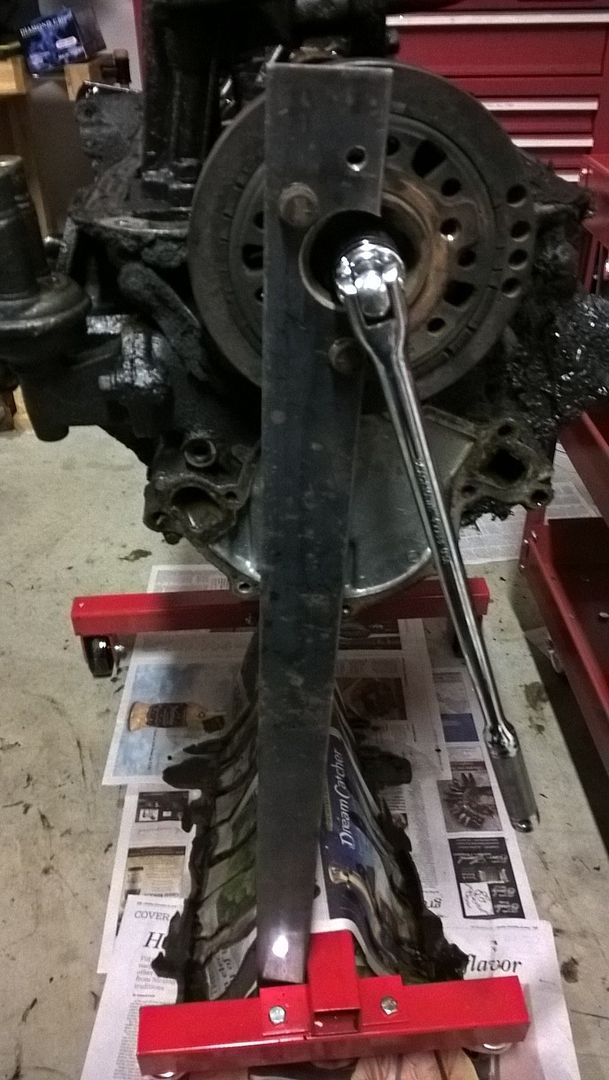
Repurposed a tool I made to remove the crankshaft pulley on my land cruiser. Flat stock from Home Depot & some holes.

WP_20160105_22_45_50_Pro_zps4rglttix.jpg


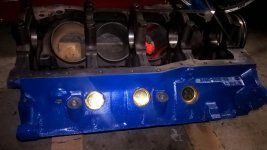
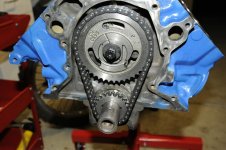
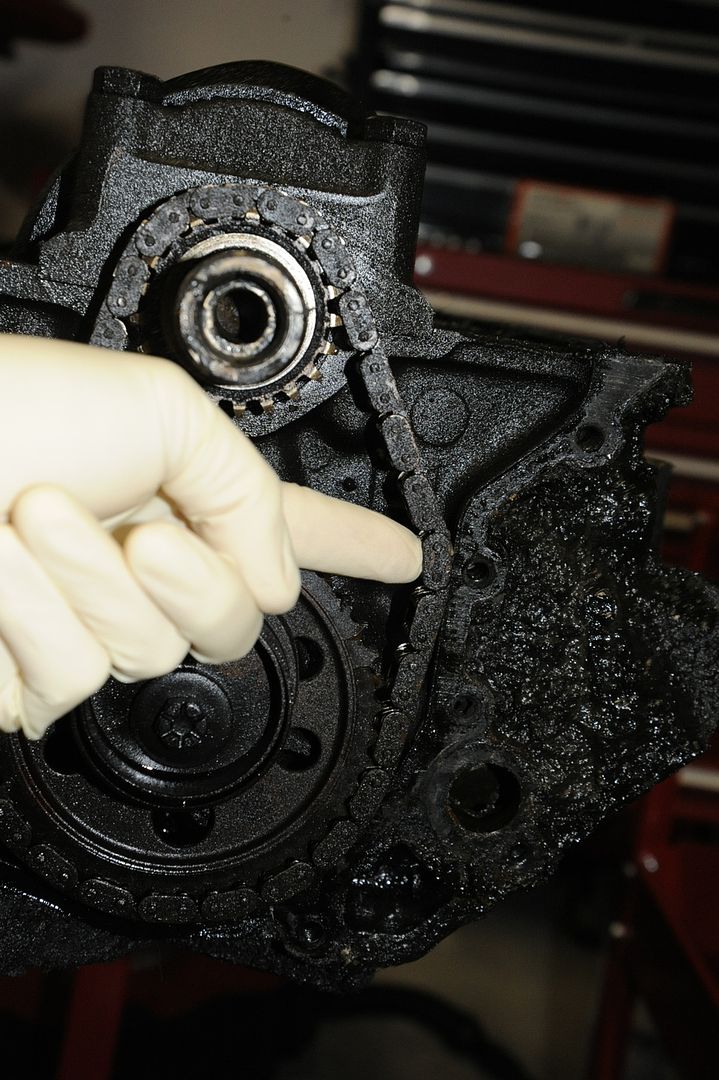
Nylon timing gear is worn to the aluminum. I'll take some closeups later.

_DSC4715_zpsuivadhym.jpg


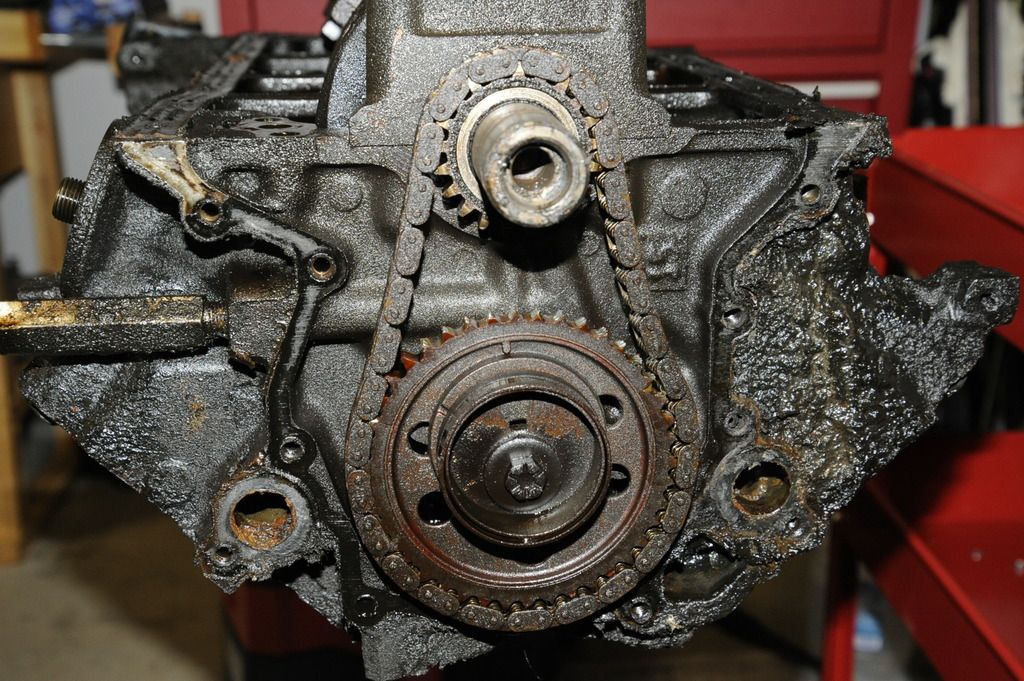
Also, very slack chain.

_DSC4718_zpsfaokkbse.jpg


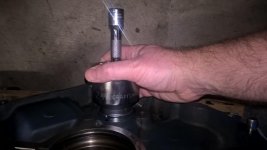
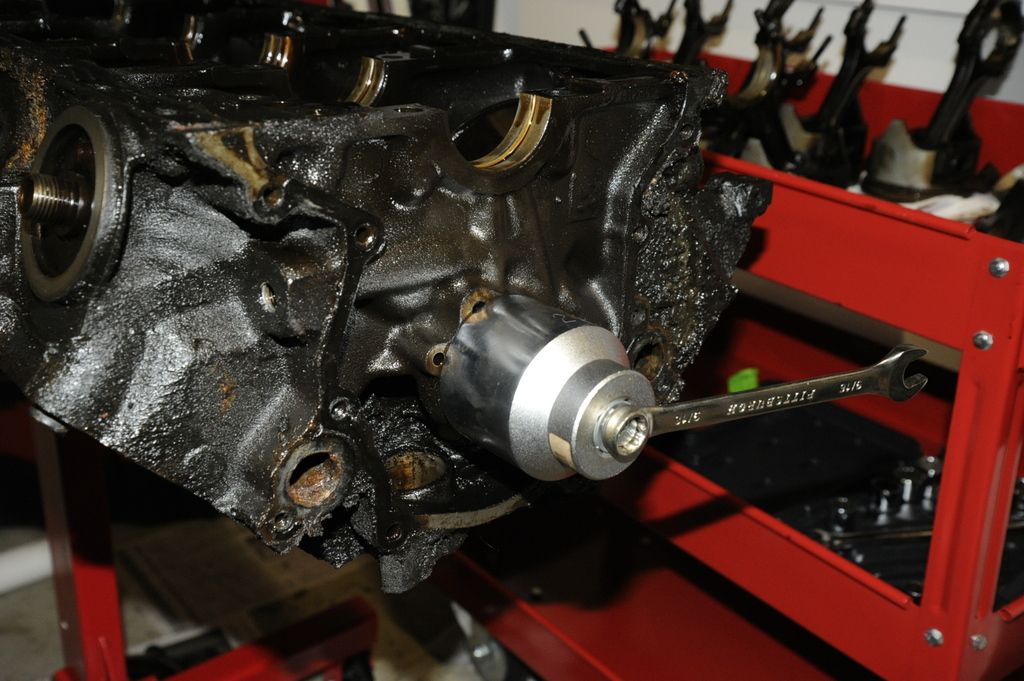
The rearmost camshaft bearing had a lip which prevent me from pulling the camshaft out. I had to improvise another tool to draw it out. Bolt through large socket...

_DSC4724_zpsaitcgos7.jpg
 
OP
OP
T

tirewater

Contributor
Sr. Member
Joined
Jan 28, 2011
Messages
1,040
Loc.
San Francisco Bay Area
I got my cylinder heads back from the machinist. Ah, the conflict of R&Ring 70's era smog heads...

Unfortunately I needed a valve job that caused the cost to go higher than expected...

*Boil cylinder heads $40
*Magnaflux $50
*Flow test $40
*Surface $80
*Valve Grind $240
--------------------------------
Total $450

_DSC4731_zpspct2zz75.jpg
 
OP
OP
T

tirewater

Contributor
Sr. Member
Joined
Jan 28, 2011
Messages
1,040
Loc.
San Francisco Bay Area
Unfortunately wear on the crankshaft appears to be too high. Necessitating a grind. This isn't worth doing for this crankshaft (versus buying a new one or good used one).

Here is the #1 rod bearing. The crank doesn't appear to have any scratches, just old & worn.

WP_20160111_12_14_16_Pro_zpsu5r3fm0q.jpg
 
OP
OP
T

tirewater

Contributor
Sr. Member
Joined
Jan 28, 2011
Messages
1,040
Loc.
San Francisco Bay Area
At this point I don't have anything to put my cylinder heads on. My block has been cleared to be bored thirty over, verbal estimate is $550 for the block work (bore/hone/freeze plugs/cam bearings, no decking).

A 331 rotating assembly sounds nice right now.
 

904Bronco

Contributor
Bronco Guru
Joined
Sep 28, 2004
Messages
5,760
Loc.
San Martin, CA
I have experienced some of your pain... I bought a road hard and put away wet 77 EB that the owner somehow grenaded the factory motor. A buddy of his is putting a new crate motor into his Mustang, so he gives the old motor to the Bronco owner. He swaps it out and then at some point realizes it will never pass smog... It sits in his driveway for 2 years, he loses interest, and then decides to sell it.

After rebuilding the roller motor, I managed to get the rear cross pipe on the E7 heads by massaging the firewall. The PO had already drilled a big hole in the firewall to put a plug into the rear smog port. Then I tracked down all the missing pieces...

I think you are on the right track, find an Explorer or Mustang 5.0L motor and use that bottom end. If you do not re-use the factory pan, you could use the late model dipstick hole in the block. You will be limited to the v-belts unless you run Mustang front dress with the smog pump. The Mustang dress creates clearance issues with the fan and radiator... One hurdle after another...

It is not a race, be patient, there is plenty of support here on this site. When you are all done, if there is such a thing with a Bronco, you will have a reliable rig that will take you anywhere.
 
OP
OP
T

tirewater

Contributor
Sr. Member
Joined
Jan 28, 2011
Messages
1,040
Loc.
San Francisco Bay Area
I have experienced some of your pain... I bought a road hard and put away wet 77 EB that the owner somehow grenaded the factory motor. A buddy of his is putting a new crate motor into his Mustang, so he gives the old motor to the Bronco owner. He swaps it out and then at some point realizes it will never pass smog... It sits in his driveway for 2 years, he loses interest, and then decides to sell it.

After rebuilding the roller motor, I managed to get the rear cross pipe on the E7 heads by massaging the firewall. The PO had already drilled a big hole in the firewall to put a plug into the rear smog port. Then I tracked down all the missing pieces...

I think you are on the right track, find an Explorer or Mustang 5.0L motor and use that bottom end. If you do not re-use the factory pan, you could use the late model dipstick hole in the block. You will be limited to the v-belts unless you run Mustang front dress with the smog pump. The Mustang dress creates clearance issues with the fan and radiator... One hurdle after another...

It is not a race, be patient, there is plenty of support here on this site. When you are all done, if there is such a thing with a Bronco, you will have a reliable rig that will take you anywhere.

Thanks. :)

I stuck with the stock heads because of the firewall issue. I was looking at the AFR 165 heads (carb EO), but the exhaust port on the back eliminated them. It's bad enough to get to the bell housing bolt that sits back there.

Fortunately I have all the smog equipment, and a pretty good grasp on how it (including vacuum lines) connects up. I bought the alt/smog pump bracket to replace the AC mount, so that's covered.

Heh, I think the worst so far is simply the grease & oil. My floor was clean. :( I'm waiting for a partially sunny day to roll the truck out and pressure wash the engine bay.

I'm looking into Probe Industries, SCAT, Eagle rotating assemblies. I need the pistons before the block can be bored & honed. Coast High has a c.a.r.b. EO short block (although for certain years of mustangs).

So many options. :)

The block I have (D4DE) has a different deck height than most 302, 8.229" (although internet knowledge seems to vary here). This affects my static compression ratio.
 
OP
OP
T

tirewater

Contributor
Sr. Member
Joined
Jan 28, 2011
Messages
1,040
Loc.
San Francisco Bay Area
Crankshaft

Picked up my crankshaft, ground 10 under... Was this really cheaper than buying a new Eagle or Scat crankshaft? Was $175 for the grind & polish.

I'll post pictures of the crankshaft later, in the mean time here's the crankshaft shop.

I can't guess how much weight that shelf is holding...
 

Attachments

  • WP_20160121_13_10_43_Pro.jpg
    WP_20160121_13_10_43_Pro.jpg
    118.9 KB · Views: 151
  • WP_20160121_13_10_56_Pro.jpg
    WP_20160121_13_10_56_Pro.jpg
    122.1 KB · Views: 135
OP
OP
T

tirewater

Contributor
Sr. Member
Joined
Jan 28, 2011
Messages
1,040
Loc.
San Francisco Bay Area
Wheels - 15x6 or 15x5.5

I have a '76 Bronco with the stock disk brakes. The tie rod ends sit close to the wheel. This inhibits the wheels you can put on the truck.

Currently the truck wears old wagon wheels of undetermined age. I want to put stock wheels with hubs back on.

Forum searches yielded that *some* people were running the 15x6 pickup wheels on the '76 & '77 Broncos. With and without spacers.

I bought some refurbished rims. The 15x6 wheel is black, the 15x5.5 wheel is silver.

The 15x6 wheel has about 1/4" to spare between the tie rod end and the wheel. The 15x5.5 has ~1/2".

_DSC4736_zpsdvkkx351.jpg


15x6 has 4" backspace.

_DSC4738_zpsdtpbbesq.jpg


15x5.5 has 3 3/4" backspace.

15x5.5 installed:

_DSC4741_zpshyixayrk.jpg


_DSC4747_zps5heuvozr.jpg


_DSC4749_zpsmhua2pov.jpg


_DSC4753_zpskcwmaqah.jpg


_DSC4750_zps5lz6uvlg.jpg


_DSC4755_zpsemuwtdkv.jpg


15x6 installed:

_DSC4757_zpso7mxp4zh.jpg


_DSC4759_zps6fuuvthc.jpg


_DSC4760_zpso8gf0mwt.jpg


_DSC4762_zps5fmejik9.jpg
 

Attachments

  • _DSC4736.jpg
    _DSC4736.jpg
    84 KB · Views: 34
  • _DSC4749.jpg
    _DSC4749.jpg
    53.7 KB · Views: 30
  • _DSC4754.jpg
    _DSC4754.jpg
    64.6 KB · Views: 33
  • _DSC4755.jpg
    _DSC4755.jpg
    64 KB · Views: 32
  • _DSC4760.jpg
    _DSC4760.jpg
    80.8 KB · Views: 34
  • _DSC4768.jpg
    _DSC4768.jpg
    54.7 KB · Views: 36
  • _DSC4769.jpg
    _DSC4769.jpg
    45.5 KB · Views: 31
OP
OP
T

tirewater

Contributor
Sr. Member
Joined
Jan 28, 2011
Messages
1,040
Loc.
San Francisco Bay Area
Very slow progress...

Some minor non engine work. Replaced the locks and ignition switch. I received 10 or so Ford keys with the truck. None of them worked very well, and the ones that did would fall out of the ignition with the vehicle running.

I ended up having to drill the ignition lock cylinder out. Not sure what the deal was, but none of the keys would go into the acc position. The key has to be turned counter clockwise passed ACC with the pin pressed to remove the core.

Also went ahead and replaced the headlight switch. I was surprised that more relays weren't used in the electrics. Feels like the bare minimum in upgrades for the 1st gen Broncos.
 

Attachments

  • WP_20160128_21_50_59_Pro.jpg
    WP_20160128_21_50_59_Pro.jpg
    66.4 KB · Views: 84
  • WP_20160130_18_42_29_Pro.jpg
    WP_20160130_18_42_29_Pro.jpg
    54.4 KB · Views: 76

broncosbybart

Bronco Guru
Joined
Mar 13, 2002
Messages
2,644
Glad I'm not in CA. Good work so far- digging your camshaft removal tool :)

Necessity is the mother of invention...
 

surfer-b

Contributor
Bronco Guru
Joined
Sep 7, 2006
Messages
2,972
Glad I'm not in CA

Me too, thats a bunch of crap, a new explorer EFI motor will run much cleaner than a old 70's carbed motor.
Keep up the good work, you have really solid looking rig. I would rather find one with a good body any day, motor and drivetrain are easy fixes
 
OP
OP
T

tirewater

Contributor
Sr. Member
Joined
Jan 28, 2011
Messages
1,040
Loc.
San Francisco Bay Area
I'm a little behind in updates. :)

I had the cylinder head guy do some of the engine block. He was to boil the block, bore/hone the cylinders and install the cam bearings.

While he did do all of that, the last camshaft bearing was pushed too far in. In addition when I test fit a camshaft it got stuck going into that last bearing.

I called the guy, he said bring it on over and he'd fix it.

Sick of mounting the block on the stand, dismounting it, putting into the pickup, driving, unloading, etc...I went ahead and bought my own camshaft bearing installation tool. Ordered a new set of bearings, popped out the newly installed ones, installed the newly bought ones. Test fit the cam, and everything appears rosy.

I washed the block and painted the sides and front face. As with everyone else, Old Ford Blue doesn't quite look right...although comparing 40 year old paint to fresh paint is an apples to oranges match.

Installed the freeze (core) plugs, tapped threads into the front oil galley plug holes, more cleaning, etc.

My recommendations for cleaning a block is to find a place that can do an acid bath. Boiling is not enough to clean the block.
 

Attachments

  • WP_20160210_20_00_52_Pro.jpg
    WP_20160210_20_00_52_Pro.jpg
    65.9 KB · Views: 94
OP
OP
T

tirewater

Contributor
Sr. Member
Joined
Jan 28, 2011
Messages
1,040
Loc.
San Francisco Bay Area
Freeze plug kits often don't include enough threaded pipe plugs for the oil galleys. So I bought two kits. To be honest, a hardware store would likely have the same plugs for less...

I bought a Summit freeze plug kit as well as a Dorman one. The Summit kit is stamped 'Made in the USA', the Dorman kit is 'Made in China'. Not that the place of manufacture has anything to do with this, but the Summit kit plugs are "beefier". The Cam plug startled me, the Summit plug could be too thick...

The back end of my giant socket fit into the cam plug perfectly. A 3/4" to 1/2" adapter & a 1/2" extension to use as a driver.

First picture is the difference in depth of the cam plugs between the Summit kit & Dorman kits. The Summit kit used thicker brass for the freeze/core plugs. In addition the oil galley/water jacket threaded plugs had an additional thread (about 1mm longer). Ironically, since I threaded the front oil galley holes I didn't actually want a longer plug...
 

Attachments

  • WP_20160210_21_02_21_Pro.jpg
    WP_20160210_21_02_21_Pro.jpg
    49.7 KB · Views: 74
  • WP_20160210_21_06_40_Pro.jpg
    WP_20160210_21_06_40_Pro.jpg
    31.6 KB · Views: 74
OP
OP
T

tirewater

Contributor
Sr. Member
Joined
Jan 28, 2011
Messages
1,040
Loc.
San Francisco Bay Area
Torque Converter & Flexplate

Viperwolf mentioned he's used the Dacco F48 torque converter and Transtar F200 Flexplate combo as a replacement TC & Flexplate.

Because I can't do anything the easy way (and I *had* to have it *now*), I trusted Autozone's part finder. Autozone has the Dacco F48 as the replacement TC & the Pioneer FRA-205 flexplate.

The Pioneer FRA-205 does *not* fit the TC. Despite stating it's a E0AZ-6375-A replacement, it doesn't fit. The holes distance is slightly too small. I tried the B&M Flexplate 50237, which looks just like the FRA-205 but iridited - it doesn't fit either.

I went through three different Dacco F48 torque converters to figure the above out...

I didn't get a F200, but I found two other flexplates that did fit over the F48 TC:

ATP Z-105:
http://www.amazon.com/gp/product/B000C8RDBY?psc=1&redirect=true&ref_=oh_aui_detailpage_o02_s00

Summit SUM-G111SFI (gold iridited, SFI rated):

http://www.summitracing.com/parts/sum-g111sfi

Ultimately I'm using the Summit version.

Best price for the venerable F200, $25 at northern auto parts:

http://www.northernautoparts.com/part/ts-f200

I didn't test fit the F200, but I'd trust Viperwolf on this.

Pictures are of the ATP & Summit flexplates.
 

Attachments

  • 51qaI7lOu6L._SX425_.jpg
    51qaI7lOu6L._SX425_.jpg
    30.6 KB · Views: 33
  • sum-g111sfi_wb_xl.jpg
    sum-g111sfi_wb_xl.jpg
    92.5 KB · Views: 36
OP
OP
T

tirewater

Contributor
Sr. Member
Joined
Jan 28, 2011
Messages
1,040
Loc.
San Francisco Bay Area
Installed the camshaft. Used a zip tie to help the last cam race to slide in.

The Monroe book gives a maximum tolerance for the distance of the front camshaft bearing to the lip of the engine block. Guess I'm glad I read the book, otherwise I would've skipped this. Apparently this is to oil the timing gear.

Photo is just of the straight edge and feeler gauge. You stick the feeler gauge between the straight edge and front of camshaft bearing.
 

Attachments

  • _DSC4785.jpg
    _DSC4785.jpg
    88.7 KB · Views: 75
  • WP_20160213_22_49_41_Pro.jpg
    WP_20160213_22_49_41_Pro.jpg
    56.2 KB · Views: 65
Last edited:
OP
OP
T

tirewater

Contributor
Sr. Member
Joined
Jan 28, 2011
Messages
1,040
Loc.
San Francisco Bay Area
Mocking up the crankshaft, and using plastigage to measure the main bearing tolerances.

Unfortunately the tolerances were all between .0025 & .003 (see photo). This is a bit much for a new rebuild where the crank was machined 10 under.

What ended up happening is that the crankshaft shop asked if I wanted to buy bearings from them. I said sure. When I picked up the crankshaft he handed me two boxes of EnginePro bearings (ACL bearings). Not knowing any better, I merrily went on my way.

Unfortunately he sold me the "race" bearings which have an addition .001 clearance.

So...new set of clevite main & rod bearings...got my tolerances to .0015 - .002.
 

Attachments

  • _DSC4807.jpg
    _DSC4807.jpg
    54.3 KB · Views: 51
  • _DSC4818.jpg
    _DSC4818.jpg
    100.1 KB · Views: 64
OP
OP
T

tirewater

Contributor
Sr. Member
Joined
Jan 28, 2011
Messages
1,040
Loc.
San Francisco Bay Area
I don't have the press or abilities to press on/off the stock ford connecting rods. So I purchased a set of Eagle connecting rods with bushed ends. Here they are resting in oil with the wrist pins....and installed.
 

Attachments

  • _DSC4833.jpg
    _DSC4833.jpg
    84 KB · Views: 91
  • _DSC4839.jpg
    _DSC4839.jpg
    95.8 KB · Views: 87
  • _DSC4844.jpg
    _DSC4844.jpg
    87.2 KB · Views: 85
Top