1buckeyefan1
Sr. Member
- Joined
- Sep 21, 2017
- Messages
- 632
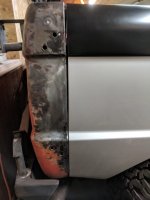
So i'm a newbie metal guy, but gaining experience on my 74 EB. Just knocked out the inner front fenders w/ lots of help from the previous build threads and just cut out my passenger inner quarter and front wheel extension. Patched in part of the wheel tub and have everything mocked up.
I'm looking for pro tips + advice (from experience) on what to check and more importantly the welding sequence before I start welding things up? I removed my door brace and reinstalled the door. The front fender has a few bolts holding it in place for mock purposes only.
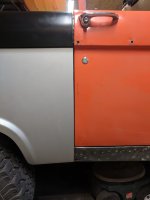
The inner quarter has a few screws in on the front. It's hanging pretty well on the original door striker post and the original rear tail light extension.
There seems to be quite a few variables here and I want to ensure I get them all correct:
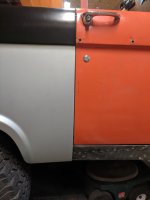
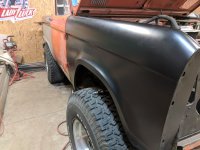
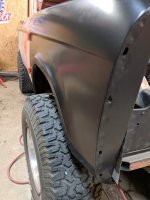
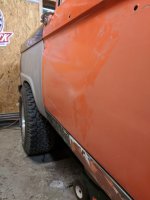
1.) front fender. I replaced the inner fender and hung the outer in place. It looks pretty decent?
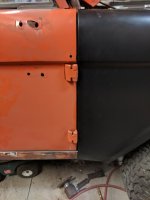
2.) door hinges . original to the vehicle. I have removed the doors and bolted them back in place and adjusted them a half dozen times to get it close
3.) door. original to vehicle, I don't think it's ever been replaced or skinned. But does have some mud in it, so probably not an *exact* reference point. I've got a skin for it that I may eventually put on, unless I find a good donor door. Do I dare weld in all of the quarter panel metal and then redo the door? I'd rather get the quarters done now and dig into the doors later if possible, using the original doors as reference. I have skins for both sides.
4.) door striker post. Original and was braced prior to taking quarter off. I removed the brace after I screwed the inner quarter back in
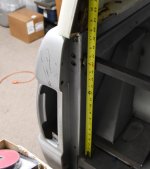
5.) inner quarter panel. seems decent, looks like i need to bring it up maybe a quarter inch in the front
6.) rear tail light extension. Original to vehicle. I had a replacement, but after taking off a bunch of bondo and pulling out some dents, it appears salvageable. It's loose right now from having to dig the old inner qtr out, I think it will pull back in once I screw/weld it.
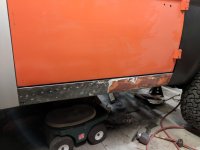
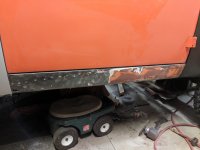
7.) outer rocker. I'm going to replace it w/ a JBG/Carpenter OEM stamped after I get the inner quarter welded back in, but before I put the lower quarter in. I wanted to keep it in place for now to keep the door gap reference.
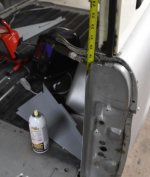
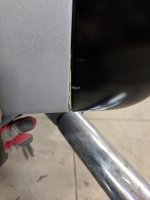
So i'm apprehensive about welding it all up and then fighting it or redoing it later. I'm pretty happy with most of the door gaps except for the rear top. i don't think the post moved, and the bottom of the door gap looks even.. how should I address this?
I'm going to bring the inner quarter up a bit in the front. this should help the body line.
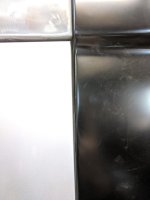
Do the rest of the gaps look decent? the lower body line looks decent enough. Unsure about the front and lower door gaps. The door closes and latches pretty well.
Anything else look out of the ordinary that I should address? I've read too many build threads about guys fighting fitment and taking panels back out, etc.
Logically, i think my next steps are:
1.) raise the inner quarter up about a 1/4 to meet the top of the door
2.) figure out how to close the upper rear door gap
3.) screw/mock the rear extension
4.) weld the inner quarter
5.) remove the outer rocker
6.) weld in the lower quarter
7.) weld in the rear tail light extension?
8.) weld in the outer rocker replacement?
Is this the correct sequence of reassembly?
I'm looking for pro tips + advice (from experience) on what to check and more importantly the welding sequence before I start welding things up? I removed my door brace and reinstalled the door. The front fender has a few bolts holding it in place for mock purposes only.
The inner quarter has a few screws in on the front. It's hanging pretty well on the original door striker post and the original rear tail light extension.
There seems to be quite a few variables here and I want to ensure I get them all correct:
1.) front fender. I replaced the inner fender and hung the outer in place. It looks pretty decent?
2.) door hinges . original to the vehicle. I have removed the doors and bolted them back in place and adjusted them a half dozen times to get it close
3.) door. original to vehicle, I don't think it's ever been replaced or skinned. But does have some mud in it, so probably not an *exact* reference point. I've got a skin for it that I may eventually put on, unless I find a good donor door. Do I dare weld in all of the quarter panel metal and then redo the door? I'd rather get the quarters done now and dig into the doors later if possible, using the original doors as reference. I have skins for both sides.
4.) door striker post. Original and was braced prior to taking quarter off. I removed the brace after I screwed the inner quarter back in
5.) inner quarter panel. seems decent, looks like i need to bring it up maybe a quarter inch in the front
6.) rear tail light extension. Original to vehicle. I had a replacement, but after taking off a bunch of bondo and pulling out some dents, it appears salvageable. It's loose right now from having to dig the old inner qtr out, I think it will pull back in once I screw/weld it.
7.) outer rocker. I'm going to replace it w/ a JBG/Carpenter OEM stamped after I get the inner quarter welded back in, but before I put the lower quarter in. I wanted to keep it in place for now to keep the door gap reference.
So i'm apprehensive about welding it all up and then fighting it or redoing it later. I'm pretty happy with most of the door gaps except for the rear top. i don't think the post moved, and the bottom of the door gap looks even.. how should I address this?
I'm going to bring the inner quarter up a bit in the front. this should help the body line.
Do the rest of the gaps look decent? the lower body line looks decent enough. Unsure about the front and lower door gaps. The door closes and latches pretty well.
Anything else look out of the ordinary that I should address? I've read too many build threads about guys fighting fitment and taking panels back out, etc.
Logically, i think my next steps are:
1.) raise the inner quarter up about a 1/4 to meet the top of the door
2.) figure out how to close the upper rear door gap
3.) screw/mock the rear extension
4.) weld the inner quarter
5.) remove the outer rocker
6.) weld in the lower quarter
7.) weld in the rear tail light extension?
8.) weld in the outer rocker replacement?
Is this the correct sequence of reassembly?
Attachments
-
 door rear gap.jpg38.4 KB · Views: 206
 -
 door front gap.jpg47.3 KB · Views: 204
 -
 passenger bottom door gap.jpg81.7 KB · Views: 181
 -
 door high.jpg93.9 KB · Views: 177
 -
 front lines.jpg62 KB · Views: 161
 -
 front line back.jpg70.6 KB · Views: 167
 -
 rear quarter lower.jpg57.3 KB · Views: 149
 -
 full body line 2.jpg129.2 KB · Views: 148
 -
 rear extension gap.jpg52 KB · Views: 373
Last edited: