


Community
Message Forum
Photo Gallery
Event Calendar
Book Reviews
Bronco Wallpaper
Bronco FAQ
Link Back to CB!
Photo Gallery
Event Calendar
Book Reviews
Bronco Wallpaper
Bronco FAQ
Link Back to CB!
Buy / Sell


Bronco Tech
3 Arm Wiper Setup
Fix Motor Mount
Roll Cage Braces
Throttle Body 65mm
Wheel Alignment
Heat Riser Replacement
Vent Window Repair
Center Console Mount
Straighten Bumper
Ford 6R80 6 spd
More Tech...
Fix Motor Mount
Roll Cage Braces
Throttle Body 65mm
Wheel Alignment
Heat Riser Replacement
Vent Window Repair
Center Console Mount
Straighten Bumper
Ford 6R80 6 spd
More Tech...

Install the app
-
Welcome to ClassicBroncos! - You are currently viewing the forums as a GUEST. To take advantage of all the site features, please take a moment to register. It's fast, simple and absolutely free. So please join our community today!If you have problems registering or can't log into your account, please contact Admin.
You are using an out of date browser. It may not display this or other websites correctly.
You should upgrade or use an alternative browser.
You should upgrade or use an alternative browser.
Tin and Tar - First Time 68 Bronco Resto
- Thread starter rydog1130
- Start date

West Tn Dawg
BULLDOG
Ryan, did you just say “Jeep” in a Bronco post.....? (dang that auto correct%))
You can't slip that by Miss Mary and her Eagle eye!!!;D
OP
OP
- Joined
- Jun 19, 2014
- Messages
- 4,024
Holy cow!!! Damn auto correct!!!
Well quick update I removed almost everything and starting from scratch...kinda. I reworked the math and I made my travel arm a little longer. I’m going with a 1/2” center bolt and 1” dom tubing for my main hinge as the 3/8” bolt 3/4” dom tubing just didn’t seem sturdy enough! I got all my pieces welded up and thought I had it spaced right but realized I had an extra 1/16” in there because I forgot to lay them next to each other instead I stacked them (palm plant to face) I guess I can blame it on the fact I was in a hurry to get it mocked up before the girlfriend got into town. Soo Sunday I’ll grind those of, reposition it and tack it, then check it before burning it in. Haste makes waste lesson learned! Anyways the link I had will be removed and the main 1” bar will act as the linkage which should hopefully eliminate some slop, just gotta be more carefully when mocking this thing up!
Well quick update I removed almost everything and starting from scratch...kinda. I reworked the math and I made my travel arm a little longer. I’m going with a 1/2” center bolt and 1” dom tubing for my main hinge as the 3/8” bolt 3/4” dom tubing just didn’t seem sturdy enough! I got all my pieces welded up and thought I had it spaced right but realized I had an extra 1/16” in there because I forgot to lay them next to each other instead I stacked them (palm plant to face) I guess I can blame it on the fact I was in a hurry to get it mocked up before the girlfriend got into town. Soo Sunday I’ll grind those of, reposition it and tack it, then check it before burning it in. Haste makes waste lesson learned! Anyways the link I had will be removed and the main 1” bar will act as the linkage which should hopefully eliminate some slop, just gotta be more carefully when mocking this thing up!

That is why every good engineer has/needs a mock up stage to fine tune. I'm sure it will turn out nice. Ken

OP
OP
- Joined
- Jun 19, 2014
- Messages
- 4,024
ok so new plans on the lift are drawn up ... hopefully this will clear things up. It's basically going to pivot at the same points but I removed the one bracket I made and will be linking the control/leveling arm directly to my seat bar. I think this will help eliminate any slack/slop I had. Im also making the whole deal about an 1" longer so I clear my rocker better.
This piece with the threaded bolt will replace the one circled green and will bolt into the control/leveling arm (what ever you want to call it) and is beefed up w/ 1/2" grade 8 bolt vs the 3/8" that was there. I'm also removing as much spacers there and more than likely adding a bushing bearing there


My awesome plans sketched up on MS paint, gotta love work is paying me to draw up plans")


This piece with the threaded bolt will replace the one circled green and will bolt into the control/leveling arm (what ever you want to call it) and is beefed up w/ 1/2" grade 8 bolt vs the 3/8" that was there. I'm also removing as much spacers there and more than likely adding a bushing bearing there
My awesome plans sketched up on MS paint, gotta love work is paying me to draw up plans
- Joined
- Mar 8, 2007
- Messages
- 81,747
Beefier hopefully means better.... just gotta cut and re weld it in the right spot, it’s square but just sitting a little to far forward on the pivot tube
View attachment 446338
Always something brother..
OP
OP
- Joined
- Jun 19, 2014
- Messages
- 4,024
Update on the seat build....cut the piece off I welded on and made sure I had the spacing correct before tacking on the new piece. I also made a new leveling arm that will accommodate a 1/2" hardened bolt. I also replaced all the sloppy washers and spacers with some good 1/8" thick bronze bushings.


Everything is lining up good but im not perfectly square on where the seat platform hinges and self levels as the seat lowers. The tube that the seat attatches to is 1/8-1/16" to short and doesn't sit perfectly vertical below the other hinge point.


I checked all my measurements and Im good so I was trying to figure out whats off. The only thing I think is off is where the leveling arm connects on the lower portion of the system. The tabs that hold the bolt may be welded just a smidge to far forward. Im thinking I can shave that hole out a tad and then counter sink some flat washers in there then get everything pretty and then burn the washers in. I feel like thats going to be easier than cutting those tabs off and trying to make new ones but I may end up doing just that, I'll keep you posted...
Everything is lining up good but im not perfectly square on where the seat platform hinges and self levels as the seat lowers. The tube that the seat attatches to is 1/8-1/16" to short and doesn't sit perfectly vertical below the other hinge point.
I checked all my measurements and Im good so I was trying to figure out whats off. The only thing I think is off is where the leveling arm connects on the lower portion of the system. The tabs that hold the bolt may be welded just a smidge to far forward. Im thinking I can shave that hole out a tad and then counter sink some flat washers in there then get everything pretty and then burn the washers in. I feel like thats going to be easier than cutting those tabs off and trying to make new ones but I may end up doing just that, I'll keep you posted...
OP
OP
- Joined
- Jun 19, 2014
- Messages
- 4,024
Oil pan installation....wow...well the pan wasn't the hard part, getting the old one out wasn't too bad. We had to drop the track bar and then the old one came right out. I called wild horses to ask them their preferred plan of attack on whether to mount the dip stick pre or post pan mounting. They said mount pan then fish it through and tighten it up...first off should have bought the duff pan as it was the same price and came with a lokar flexible dip stick tube which would have been WAY easier to get in there. Anyways, had to take the pan back off, modify the tube, get it semi tight, then reinstall the pan. Thank god I had the one piece silicone gasket otherwise I would have had a mess on my hands. Once everything was in, we had to modify a wrench that would fit on the dip tube nut so that I could tighten it down. Anyways, a 2hr project took about 6 but thankfully no leaky oil pan! yay!


It's hard to see but just to the left of those 3 streaks theres a hole in the old pan. Plus the gasket at the base of the tube was shot...so now it's done and hopefully I shouldn't have to worry about it!

It's hard to see but just to the left of those 3 streaks theres a hole in the old pan. Plus the gasket at the base of the tube was shot...so now it's done and hopefully I shouldn't have to worry about it!
OP
OP
- Joined
- Jun 19, 2014
- Messages
- 4,024
This was pre supercell, trying to get my 6x9's mounted and my inner quarter panels mounted. Those lookn great but just trying to get my stereo to work. Need to figure out which wires will power it and why they don't have power with the key in the ACC position.


The other thing was to have working wipers for the trip even though it never rained.I had to fold the windshield forward then run the vac tubing through the frame. Silicone spray works good at the bend and the a pair of needle noses at the bottom of the frame.


then I found out my door latch would lock but not unlock, tried bending all those tabs according to the WH video on you tube but its just old and worn out, sooo bought new ones for each door

Lastly a little fun, TN was great and even got a bird when I got back to MI!


At the moment have a few projects for some customers to finish next week, doing a set of satinblack exterior trim and parts and also some satin silver for a member here. Once that's done I can get back to sorting out my electrical issues under the dash, ie heater, radio, cigar lighter, and washer fluid stuff, then get my dash back on!
The other thing was to have working wipers for the trip even though it never rained.I had to fold the windshield forward then run the vac tubing through the frame. Silicone spray works good at the bend and the a pair of needle noses at the bottom of the frame.
then I found out my door latch would lock but not unlock, tried bending all those tabs according to the WH video on you tube but its just old and worn out, sooo bought new ones for each door
Lastly a little fun, TN was great and even got a bird when I got back to MI!
At the moment have a few projects for some customers to finish next week, doing a set of satinblack exterior trim and parts and also some satin silver for a member here. Once that's done I can get back to sorting out my electrical issues under the dash, ie heater, radio, cigar lighter, and washer fluid stuff, then get my dash back on!
OP
OP
- Joined
- Jun 19, 2014
- Messages
- 4,024
No more leaky oil pan...priceless! Glad you had a great SC trip! Keep up the good work!
yes, very happy about that!
Nice gobbler there Ryan. By the way there are two more right behind you. How much did he weigh? Ken
How much did he weigh? Ken
OP
OP
- Joined
- Jun 19, 2014
- Messages
- 4,024
Nice gobbler there Ryan. By the way there are two more right behind you.
thanks Ken, he was 23# 10" beard and 1" spurs....not a bad bird!
OP
OP
- Joined
- Jun 19, 2014
- Messages
- 4,024
Latest update, I have my transfer seat plat form done, I just need to mout it to something sturdy (like my dads deck) so in case it fails it doesn't come crashing apart on to my silplate and rockers
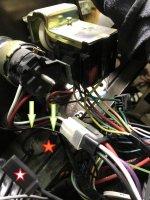
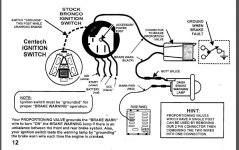
I believe Ive tracked down my electric problem, I wasn't getting any power to my ACC items and I believe its due to the fact that my ACC power lead (which is black) was grounded to my dash, when it should be on the ACC post off the back of the ignition. You can see the orange star is the lead that should be connected to the ignition. My friend was helping me out last year and he mistook that for a ground as the instructions state the ignition mut be grounded. It also states vie the picture it needs to be on that post...oh well I'll blame it on the fact we were in a hurry to get it to the take over.
I believe Ive tracked down my electric problem, I wasn't getting any power to my ACC items and I believe its due to the fact that my ACC power lead (which is black) was grounded to my dash, when it should be on the ACC post off the back of the ignition. You can see the orange star is the lead that should be connected to the ignition. My friend was helping me out last year and he mistook that for a ground as the instructions state the ignition mut be grounded. It also states vie the picture it needs to be on that post...oh well I'll blame it on the fact we were in a hurry to get it to the take over.
Attachments
It's always nice to have friends to blame. Good luck with that wiring, sounds like you figured it out. Ken
Good luck with that wiring, sounds like you figured it out. Ken
OP
OP
- Joined
- Jun 19, 2014
- Messages
- 4,024
It's always nice to have friends to blame.
Ha ha, I take most of the blame but in my defense its hard to see whats going on from my view
OP
OP
- Joined
- Jun 19, 2014
- Messages
- 4,024
I also sent out my gauge cluster to get refurbished. The needle was bent bad, how it got that way I'm not sure. Anyways, I thought I was just going to get the need fixed but according to kevin once he opened it up it was toast and pretty much everything needed to be replaced. He even replaced the alt meter with a modern gauge that will work with my modern alternator. Overall, he did a great job and super fast turn around. I sent it Monday he got it Wednesday and had it fixed Today (Friday) ...should have it back by Tuesday before the 4th of July. I cant wait to get it back in!
before

after

before
after
Similar threads
- Replies
- 4
- Views
- 1K