• Welcome to ClassicBroncos! - You are currently viewing the forums as a GUEST. To take advantage of all the site features, please take a moment to register. It's fast, simple and absolutely free. So please join our community today!
    If you have problems registering or can't log into your account, please contact Admin.

Updating my 11 year old build "Project Captain Crunch"

Bitch'nBronco

Contributor
Loose Cannon
Joined
Dec 1, 2005
Messages
3,361
Loc.
Havre De Grace, MD
Edit: I've started a bunch of updates to the build, skip to the end of the thread to see them


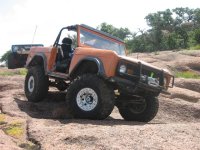
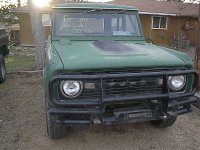
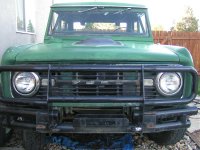
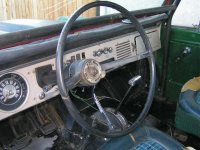
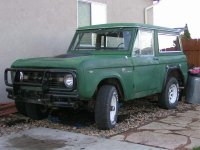
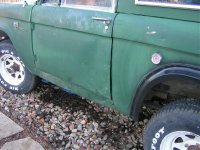
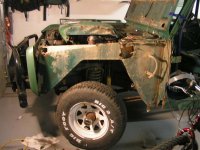
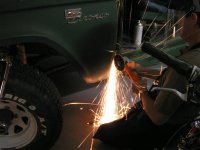
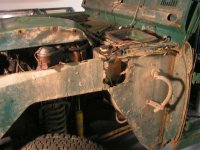
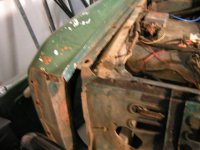
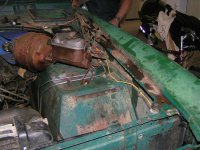
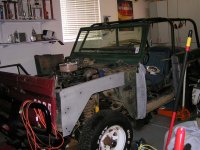
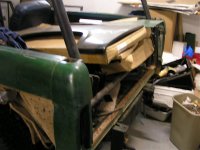
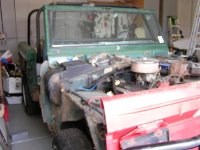
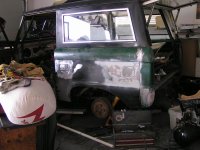
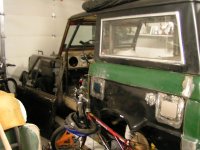
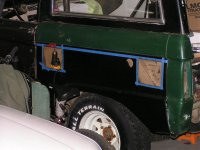
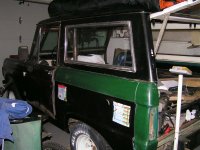
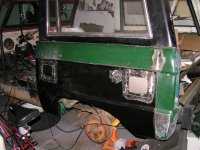
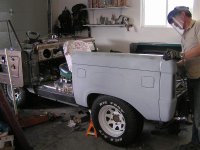
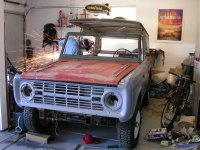
Allright, Ive been getting a lot of requests to see what I have been building for the past year and a half so I thought I would start a build thread. Please be patient, this is gonna take me some time to bring yall up to speed, but it should be good when I am done. Im also about to send money for my contributor status so I can post le pictures. But, here is where I started. I bought my Bronco last year on October 23 from a red neck type of dude that sold me my pride and jow for $2100 with a bunch of extra parts that I have been selling. She'd been rolled 3 times when I bought it and it had a lot of redneck innovation, along with other good things like an ARB air locker and sweet bumpers, and an engine with "only 500 miles since the re-build" (more on that later). I thought it would be a good project and I thought it would only take me a few months to build (ingorance is bliss) and it is my first vehicle ever and I wanted somthin that would stand out from everything else in the drab parking lot that we're all so used to. So here begins the write up for PROJECT CAPTAIN CRUNCH! (sorry if the names been taken, but I liked how it sounded and there you go.)
 
Last edited:

tx1ton

Sr. Member
Joined
Oct 9, 2003
Messages
840
Loc.
Boerne, TX
PROJECT CAPTAIN CRUNCH! (sorry if the names been taken, but I liked how it sounded and there you go.)

Well my crawler is nicknamed Crunch due to that's the sound it's usually making when out on the rocks....;D I've thought of putting a "Capn' Crunch" decal on the hood....but it's not straight enough to show the good Capn' off properly....%) Don't mind sharing the name at all....it's a good'un!
 

Attachments

  • Katemcy June9 2007 044.jpg
    Katemcy June9 2007 044.jpg
    76.6 KB · Views: 430
OP
OP
Bitch'nBronco

Bitch'nBronco

Contributor
Loose Cannon
Joined
Dec 1, 2005
Messages
3,361
Loc.
Havre De Grace, MD
Still havent done the contributor thing yet, but I think Ill send the check today. So until then here is what the frame looked like before I re built the engine (I wasnt done building the frame in this pic.) I powder coated almost everything so there you go. Cool bronco tx1ton, thanks fer sharin the name!

-John

http://classicbroncos.com/photos/sh.../cat/all/what/allfields/name/Bitch/name/Bitch
85b981af96efc255ee9f461f01e13e83.jpg
 
Last edited:
OP
OP
Bitch'nBronco

Bitch'nBronco

Contributor
Loose Cannon
Joined
Dec 1, 2005
Messages
3,361
Loc.
Havre De Grace, MD
Allright, so heres where I started. My uncle showed the bronco to me in an e-mail a year of 2 before I bought it, and i thought it was a real POS, and I didnt want it. But when I came out, I loved it and I bought it. Its a 1967 Bronco Sport
 

Attachments

  • IM001011.jpg
    IM001011.jpg
    174.6 KB · Views: 264
  • IM001012.jpg
    IM001012.jpg
    144.2 KB · Views: 257
OP
OP
Bitch'nBronco

Bitch'nBronco

Contributor
Loose Cannon
Joined
Dec 1, 2005
Messages
3,361
Loc.
Havre De Grace, MD
few more pics
 

Attachments

  • 6.jpg
    6.jpg
    115.3 KB · Views: 127
  • 7.jpg
    7.jpg
    133.7 KB · Views: 239
  • 22.jpg
    22.jpg
    105.3 KB · Views: 215
  • 24.jpg
    24.jpg
    101.4 KB · Views: 172
  • 15.jpg
    15.jpg
    110.7 KB · Views: 116
  • 12.jpg
    12.jpg
    106.3 KB · Views: 229
OP
OP
Bitch'nBronco

Bitch'nBronco

Contributor
Loose Cannon
Joined
Dec 1, 2005
Messages
3,361
Loc.
Havre De Grace, MD
Where we started was at the front end. The PO welded the fenders to the rockers, and they were nasty. I had to cut 'em to get to the inner fender aprons and I sold them. After that we placed a huge order to LMC and ordered just about everything. More to come
 

Attachments

  • 44.jpg
    44.jpg
    96.3 KB · Views: 185
  • 32.jpg
    32.jpg
    71.3 KB · Views: 190
  • 47.jpg
    47.jpg
    94.8 KB · Views: 236
  • 50.jpg
    50.jpg
    77.7 KB · Views: 156
  • 33.jpg
    33.jpg
    115.3 KB · Views: 170
  • 49.jpg
    49.jpg
    85.1 KB · Views: 145
OP
OP
Bitch'nBronco

Bitch'nBronco

Contributor
Loose Cannon
Joined
Dec 1, 2005
Messages
3,361
Loc.
Havre De Grace, MD
Heres pre-fitting the panels. We converted the door posts from the 66-67 posts to the later posts. Most things were rusted, and not patch worthy. So, we opted to change it all out. We pre fitted everything with self tapping screws to get things where we wanted them. Then when everything was where it needed to be, we (my dad and I btw.) removed the screw, welded it up and mover onto the next one. Thats all for now. More to come later. (these pics are from almost 2 years ago)
 

Attachments

  • 58.jpg
    58.jpg
    111.5 KB · Views: 317
  • 61.jpg
    61.jpg
    79.4 KB · Views: 201
  • 64.jpg
    64.jpg
    76.4 KB · Views: 193

Carl

Bronco Guru
Joined
Aug 8, 2006
Messages
1,035
Loc.
Aurora, IL
Nice pics. How do you remove the rocker panels and the rear quarters? Do you just cut them out with a grinder?

Maybe a BRO is a Bronco Rig Owner, or Bronco Rust Owner. I don't know.
 
OP
OP
Bitch'nBronco

Bitch'nBronco

Contributor
Loose Cannon
Joined
Dec 1, 2005
Messages
3,361
Loc.
Havre De Grace, MD
Well, i didnt really know what I was doing when I started, and they were in horrible shape, so I hammer and chiseled them out. With the ones I couldnt get the chisel into, I stuck a crow bar in and ripped the suckers out. The rockers were not factory, and weren't welded in properly. I would suggest a spot weld cutter, way faster and not as barbaric. Oh yah, then I took yel olde grinder and ground 'em smooth. As for the quarters, I did the same thing on one side, and on the other I got sick of the hammer and chisel and used the grinder with a cut off wheel. I cut the quartes just below the flange, tore the residual steel off from the flange, and ground 'er smooth. As for BRO, i have no idea. Bronco Rust owner, hahaha
 
OP
OP
Bitch'nBronco

Bitch'nBronco

Contributor
Loose Cannon
Joined
Dec 1, 2005
Messages
3,361
Loc.
Havre De Grace, MD
Heres everything on. At this point it was all held on by sheet metal screws, and those white patches are where I was planning on sticking my gas doors. I went to the A-1 pick your part with a hammer and chisel and cut gas doors outta 2 mazdas. I wanted to put the doors in to clean it up, and I chose doors that you opened from inside the car. Ill post more on that later, but heres the pics.
 

Attachments

  • 82.jpg
    82.jpg
    97.5 KB · Views: 268
  • 88.jpg
    88.jpg
    86.8 KB · Views: 247
  • 71.jpg
    71.jpg
    86.5 KB · Views: 239
  • 66.jpg
    66.jpg
    100.2 KB · Views: 760
  • 72.jpg
    72.jpg
    111.3 KB · Views: 738

JHD

Sr. Member
Joined
Feb 6, 2007
Messages
587
Loc.
Colorado Springs
Looking good. I think I could have saved my kick pannels after seeing how you overlaped the inner apron over the rust hole. Oh well. Looking foward to seeing the dash and how it sits now.
 
OP
OP
Bitch'nBronco

Bitch'nBronco

Contributor
Loose Cannon
Joined
Dec 1, 2005
Messages
3,361
Loc.
Havre De Grace, MD
Heres some pics after we pulled the top and cage off and shot it with some rattle can primer just to protect it until later. You can see the line that we drew for the flares. Man it was hard installing a new panel, making it un cut and then cutting 50% of that panel out.
 

Attachments

  • 98.jpg
    98.jpg
    94.4 KB · Views: 463
OP
OP
Bitch'nBronco

Bitch'nBronco

Contributor
Loose Cannon
Joined
Dec 1, 2005
Messages
3,361
Loc.
Havre De Grace, MD
After that we welded all the panels up and started tearin 'er down. I scored a pretty nice steel hood, cuz the old one was pretty trashed.
 

Attachments

  • Picture 001.jpg
    Picture 001.jpg
    124.3 KB · Views: 198
  • Picture 003.jpg
    Picture 003.jpg
    72.1 KB · Views: 176
Top