


Alternator Mounting
Tech article by BwoncoHowie and filed under ElectricalTech article by Howard Eglett (BwoncoHowie)
The purpose of this article is to help those who seek to upgrade their alternator to the large housing Motorcraft 1G version. The information covered here will only pertain to the mounting process and will hopefully give an idea of what materials may be needed to help in mounting the alternator to your engine. This information is specifically for the stock V-belt configuration and is not intended for those who choose the serpentine setup common to EFI motors. This Alternator is a tough workhorse, and its low RPM performance is surprising. This charging system performance upgrade will allow the use of the existing voltage regulator and requires minimal wiring modifications. If your Early Bronco has the stock V-8 engine configuration, and is a 1974 or later, there is a good chance that it still has the large cast iron alternator mounting bracket. If so, it will need to be removed in order to easily mount the 1G 100A large housing alternator. If you plan to run the smog pump and or air conditioning, perhaps the following modification is not the best suited for your particular application.
Size comparison:
Here are the 2 Motorcraft alternators that use an external voltage regulator: 1G small, which is factory equipment on the early Bronco, is shown pictured on the right and the 1G large on the left.

Misc. Hardware:
If you need new brackets, you can find some of this stuff at your local favorite wrecking yard. Many of the Bronco parts suppliers that advertise on this site have these brackets available brand new, with chrome plating, as well as good used hardware at fairly reasonable prices.

Upper bracket:
This upper mounting bracket can be found on a wide variety of mid sixties to mid seventies Ford cars and trucks equipped with either 289 or 302 engines. I like the ones that were stock on 1965-67 models because they were stamped from heavier gauge metal. Unfortunately, the thicker brackets are becoming rare and getting harder to find. The OE number found on the part pictured here is C8OE-10156-A, and came factory on a 1969 Ford Econoline with a 302.

Spacers:
These alternator spacers come in many different lengths to serve Ford’s wide variety of applications and engine configurations. It is important to get a spacer with the correct length to insure proper belt alignment. The spacer length we are concerned with is 1.640” long or (1 5/8”) and can either be steel, or aluminum. The aluminum spacers are found on the later than 1967 engines. The extruded aluminum spacer is pictured on the left, notice the split in it lengthwise.

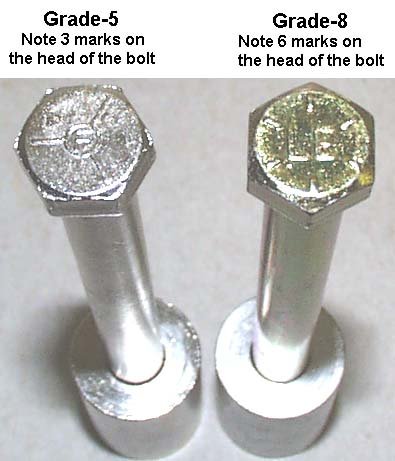
Bolt:
The bolt is a 7/16”-14 size. It’s shank, not counting the head is about 5 ½” long. It is a shouldered bolt that has only 1 1/4” of thread length. Earlier cars used a grade (5). The later years used a grade (8). The grade (8) bolt is stronger and what I recommend especially if your engine is modified for a higher than stock horsepower rating. Install this bolt using a split lock washer.
Lower Bracket:
The stock lower bracket for 73 and earlier Broncos equipped with the V8, is the shorter of the 2 pictured, and sometimes requires elongating of the slotted hole at the far end in order to get the belt tension tight enough. If your alternator has a larger than average pulley, modification of the slotted hole may not be needed. Notice it is more angular than the longer one. The longer lower bracket works better for mounting the large housing alternator. It is curved at the lower end and works very well for getting that extra bit of belt adjustment needed. The OE numbers stamped into these parts are as follows:
Short, C9OE-10145-B
Long, D3UE-10145-AA
Note: These are engineering numbers shown as examples. These numbers can vary slightly from year to year and yet be the same bracket.

Mounting:
Displayed below is a picture of the Large Housing 1G 100A Motorcraft Alternator mounted on a 1973 Bronco with a 302 engine. It is using the stock (shorter) lower bracket. No modification was necessary to the bracket because the pulley used was 2 7/8” diameter. If a smaller pulley is used, it may be best to either elongate the slotted hole with a rat-tail file or invest in the longer bracket. Notice how the upper bracket attaches to the water pump? The lower bracket attaches to the timing chain housing. The location of the spacer is between the alternator housing and the cylinder head. The 5 ½” bolt passes through the upper bracket, then through the alternator mounting boss, then it passes through the spacer before threading into the cylinder head.

After mounting the alternator, check the clearance between the lower radiator hose and the lower alternator mounting bracket. You may need to adjust the hose position so it does not rub against any of the new hardware.
Tech article by Howard Eglett (BwoncoHowie)