


Heater Craft 200H Install
Tech article by admin and filed under - Heater, InteriorTech article by David Neuman II (daves77)
This is a replacement heater for the stock classic bronco heater. The OEM heater in the classic bronco just does not supply enough air for the cab or the defrost, this replacement sends out enough air at 20 times the amount of the stock heater, with the heater craft, you will not wait for the window shield to defrost or the cab to get warm enough in the cold winter mornings.I am not a salesperson for the heater craft, I just bought a heater from Mike at www.completeoffroad.com and I am very pleased with his service and I am very pleased with the heater craft 200H installed in my 1977 Ford Bronco.
I will attempt to give some instructions on the installation of the heater craft in a classic bronco.
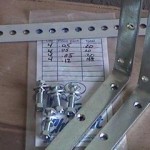
First and for most, the additional hardware you will need are as follows:
- Four rivets size 5/32″ diameter ½” grip
- Four Bolts size 5/16″ by 1″ length
- Four washers
- Four lock washers
- Four nuts
- Two brackets (“L shape”, 9″ length)
- One piece of plumbers bracket. 12″
- 2 pieces of sheet metal and gasket material (3.5″ x 2″)


Remove the stock heater. You will need to drain some antifreeze before you disconnect heater hoses. Disconnect the battery (electrical connections will be done in this install process). Remove heater hoses from engine bay side. Remove four nuts from the mounting studs on the engine bay side. Inside of bronco, remove blower from housing unit, this is required to clear glove box, disconnect electrical connections and ground. Pull heater housing unit inboard to remove, once you have enough clearance to reach the heater switch, disconnect red and orange wire from the switch. Now remove retaining screw for the defrost cable and heater switch cable. Remove heater housing. Remove heater switch, the power wire is the brown wire on the back of the heater switch.
Time to prepare the Bronco’s firewall for the heater craft install. Place the two pieces of sheet metal, gaskets, and pop rivets over the original heater hoses guide holes. One set (piece of sheet metal and gasket on inside of Bronco and other on the engine bay side). Drill a 5/32″ hole in the corners of the sheet metal and gaskets. This must be done so that all the holes align for a pop rivet. Place the material over the heater hose guide holes and install a pop rivet in each of the drilled holes. Take the two “L” shaped brackets and set them in place where the original heater mounting holes are, mark brackets if holes need to be drilled. You will need to drill 3/8″ holes in order for the 5/16″ bolts to guide through holes. Once the holes are drilled and match up with the guide holes install brackets with support side of bracket down and out. I installed my bolts from the inside of Bronco out to the engine bay. Temporary place the Heater Craft on the mounting bracket and mark on the firewall the spots where the heater hoses align. Remove the heater and drill a 1″ guide hole for the heater hoses to go through the firewall.The side brackets of the heater will have to have a plumbers guide brace installed. I placed the brace on the forward part of the brackets with small attaching bolt and nut. Install the heater brackets loosely on the side of the heater and install the heater on your mounting brackets. The holes on the forward part of the “L” shaped bracket and holes in your plumbers brace will be attached with a small bolt and nut. This will secure your heater to the Bronco. Now connect the heater hoses to the heater craft.
You have four wires on the Heater Craft. The electrical connections are given in detail in the owner’s manual. You will need to extend the heater wires (yellow, red and orange) approximately 12 inches. This will be enough wire to reach the heater switch on the dash in the original location. Connect the four wires on the back on the heater 3 speed switch (brown is the original color of the bronco power wire). Place the switch through the back of the heater switch hole install the cover plate, washer, and knob.
You are now on the final run of the Heater Craft completely installed in the Bronco. Make sure that all your connections set, hose clamps are tight, replace the antifreeze that you drained or lost earlier. Reconnect the battery. Turn on the accessory and try your heater switch. If all went well, you will be surprised by the amount of heat that will be supplied by this Heater Craft 200H. On the front of the Heater Craft are two ducts, One duct can be used to supply air to defrost. If you are to install a defrost duct, you will have to extend your defrost tubes or run new ones.
I bought this Heater Craft, witch came with all heater hardware and wires for $202 US Dollars, that included shipping and handling for Mike at Complete Off Road. His web site is www.completeoffroad.com. You will need to go to a local hardware store for the brackets and bolts I mentioned earlier.