


Tech article by Josh Wilczynski (kontinu)
This is my write up for the 3 speed manual and transfer case removal, seal replacement and new gaskets. I recently purchased my '69 bronco and got it on the road. Now that it's on the road after sitting for 15 years or so, some of the gaskets and seals are hammered. Good excuse to tear them down, clean them up and throw some paint on them.
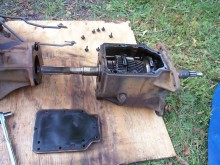
Step 1: The first thing you need to do is remove the tranny, intermediate housing and the transfer case. Not as easy as it sounds so what we do first is make some room to work.
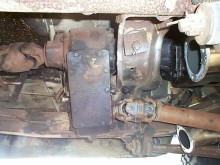 Step 2: I am lucky enough to have fresh unrusted exhaust that I can unbolt from the headers. Without the mufflers in the way I now have room to work and get my wrenches in there to start ripping things apart.
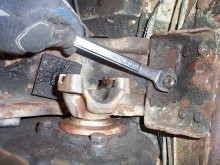
 Step 3: Unbolt the front and rear drive shafts (8 bolts per drive shaft). Remember your drive shafts are balanced, so mark them so you can rebolt them to the yolks in the same position they came off.
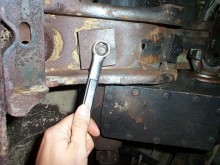 Step 4: My next step was to unbolt the cross member from the frame rails. You'll have to use a socket on the top to hold it it place while you loosen the bottom nut. It was a little tight. A body lift would've been nice to help out. Eventually I took out the two inner bolts that connect to the intermediate housing adapter so you might as well do that now. Pull out the bushings from those bolts and if they are in bad shape it's a good time to replace them when you reinstall this.
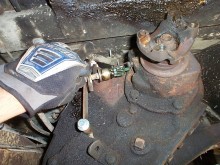 Step 5: You want to unbolt the 1 bolt that holds the speedometer gear in place. Then pull it out and push it out tof the way. This is located on the back of the transfercase up high.

 Step 6: The next step is to pull off the shifting linkage. In my case I have a Hurst floor shifter and a T shift for the dana 20 t/case. I was told to put it in first gear and leave it there until reassembled. Something about pin bearings falling out or something. I'm not real sure, I just did it. A couple bolts holding the Hurst floor shifter handle in place were removed for that. Now the t/case shifter has 1 big bolt that runs through the top of the t/case. Find a friend to hold that nut from underneath while you loosen it from the top. Then there's a cotter pin holding the rest of the handle to the shift rods. Remove that and that part is done.

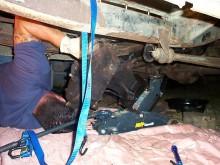 Step 7: Now for the hard part; "pulling it all out." You definitely need a friend or 2 to help along with a jack. This thing is pretty heavy, close to 200lbs probably. I removed the cross member 1st so that I was able to pull down and back at the same time. 1st loosen the 4 bolts from the tranny to the bell housing. Before you do that and the cross member set up the jack to keep it up and level. Now pull it out. It has to come back about 5-6 inches before it's out.
Step 8: Now that it's out, clean it up so you can paint it later. Better to clean it now rather than later when you have things falling into spots you don't want them in. I used brake and parts cleaner along with a toothbrush size wire brush. Get it all good because paint will not stick to grease.
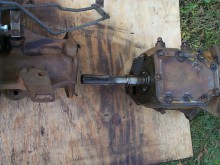 Step 9: Next is remove the bolts from the back of the tranny to the adapter. I had to tap it a few times with a hammer to break it loose. You'll have to pull it about 5-6 inches also because of the shaft on the back.
 Step 10: Now you can start to replace gaskets and seals. Unbolt the 9 bolts from the top of the tranny and pull the top off. Clean the old gasket off and slap on the new one. I used a little silicone gasket sealant on one side before I put it back on. Do this with all the gaskets you replace.
Step 11: The front of the tranny has a seal it it. Undo the 4 bolts on the front of the tranny shaft. Now slide the cover off and you will see the seal. Replace it and put a new gasket on. The tranny is done.
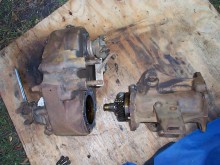
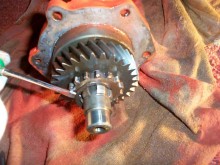
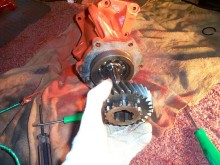
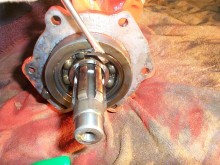
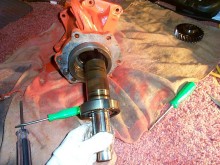
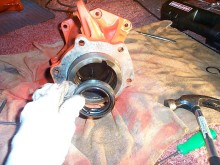
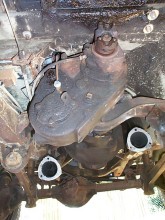
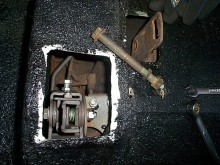
Step 12: Intermediate housing adapter seal, O-ring and removal. Now remove the 6 bolts that connect the t/case to the adapter. Be careful when you pull them apart there are pin bearings that may fall out of place. I was lucky they didn't. Now that it's out, where the gears are you need to pull the first clip off. Now slide the gear off. Next is the bearing retaining clip. Pull that out and slide the whole shaft and bearing out. Now you have access to the seal. I used a long screwdriver and a hammer to knock it out. I tapped it from the opposite side through the entire adapter. Put in the new seal, bearing and shaft, clip, gear, clip and you're done! Don't forget the big O-ring that goes over that gear and flange that you just did. Put the new gasket back on when your ready to put it back together.
Step 13: The t/case seals I chose not to do at this time. First because they weren't leaking and second they are easily accessible while it's on the truck. I will however do the big gasket on the plate with the 10 bolts.
 Step 14: I used high temperature red-orange paint with ceramic in it. I figured since it's out I might as well make it look nice too. The finish is rock hard and nice and glossy. While this is all out of the truck it's also a good time to do the clutch (my next write up) and also spray a few cans of undercoating.
Step 15: Now all you have to do is put it back in the truck.
Tech article by Josh Wilczynski (kontinu)
This is my write up for the 3 speed manual and transfer case removal, seal replacement and new gaskets. I recently purchased my '69 bronco and got it on the road. Now that it's on the road after sitting for 15 years or so, some of the gaskets and seals are hammered. Good excuse to tear them down, clean them up and throw some paint on them.
Step 1: The first thing you need to do is remove the tranny, intermediate housing and the transfer case. Not as easy as it sounds so what we do first is make some room to work.
 Step 2: I am lucky enough to have fresh unrusted exhaust that I can unbolt from the headers. Without the mufflers in the way I now have room to work and get my wrenches in there to start ripping things apart.
 Step 3: Unbolt the front and rear drive shafts (8 bolts per drive shaft). Remember your drive shafts are balanced, so mark them so you can rebolt them to the yolks in the same position they came off.
 Step 4: My next step was to unbolt the cross member from the frame rails. You'll have to use a socket on the top to hold it it place while you loosen the bottom nut. It was a little tight. A body lift would've been nice to help out. Eventually I took out the two inner bolts that connect to the intermediate housing adapter so you might as well do that now. Pull out the bushings from those bolts and if they are in bad shape it's a good time to replace them when you reinstall this.
 Step 5: You want to unbolt the 1 bolt that holds the speedometer gear in place. Then pull it out and push it out tof the way. This is located on the back of the transfercase up high.
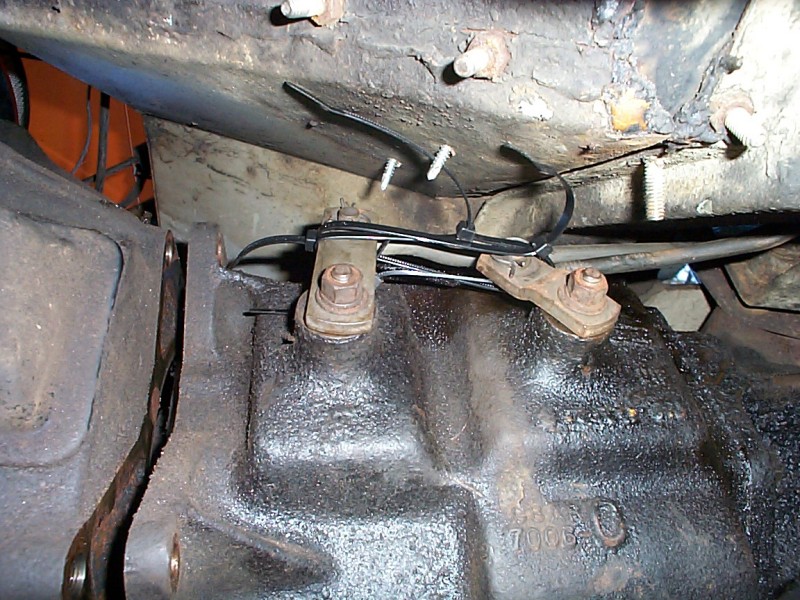
 Step 6: The next step is to pull off the shifting linkage. In my case I have a Hurst floor shifter and a T shift for the dana 20 t/case. I was told to put it in first gear and leave it there until reassembled. Something about pin bearings falling out or something. I'm not real sure, I just did it. A couple bolts holding the Hurst floor shifter handle in place were removed for that. Now the t/case shifter has 1 big bolt that runs through the top of the t/case. Find a friend to hold that nut from underneath while you loosen it from the top. Then there's a cotter pin holding the rest of the handle to the shift rods. Remove that and that part is done.
 Step 7: Now for the hard part; "pulling it all out." You definitely need a friend or 2 to help along with a jack. This thing is pretty heavy, close to 200lbs probably. I removed the cross member 1st so that I was able to pull down and back at the same time. 1st loosen the 4 bolts from the tranny to the bell housing. Before you do that and the cross member set up the jack to keep it up and level. Now pull it out. It has to come back about 5-6 inches before it's out.
Step 8: Now that it's out, clean it up so you can paint it later. Better to clean it now rather than later when you have things falling into spots you don't want them in. I used brake and parts cleaner along with a toothbrush size wire brush. Get it all good because paint will not stick to grease.
 Step 9: Next is remove the bolts from the back of the tranny to the adapter. I had to tap it a few times with a hammer to break it loose. You'll have to pull it about 5-6 inches also because of the shaft on the back.
 Step 10: Now you can start to replace gaskets and seals. Unbolt the 9 bolts from the top of the tranny and pull the top off. Clean the old gasket off and slap on the new one. I used a little silicone gasket sealant on one side before I put it back on. Do this with all the gaskets you replace.
Step 11: The front of the tranny has a seal it it. Undo the 4 bolts on the front of the tranny shaft. Now slide the cover off and you will see the seal. Replace it and put a new gasket on. The tranny is done.


Step 12: Intermediate housing adapter seal, O-ring and removal. Now remove the 6 bolts that connect the t/case to the adapter. Be careful when you pull them apart there are pin bearings that may fall out of place. I was lucky they didn't. Now that it's out, where the gears are you need to pull the first clip off. Now slide the gear off. Next is the bearing retaining clip. Pull that out and slide the whole shaft and bearing out. Now you have access to the seal. I used a long screwdriver and a hammer to knock it out. I tapped it from the opposite side through the entire adapter. Put in the new seal, bearing and shaft, clip, gear, clip and you're done! Don't forget the big O-ring that goes over that gear and flange that you just did. Put the new gasket back on when your ready to put it back together.
Step 13: The t/case seals I chose not to do at this time. First because they weren't leaking and second they are easily accessible while it's on the truck. I will however do the big gasket on the plate with the 10 bolts.
 Step 14: I used high temperature red-orange paint with ceramic in it. I figured since it's out I might as well make it look nice too. The finish is rock hard and nice and glossy. While this is all out of the truck it's also a good time to do the clutch (my next write up) and also spray a few cans of undercoating.
Step 15: Now all you have to do is put it back in the truck.
Tech article by Josh Wilczynski (kontinu)