


Product Review by Jon Hanna (Admin)
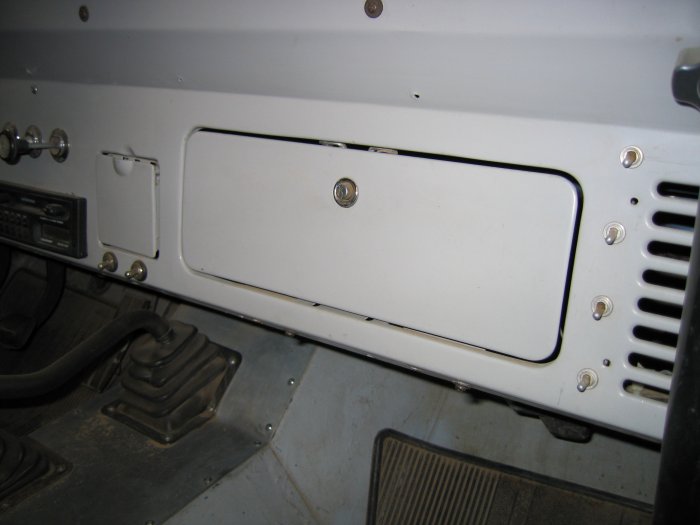
 Having bought other items from Tuffy Security Products I knew I could expect their new 66-77 Bronco glove box to be heavy duty, and I certainly wasn't disappointed. Just like their consoles, the Bronco glove box is a solid 16 guage steel box with a tough black powder coating. It has a large locking mechanism and heavy hinge with a nice solid feel to it. This box is made specifically for early Broncos and solves the common problem of your roll cage blocking access to the glove box door. The Tuffy door is offset so the right side remains solid. This gives plenty of space for your cage bar to come down without interfering with the door.I'm in no hurry to have some punk theif put it to the test, but the system looks to be very secure. Once installed and locked, none of the mounting bolts are accessible. And because it's solid steel all the way around they won't be able to break in from underneath like plastic or cardboard glove boxes.
Installation was very easy and took me just over an hour, which included time to shoot photos. See below for instructions and installation tips.


The kit includes box, mounting bracket and hardware. Note the hole provided for on the left for the stock Bronco fuse block. If your fuse block isn't glove box mounted simply bolt on the provided block-off plate.

1. Start by removing your stock glove box door. Take off all hinges, latches and support straps. Note that my glove box looks a little different then yours because years ago I relocated it to clear my roll bar. That was before the Tuffy box was on the market.


2. Install the mounting bracket. You'll be adhering the bracket to the top flange surrounding the stock glove box opening in the dash. See figure 2 above. Be sure to clean off all surfaces thoroughly so the tape sticks. Carefully position the bracket so it's holes line up with the stock holes in the opening flange. You'll be screwing into these to mount the new box.


3. Insert the Tuffy box. If you aren't going to use the fuse block hole now is the time to install the supplied block-off plate. If you are going to attach your fuse block don't do it quite yet. You'll need the box to be inserted into the dash opening first. The fuse block should have 2 mounting flanges on it fastened with 2 screws. Remove the screws and outer flange, but leave the inner flange attached to the block. Push the fuse block as far to the left as you can and push away any other wiring. Insert the glove box most of the way in and then reach under the dash and position the fuse block into the hole. Re-attach the fuse panel outer flange with the original screws.


4. Secure the glove box. Line up the 4 mounting holes in the glove box with the factory holes and Tuffy mounting bracket behind them. The far right side screw will be a bit of a challenge. It's behind the solid portion of the glove box door where it's hard to see. I used a flash light and small mirror to check that the holes were lined up and then start the screw. The top, left screw is more easily installed if you unbolt the locking mechanism for clearance.


5. Finished product. Be sure the door closes cleanly without hitting the dash and then tighten all 4 screws completely.
And you're done! In less than an hour you now have a secure glove box where you can safely store your valuables. For more information about Tuffy Security Products visit their web site at http://www.tuffyproducts.com
Having bought other items from Tuffy Security Products I knew I could expect their new 66-77 Bronco glove box to be heavy duty, and I certainly wasn't disappointed. Just like their consoles, the Bronco glove box is a solid 16 guage steel box with a tough black powder coating. It has a large locking mechanism and heavy hinge with a nice solid feel to it. This box is made specifically for early Broncos and solves the common problem of your roll cage blocking access to the glove box door. The Tuffy door is offset so the right side remains solid. This gives plenty of space for your cage bar to come down without interfering with the door.I'm in no hurry to have some punk theif put it to the test, but the system looks to be very secure. Once installed and locked, none of the mounting bolts are accessible. And because it's solid steel all the way around they won't be able to break in from underneath like plastic or cardboard glove boxes.Installation was very easy and took me just over an hour, which included time to shoot photos. See below for instructions and installation tips.


The kit includes box, mounting bracket and hardware. Note the hole provided for on the left for the stock Bronco fuse block. If your fuse block isn't glove box mounted simply bolt on the provided block-off plate.
1. Start by removing your stock glove box door. Take off all hinges, latches and support straps. Note that my glove box looks a little different then yours because years ago I relocated it to clear my roll bar. That was before the Tuffy box was on the market.


2. Install the mounting bracket. You'll be adhering the bracket to the top flange surrounding the stock glove box opening in the dash. See figure 2 above. Be sure to clean off all surfaces thoroughly so the tape sticks. Carefully position the bracket so it's holes line up with the stock holes in the opening flange. You'll be screwing into these to mount the new box.
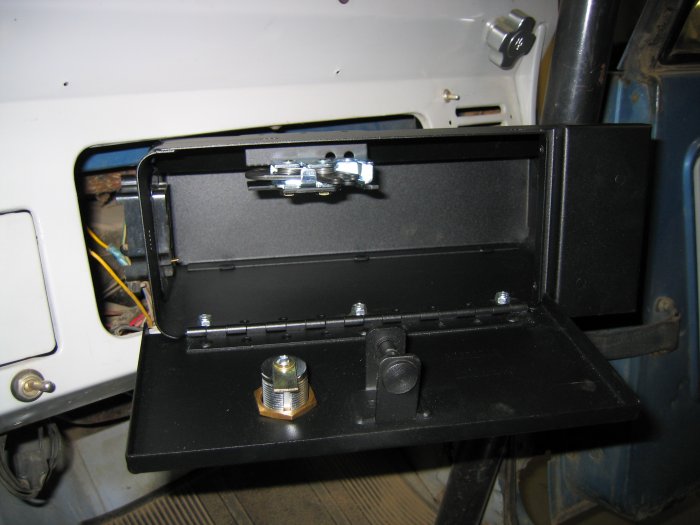

3. Insert the Tuffy box. If you aren't going to use the fuse block hole now is the time to install the supplied block-off plate. If you are going to attach your fuse block don't do it quite yet. You'll need the box to be inserted into the dash opening first. The fuse block should have 2 mounting flanges on it fastened with 2 screws. Remove the screws and outer flange, but leave the inner flange attached to the block. Push the fuse block as far to the left as you can and push away any other wiring. Insert the glove box most of the way in and then reach under the dash and position the fuse block into the hole. Re-attach the fuse panel outer flange with the original screws.


4. Secure the glove box. Line up the 4 mounting holes in the glove box with the factory holes and Tuffy mounting bracket behind them. The far right side screw will be a bit of a challenge. It's behind the solid portion of the glove box door where it's hard to see. I used a flash light and small mirror to check that the holes were lined up and then start the screw. The top, left screw is more easily installed if you unbolt the locking mechanism for clearance.


5. Finished product. Be sure the door closes cleanly without hitting the dash and then tighten all 4 screws completely.
And you're done! In less than an hour you now have a secure glove box where you can safely store your valuables. For more information about Tuffy Security Products visit their web site at http://www.tuffyproducts.com