


Tech article by Jody York (broncnaz)
I've run a Holley 4 barrel on my Bronco for close to 30 years. Before I did some of these mods I rarely had any problems offroad that couldn't be fixed with a float level adjustment. Keep in mind I'm not into the extreme stuff, but I have had my Bronco in some similar situations so these mods should work for everyone. My early mods were taken out of an offroad magazine with some minor differences in materials used. My latest mods have basically copied the Holley TA vent tube design, which is about the only thing I like about the TA as I wouldn't pay $400 for a $200 carb with a modified vent tube. I've made my carb perform like the TA for less than $10 and years before Holley decided to do it.
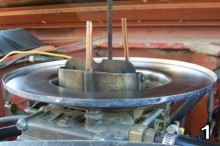
My first mods were on a standard Holley 600 cfm model 4160 vacuum secondary P/N 1850. This carb has the side hung floats which are more desirable for offroad use than the center hung floats, but the mods will work on either carb. It will also work on Demon carbs. I have a 525 cfm Road Demon Jr. that I will be modding soon. My early mods were basically just to extend the vent tubes. I used straight 1/4" copper tubing because it fit perfectly into the stock Holley vent tubes. I extended the vent tubes to within 1/2" of the top of the air cleaner (pic #1 above) Any closer than that and you may draw fuel vapor out of the vent tube thereby richening your fuel mixture.
Next I played around with spring loaded needle seats. To me they didn't make any difference and seemed to be more problematic, but if your into high speed running they may make a difference. So I recommend sticking to the standard needle seats that will save you $20 on something that isn't needed.
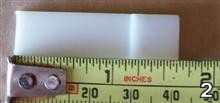
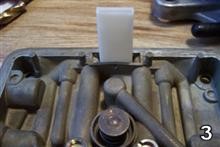
My next mod was to install a vent whistle (pic 2 above) While they are not recommended for side hung float bowls (model 4160's) I modified it to fit. This is for the primary side only as the secondary side has a metering plate and the whistle won't fit on the 4160 model carbs. I have had one in for close to 20 years with no problems. Basically you just cut the whistle down to about 1 1/2"-1 9/16" then install in the metering block. Instead of using the rivet supplied with the whistle I staked the bottom of the metering block. Now it's tight enough to hold the whistle in place and I can still remove it without having a hole in the metering block (see pic #2and 3 above).
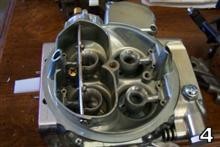
I found that my Road Demon carb came with a vent whistle installed so I guess I was on the right track 20 years ago.(pic 4 above) I haven't seen the inside of a Holley TA but suspect they may have these also. You can run a vent screen instead of the vent whistle if you like Holley P/N HLY-26-39 for $9.39 but I have never tried this.
I have never had any problems with this setup, but when I saw the new TA vent tube I decided that that would be the way to go. Although it has taken me about 8 months to actually start this article.

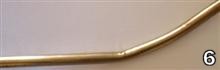
Next is my TA style vent tube. I have found that Holley has a couple of different vent sizes as my first 1850 had 5/16" tubes installed while my 1850-3 has no tubes installed and the vents are 9/32". This was the fun part; finding tubing that would work. I've tried a lot of different stuff from steel brake line to copper tubing. The easiest to work with is copper tubing. I found some 5/16" copper tubing. I've also found 5/16" aluminum and stainless steel tubing (pic 5 above) that will work for the aluminum tubing make sure you get the thick walled tubing .032 thick the .020 tubing will kink when bent (see pic 6 above)

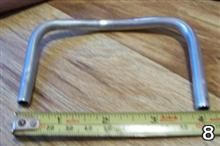
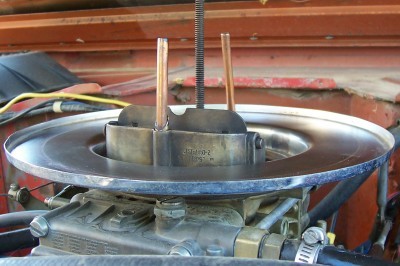
I also found some thick walled 9/32" tubing, but had already decided to go with the 5/16" and just drill out the vents (pic 7). Disassemble the carb before drilling to ensure you leave no metal in the carb. On the primary side I drilled the vent down 1 1/2" from the top of the stock vent tube. I didn't want to go all the way to the metering block. Just to make sure I didn't mess anything up on the secondary vent, I drilled to a depth of 1 1/8". I don't know if there are any height differences among Holley carbs but you may want to double check before just drilling as it's harder to put metal back than it is to remove it. As for bending the tubing I used a tubing bender and just bent it by eye. It came out pretty close. Don't worry to much about the length of the legs. Most tubing benders will leave you enough length on the legs that you can adjust the height. The Holley vent tubes on a 600CFM carb are spaced 4" apart also the secondary leg of the vent tube needs to be about 1/2" longer than the primary side to ensure that the vent tube reaches the secondary vent and its level when installed. (pic 8,9)
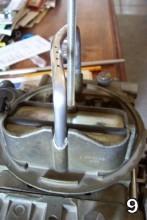
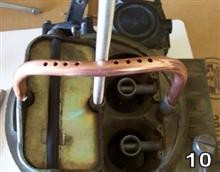
You also need to bend it so the air cleaner stud will clear (pic 9,10). Once your tube is bent and fits the carb you need to drill some vent holes. I used a 5/64" bit to drill 8 holes in the top of the tube(pic 10 above). Depending on your air cleaner height you can decide how high you want the vent tube height (pic 11 below).
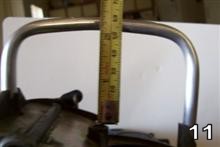
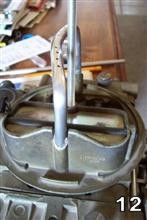
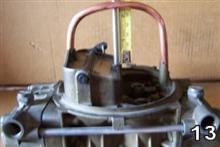
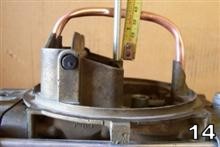
Once again try to leave about 1/2" clearance between the top of the vent tube and the bottom of the air cleaner top. Here are some finished pics with different tubes and heights (pics 10,11,12,13,14)
My only other trick is to set my fuel level fairly low. I have to shake my Bronco pretty hard to get fuel to slosh out. Just make sure you can still cruise down the highway with this lower setting, although with this new style vent tube the standard setting may be fine.
Parts List
I've run a Holley 4 barrel on my Bronco for close to 30 years. Before I did some of these mods I rarely had any problems offroad that couldn't be fixed with a float level adjustment. Keep in mind I'm not into the extreme stuff, but I have had my Bronco in some similar situations so these mods should work for everyone. My early mods were taken out of an offroad magazine with some minor differences in materials used. My latest mods have basically copied the Holley TA vent tube design, which is about the only thing I like about the TA as I wouldn't pay $400 for a $200 carb with a modified vent tube. I've made my carb perform like the TA for less than $10 and years before Holley decided to do it.
My first mods were on a standard Holley 600 cfm model 4160 vacuum secondary P/N 1850. This carb has the side hung floats which are more desirable for offroad use than the center hung floats, but the mods will work on either carb. It will also work on Demon carbs. I have a 525 cfm Road Demon Jr. that I will be modding soon. My early mods were basically just to extend the vent tubes. I used straight 1/4" copper tubing because it fit perfectly into the stock Holley vent tubes. I extended the vent tubes to within 1/2" of the top of the air cleaner (pic #1 above) Any closer than that and you may draw fuel vapor out of the vent tube thereby richening your fuel mixture.
Next I played around with spring loaded needle seats. To me they didn't make any difference and seemed to be more problematic, but if your into high speed running they may make a difference. So I recommend sticking to the standard needle seats that will save you $20 on something that isn't needed.


My next mod was to install a vent whistle (pic 2 above) While they are not recommended for side hung float bowls (model 4160's) I modified it to fit. This is for the primary side only as the secondary side has a metering plate and the whistle won't fit on the 4160 model carbs. I have had one in for close to 20 years with no problems. Basically you just cut the whistle down to about 1 1/2"-1 9/16" then install in the metering block. Instead of using the rivet supplied with the whistle I staked the bottom of the metering block. Now it's tight enough to hold the whistle in place and I can still remove it without having a hole in the metering block (see pic #2and 3 above).

I found that my Road Demon carb came with a vent whistle installed so I guess I was on the right track 20 years ago.(pic 4 above) I haven't seen the inside of a Holley TA but suspect they may have these also. You can run a vent screen instead of the vent whistle if you like Holley P/N HLY-26-39 for $9.39 but I have never tried this.
I have never had any problems with this setup, but when I saw the new TA vent tube I decided that that would be the way to go. Although it has taken me about 8 months to actually start this article.


Next is my TA style vent tube. I have found that Holley has a couple of different vent sizes as my first 1850 had 5/16" tubes installed while my 1850-3 has no tubes installed and the vents are 9/32". This was the fun part; finding tubing that would work. I've tried a lot of different stuff from steel brake line to copper tubing. The easiest to work with is copper tubing. I found some 5/16" copper tubing. I've also found 5/16" aluminum and stainless steel tubing (pic 5 above) that will work for the aluminum tubing make sure you get the thick walled tubing .032 thick the .020 tubing will kink when bent (see pic 6 above)

I also found some thick walled 9/32" tubing, but had already decided to go with the 5/16" and just drill out the vents (pic 7). Disassemble the carb before drilling to ensure you leave no metal in the carb. On the primary side I drilled the vent down 1 1/2" from the top of the stock vent tube. I didn't want to go all the way to the metering block. Just to make sure I didn't mess anything up on the secondary vent, I drilled to a depth of 1 1/8". I don't know if there are any height differences among Holley carbs but you may want to double check before just drilling as it's harder to put metal back than it is to remove it. As for bending the tubing I used a tubing bender and just bent it by eye. It came out pretty close. Don't worry to much about the length of the legs. Most tubing benders will leave you enough length on the legs that you can adjust the height. The Holley vent tubes on a 600CFM carb are spaced 4" apart also the secondary leg of the vent tube needs to be about 1/2" longer than the primary side to ensure that the vent tube reaches the secondary vent and its level when installed. (pic 8,9)


You also need to bend it so the air cleaner stud will clear (pic 9,10). Once your tube is bent and fits the carb you need to drill some vent holes. I used a 5/64" bit to drill 8 holes in the top of the tube(pic 10 above). Depending on your air cleaner height you can decide how high you want the vent tube height (pic 11 below).


Once again try to leave about 1/2" clearance between the top of the vent tube and the bottom of the air cleaner top. Here are some finished pics with different tubes and heights (pics 10,11,12,13,14)
My only other trick is to set my fuel level fairly low. I have to shake my Bronco pretty hard to get fuel to slosh out. Just make sure you can still cruise down the highway with this lower setting, although with this new style vent tube the standard setting may be fine.
Parts List
- Vent whistle Holley P/N HLY-26-40 cost $6.95
- Tubing:
copper 5/16" $.97 per foot
aluminum 5/16"x .032 x 12" $2.79
Stainless steel 5/16"x 12" $5.49
- Drill
- Drill bits 5/16" and 5/64"
- Tubing bender
- Tubing cutter