Very impressive build with all the custom touches. Not a lot of room in a half cab. I bet A/C in a well insulated half cab is nice.


Community
Message Forum
Photo Gallery
Event Calendar
Book Reviews
Bronco Wallpaper
Bronco FAQ
Link Back to CB!
Photo Gallery
Event Calendar
Book Reviews
Bronco Wallpaper
Bronco FAQ
Link Back to CB!
Buy / Sell


Bronco Tech
3 Arm Wiper Setup
Fix Motor Mount
Roll Cage Braces
Throttle Body 65mm
Wheel Alignment
Heat Riser Replacement
Vent Window Repair
Center Console Mount
Straighten Bumper
Ford 6R80 6 spd
More Tech...
Fix Motor Mount
Roll Cage Braces
Throttle Body 65mm
Wheel Alignment
Heat Riser Replacement
Vent Window Repair
Center Console Mount
Straighten Bumper
Ford 6R80 6 spd
More Tech...

Install the app
-
Welcome to ClassicBroncos! - You are currently viewing the forums as a GUEST. To take advantage of all the site features, please take a moment to register. It's fast, simple and absolutely free. So please join our community today!If you have problems registering or can't log into your account, please contact Admin.
You are using an out of date browser. It may not display this or other websites correctly.
You should upgrade or use an alternative browser.
You should upgrade or use an alternative browser.
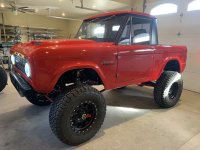
68 half cab retro build
- Thread starter ratbilt
- Start date
OP
OP
ratbilt
Jr. Member
- Joined
- Dec 29, 2019
- Messages
- 139
Thanks Jeff
Yea interior it's like stuffing 5 lbs of stuff in a 2lb container. Rock lights just came in (installing those tuesday) not going to install train horn
tp sensor bracket done, wired and tested. Adjusted lights.
State farm was going to insure me for 55k value (I told them I have 80k in parts), they gave me the name of an appraiser (should know in a couple of days), Rich
Nice build!! You are very talented!
OP
OP
ratbilt
Jr. Member
- Joined
- Dec 29, 2019
- Messages
- 139
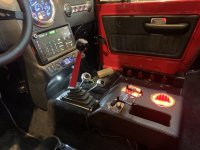
Thanks stupidboy decided to paint my shift shaft/ installed center console/ repainted fuel door/ been screwing around with the trans got it working a lot better
need to finish looming wires / hook up rock lights/ add a couple zombie lights, Rich
need to finish looming wires / hook up rock lights/ add a couple zombie lights, Rich
Attachments
$219k!!! If that happened to one of mine, I would have to keep it a secret from the wife. You think State Farm will give you the "Patrick Price". LOL
OP
OP
ratbilt
Jr. Member
- Joined
- Dec 29, 2019
- Messages
- 139
Hey Jeff wife knows ( had to tell her - she's on the pink ) can't wait to tell my mother in law ( burn it in)
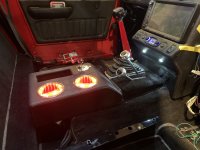
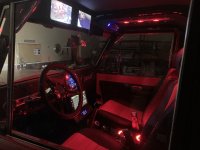
Got the rock lights installed, building the under panel for the pass side (to cover a/c & speaker). Going to paint 1 spoke on the rims red (should look good)
wet sanded the paint going to polish again thursday. Hope to bring it to the shop friday to align & a/c service. Rich
Got the rock lights installed, building the under panel for the pass side (to cover a/c & speaker). Going to paint 1 spoke on the rims red (should look good)
wet sanded the paint going to polish again thursday. Hope to bring it to the shop friday to align & a/c service. Rich
- Joined
- Apr 19, 2014
- Messages
- 2,300
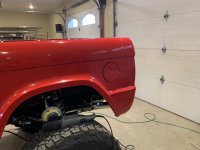
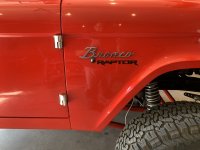
That rear end view of the tailgate is way, way yummy!!! None of my business, but rock chips......... Very cool that you're using it as intended, but rock chips???? Although I suppose that could occur on a gravel road as well. It's a beautiful build, congrats!Painted 1 wheel 4 to go, got the tail lights done, all the rubber installed, polished the paint, marked the emblems going to drill but not going to install (going to have a clear wrap installed on the fenders & doors - for rock chips). Rich
OP
OP
ratbilt
Jr. Member
- Joined
- Dec 29, 2019
- Messages
- 139
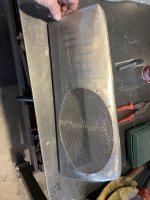
Hi Howard, Ca paint chips easy (I did paste wax today seems a lot harder) The tires stick out past the fenders ( going to be flinging shit) Finished the right side panel to hide the speaker & a/c. Cut and formed alum panel cutout for speaker & riveted some stainless screen, then covered with trunk carpet
Here some pics of the lights. Rich
Here some pics of the lights. Rich
Attachments


- Joined
- Apr 19, 2014
- Messages
- 2,300
Very tasty indeed! Now I have to clean the drool off my keyboard....
- Joined
- Nov 29, 2010
- Messages
- 607
Incredible build! That frame/chassis/suspension work is amazing. You have skills beyond belief!
OP
OP
ratbilt
Jr. Member
- Joined
- Dec 29, 2019
- Messages
- 139
HAHAHA Howard, thanks triracer67.
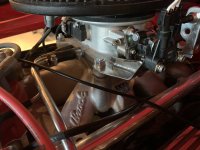
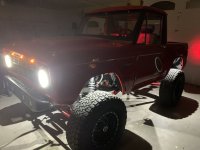
Aligned it yesterday have camber kits on order. Bein adjusting shocks gave more tender spring and backed off the dampening in the rear - front seems really good/ sway bar (tightened up) / set caster from 4 to 7 deg (going to add 1 more deg caster) It handles really good on road, The engine has plenty of power.
Tested trans (hard shift from park) line pres is at 100 psi at idle (should be 50 ) ordered a set of pressure springs (the trans shop that built my trans 2 1/2 years ago went out of business. Making stainless sill plates, hooked up trigger so rear camera comes on when in reverse. Have 11 more items on list until finished. Rich
OP
OP
ratbilt
Jr. Member
- Joined
- Dec 29, 2019
- Messages
- 139
Made the sill plates & coolant reservoir (I'll pick up fittings for the reservoir monday) . Removed the trans valve body, checked the pressure valve & spring (the springs I ordered were wrong)
replaced the valve body, rechecked still at 100 psi not sure what to do now (going to finish up all the other stuff 1st. Rich
replaced the valve body, rechecked still at 100 psi not sure what to do now (going to finish up all the other stuff 1st. Rich
Attachments


Made the sill plates & coolant reservoir (I'll pick up fittings for the reservoir monday) . Removed the trans valve body, checked the pressure valve & spring (the springs I ordered were wrong)
replaced the valve body, rechecked still at 100 psi not sure what to do now (going to finish up all the other stuff 1st. Rich
Did you make the PS res or is that store bought? If you made it, you should have made extra as I would sent some cash your way for one
")
- Joined
- Jan 7, 2022
- Messages
- 1
Been doing body work seems like for ever all these little dents all over (I think about 1.5 million of them) finally got primed (except the grill hood & bed). I also found a couple more dents aaghh about ready to just fuck it on the dents and just paint it (not really). It was 108 deg in the garage today. Some of my carpet parts are done. Dash is promised by next friday. I don't see where to upload pics. Rich
Do
Thanks
OP
OP
ratbilt
Jr. Member
- Joined
- Dec 29, 2019
- Messages
- 139
Removed the valve body again & replaced the epc solenoid (works good now) dialed in the shift points. Pulled the fuel tank again (finally fix the fuel sender).
Replaced the vacuum booster with wild horses hydro booster (man do the brakes stop now). Been fine tuning the suspension & injection, almost done (need to raptor line the bed/ fix some chips. Rich
Replaced the vacuum booster with wild horses hydro booster (man do the brakes stop now). Been fine tuning the suspension & injection, almost done (need to raptor line the bed/ fix some chips. Rich
- Joined
- Feb 2, 2006
- Messages
- 106
It looks great! Well done!
OP
OP
ratbilt
Jr. Member
- Joined
- Dec 29, 2019
- Messages
- 139
The panels I made between the role bar and body, above e brake handle, behind center dash both sides
Attachments
-
 IMG_2032.JPG152.3 KB · Views: 16
 -
 IMG_2048.JPG113.8 KB · Views: 14
 -
 IMG_2047.JPG227.8 KB · Views: 13
 -
 IMG_2046.JPG257.3 KB · Views: 16
 -
 IMG_2045.JPG258.1 KB · Views: 16
 -
 IMG_2044.JPG200.6 KB · Views: 16
 -
 IMG_2042.JPG219.9 KB · Views: 15
 -
 IMG_2041.JPG183.4 KB · Views: 15
 -
 IMG_2033.JPG163.4 KB · Views: 16
Similar threads
- Locked
City: Hacienda Heights
Price: $750
- Replies
- 0
- Views
- 116
City: Shenandoah
Price: $600
- Replies
- 2
- Views
- 325
- Locked
City: Saint David, AZ
Price: $25900
- Replies
- 0
- Views
- 492