• Just a reminder that you won't be able to start new posts or reply to existings posts in the Archive forum.

    This is where all the old posts go so they can still be used for reference and searched.
  • Welcome to ClassicBroncos! - You are currently viewing the forums as a GUEST. To take advantage of all the site features, please take a moment to register. It's fast, simple and absolutely free. So please join our community today!
    If you have problems registering or can't log into your account, please contact Admin.

2000 Explorer OBD II Transplant

surfer-b

Contributor
Bronco Guru
Joined
Sep 7, 2006
Messages
2,972
Well I finshed my 2000 Explorer OBDII engine transplant. I stated I would do a write up on it so here it is. Hopefully this will answer a lot of Q's all of you have and put a stop to the myth that its too difficult to do, in my opinoin its no more involved than doing the 89-93 stang 5.0, I'm sure will some will argue otherwise. However there are few things that will make it much easier.
1: You will need the complete running vehicle. When you purchase it, drive it and bring it up to operating temp then check for codes, yes you are going to have to purchase a scanner but you are going to need one anyway, this way you will know what you have before you start, which will keep you from guessing later when you have finished and fire it up. I see them all the time on CL for 2K or less with low milage and you can always scrap what you dont need and get some of the money back. I will list the other parts you will need from the Explorer later.

2: You must be able to read a wiring schematic and understand it, if you are not too comfortable with this I'm sure members here can help you along. I will post the schematic I have in the pics, which will be all that is needed, or at least thats all I needed.

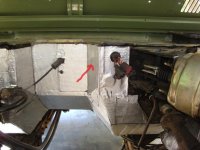
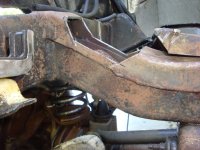
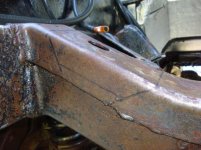
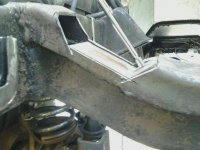
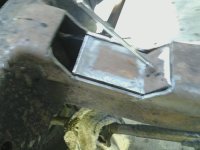
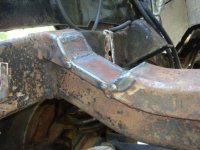
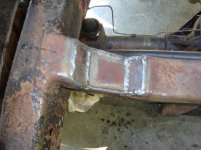
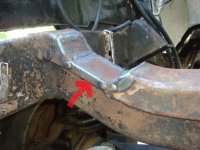
3: You are going to have to do some fab work so if you can weld thats great if not you better get to know someone who can. There are 3 things that will need to be addresed, well 2 for sure, the 3rd being the stock Bronco rear tank. I modded it so the Explorer fuel pump would fit in it, you can buy one from the vendors if you like but it will prob need to be modded so the Explorer pump will work.

4: For the PCM mods contact Rick at http://www.amazonracing.com/contact.html
These are the items I had removed from the PCM
A: PATS, I originally was going to use this and I wired up for it but later changed my mind. I didnt want this thing giving me probs when I'm in the middle of nowhere hunting and its 15* outside.
B: Tranny, I'm running the c-4. If you plan on using the stock 4R70 then you will want to leave this unless you are going to use whatever all the other members are using then it will need to be removed. However if you plan to use the stock harness to control the tranny you will need to look at how you are going to incorporate the stock shift leaver to the shift range sensor from the column shifter on the Explorer, I'm sure it can be done I just didnt look into it.
C:post Cats unless you need to run the cats, I dont
D:EVAP Emissions, there are 3 codes he could not remove with the chip I supplied however they do not effect the engine performance at all, they are as follows:
1: EVAP purge control valve
2: " pressure sensor
3: " vent control
these are all fuel tank emmisions, no worries

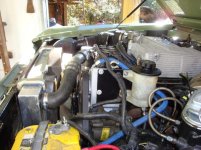
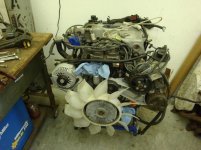
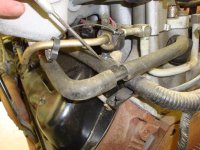
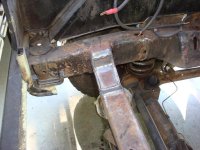
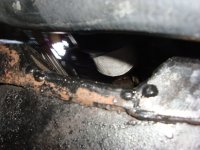
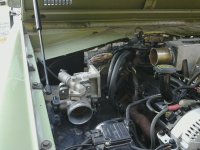
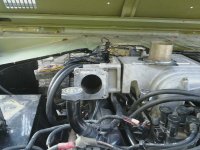
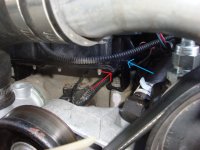
Ok I will throw a couple of pics on here to show what the final build looks like and tomorrow I will continue on
 

Attachments

  • DSC00530.jpg
    DSC00530.jpg
    113.2 KB · Views: 764
  • DSC00529.jpg
    DSC00529.jpg
    108.7 KB · Views: 734

SpareParts

Bronco Guru
Joined
Nov 13, 2004
Messages
5,592
I'm parting out a 1999 as we speak. I wasn't planning on keeping the wiring, but I'm going to follow the rest of this thread in case. Mines already EFI, but I was thinking about using the 4R70W tranny someday...maybe.
 
OP
OP
surfer-b

surfer-b

Contributor
Bronco Guru
Joined
Sep 7, 2006
Messages
2,972
Here is what I started with after I removed from the Explorer. There are a few things I would suggest doing to the motor before installing,

1: Swap the coolant temp sending unit for the gauge to the stock Bronco sending unit, no mods needed simply take out the one from the Bronco manifold and install to in the Explorer, it is in the same location just calibrated different.
2: Swap the oil sending units, you will nedd the Bronco oil sending unit extention to clear the oil filter.
3:Oil filter, the Explorer I got had the Gooseneck extention on it. I removed the nipple that the oil filter screwed onto the extention and installed it into the block, this allowed me to install the filter in the stock Bronco location.
4: Coil-pack bracket, if no body lift you will have to do this unless you have a raised hood of some kind. I cut down the bracket so that the bottom of it just clears the top of the "ECT",engine coolant temp sensor, I did this after the engine was installed so I would know how much I needed to remove, it should work unless you have taller that stock motor mounts.
 

Attachments

  • DSC00493.jpg
    DSC00493.jpg
    96.9 KB · Views: 360
OP
OP
surfer-b

surfer-b

Contributor
Bronco Guru
Joined
Sep 7, 2006
Messages
2,972
Here is another mod that needs to be done before install. The PCV vacum hoses need to be cut down to clear the firewall, I removed enough so the back of them were almost flush with the block.
 

Attachments

  • DSC00509.JPG
    DSC00509.JPG
    278 KB · Views: 466
  • DSC00510.jpg
    DSC00510.jpg
    114.9 KB · Views: 432
OP
OP
surfer-b

surfer-b

Contributor
Bronco Guru
Joined
Sep 7, 2006
Messages
2,972
Now it was time to tackle the engine bay. The first thing I did was to spray it down with Easy-Off heavy duty oven cleaner, this stuff really cuts the grease and grime. After letting it sit for bout 10~15 mins I hooked the pressure washer up to the hot water heater and blasted it clean. I also removed the tranny and t-case because I used this B-Quiet sound deadning material, http://www.b-quiet.com/ultimate.html, on the firewall and on the tranny tunnel which really knocks down the heat and noise. Here is a pic after the material was added, the arrow indicates were I had to move the factory Bronco pigtails so they would clear the intake pleneum, you can leave them in the factory location but it really puts them in bad position, not easy to get to and may give problems later on if they were to rubb the insulation off and GRND out.
If you don't do anything else before you install the engine do this mod, you can thank me later.
Where the factory throttle cable goes into the firewall, mount a plate to the firewall, drill a hole so the Lokar throttle cable will mount to it and tack weld the nuts to this plate where the throttle bracket inside bolts go to, if you dont do this its a pain in the ass to work and you will need someone to help you. Here is the Summit prt # for the cable. http://www.summitracing.com/parts/lok-tc-1000ht72/media/images
Forgot to mention before I installed the b-quiet I removed that undercoating they sprayed on at the factory with a heat gun and scraper, it will just fall off with this method. This stuff is just "black mammy", roofing tar, here in the south we call it black mammy because if you mess up it will be all over you like ole black mammy.
 

Attachments

  • paint firewall.jpg
    paint firewall.jpg
    110.2 KB · Views: 501
Last edited:

boonz28

Contributor
Sr. Member
Joined
Aug 28, 2011
Messages
477
I'm in the process of building a 2000 Explorer 5.0 right now so i'm definitely watching... :)
 

Tom Dummer

Sr. Member
Joined
Nov 8, 2003
Messages
957
Loc.
Scappoose, Or
Watching for someone to keep the 4R70 and custom wiring in the cruise control.....
The other thing I'm looking at is that Vintage Air said I couldn't use their kit with the factory A/C pump... whats up with that?
 
OP
OP
surfer-b

surfer-b

Contributor
Bronco Guru
Joined
Sep 7, 2006
Messages
2,972
The other thing I'm looking at is that Vintage Air said I couldn't use their kit with the factory A/C pump... whats up with that?

Not sure on this one, I havn't looked into it, however I dont know what the diff would be but thats something maybe someone else here can answer. I was planing on using the Explorer comp when I put the in the AC. However I would think they would have a comp that will fit this serp setup.

Watching for someone to keep the 4R70 and custom wiring in the cruise control.....
It could be done the only real prob I see is trying to keep the stock column and shifter and incorporate the Explorer shift indicator into it, as for the wiring that would be no prob because for this conversion you need the underdash harness and the tranny harness from the Explorer anyway. Most anything is possible its just a matter of how much time you want to put into it. I need to clear this, I'm talking about the indicator for the PCM and not the visual indidcator
 
OP
OP
surfer-b

surfer-b

Contributor
Bronco Guru
Joined
Sep 7, 2006
Messages
2,972
The next steep I took was to install the engine and see what mods were needed. One thing I was going to have to deal with right away was to notch the cross member for the lower pass idler pully to clear. I think a few of the members have just taken a hammer to it but I didn't want to do this and wanted enough room so I could work around it if needed. Here are a few pics of what I did, I kept the lower cut about an 1" above the seam so I wouldn't get into the lower section of the member. You don't have to notch this much if you dont want. In the 3rd pic you can see were I removed the angle brace, I reinstalled it but cut it down to match member. Also a dirt dobbers nest, one of the culprits of frame rust, this dirt gets wet and want dry for a long time.
I used .250" plate to weld back in the notched area:
 

Attachments

  • DSC00502.JPG
    DSC00502.JPG
    289.7 KB · Views: 254
  • DSC00500.jpg
    DSC00500.jpg
    114.5 KB · Views: 292
  • DSC00499.jpg
    DSC00499.jpg
    115.6 KB · Views: 260
  • DSC00498.jpg
    DSC00498.jpg
    110.6 KB · Views: 285
  • frame notch 2.jpg
    frame notch 2.jpg
    84.6 KB · Views: 272
  • frame notch.jpg
    frame notch.jpg
    73.5 KB · Views: 278
OP
OP
surfer-b

surfer-b

Contributor
Bronco Guru
Joined
Sep 7, 2006
Messages
2,972
A little update today, hopefully tomorrow I will be able to post more on this and get into the good stuff. Here are a few pics of the frame welded back to clear the serp pully. The first 3 are before I modded the angle brace, the last pic shows the seam I was talking about that I did not want to get below, these two parts overlap bout 1" so I keep the cut up so I would not get into the bottom part of it, this provided plenty of room for clearence.
 

Attachments

  • DSC00506.jpg
    DSC00506.jpg
    112 KB · Views: 209
  • DSC00505.jpg
    DSC00505.jpg
    92.5 KB · Views: 216
  • DSC00503.jpg
    DSC00503.jpg
    101.7 KB · Views: 219
  • DSC00514.jpg
    DSC00514.jpg
    92.7 KB · Views: 207
  • DSC00515.jpg
    DSC00515.jpg
    81.7 KB · Views: 214
  • brace pic.jpg
    brace pic.jpg
    262.7 KB · Views: 241
OP
OP
surfer-b

surfer-b

Contributor
Bronco Guru
Joined
Sep 7, 2006
Messages
2,972
Great thread & very nice work !

Thanks Franko, I didnt clean the metal as good as I should have to be using the mig on it but its there to stay. Its much better than the factory welds, just doesn't look as good as it could if it were cleaner.
 
OP
OP
surfer-b

surfer-b

Contributor
Bronco Guru
Joined
Sep 7, 2006
Messages
2,972
After I got the cross member notched and all the sound deadening in I was ready to install the tranny, t-case and engine. Here is a pic to show where the pully clears the notched area. This pic is about worthless but it will give you an idea of how much clearence there is.
 

Attachments

  • DSC00550.JPG
    DSC00550.JPG
    290.4 KB · Views: 339
OP
OP
surfer-b

surfer-b

Contributor
Bronco Guru
Joined
Sep 7, 2006
Messages
2,972
Now that everything was bolted together I was able to see where and what I going to have to mod so the hood would clear. I don't have a body lift, so for those of you that do you may not have to do some of these mods, you will just have to see what will be needed. The 3 things I knew that were going to have to be worked on were the throttlebody, oil filler tube and the pwr steering reservoir. I used plumbers putty to place on things and gently lower the hood to see where and what was going to hit. Here are a few pics of where I was trying diff locations for the throttle body. I wanted to keep the egr hooked up so moving it to the fender was out, also I didn't want to cut and splice into the motor harness if I could keep from it. In the 2nd pic, from lft, I decided to keep it in the factory location. I was gonna have to flip the throttlebody itself 180* so that the IAC was on the bottom. I also wanted to use the factory airbox and connector tube because part of the PCV system was hooked to it.
So I decided to cut the elbo and take some of the 90 out of it. The next pic shows where and how I cut it. I wanted to get as close to 30* total as possible and still retain the egr port, I ended up with about 24* total, 12* from each side. The 4th pic shows it welded back together, the piece that I cut out was rotated 180* and welded back in. I lined the seams up from the casting marks, the red arrow shows the marks. I goofed on this and should have rotated the removed peice so that the thicker part was a little more towards the top so it would kick the throttlebody down a little but it worked out OK. The orange arrows point out the tube that is part of the PCV system that I wanted to retain. I wanted to keep this as close to OEM as possible so I wouldn't have to go chasing my tale if I had problems when it was time to fire it up. A quiz here for all you FI gurus, can you point out what is wrong in this pic, I will give you a clue, its part of the throttlebody. I will tell what it is and what happened after a few guesses.
 

Attachments

  • throttlebody2.jpg
    throttlebody2.jpg
    171.8 KB · Views: 397
  • throttlebody.jpg
    throttlebody.jpg
    178.9 KB · Views: 395
  • Explorer throttle body mod.jpg
    Explorer throttle body mod.jpg
    169.6 KB · Views: 395
  • THB weld.jpg
    THB weld.jpg
    291.1 KB · Views: 397
OP
OP
surfer-b

surfer-b

Contributor
Bronco Guru
Joined
Sep 7, 2006
Messages
2,972
The next thing I had to do was to shorten the oil filler tube. I removed about 1" between the red arrows, the blue arrow is the necked down part that slides into the valve cover.
 

Attachments

  • oil filler mod.jpg
    oil filler mod.jpg
    289.9 KB · Views: 274
OP
OP
surfer-b

surfer-b

Contributor
Bronco Guru
Joined
Sep 7, 2006
Messages
2,972
At this point I was getting close to the hood closing but still had to lower the coil packs and move the pwr steering reservoir, both which were going to be relativly easy. In the first pic it shows the coil pack mounting bracket lowered to the limit just above the ECT sensor/heater fitting. I dont recall how much I removed from this but if you attemp this it will be easy to figure. The arrow points to the ECT/heater fitting.
The 2nd pic shows the mod on the driver side, the red arrow shows where I cut the base off and the blue is where I welded the leg and foot back on so it would bolt back up. This is just one of those things you have to tack and check to make sure everything will work out, its not difficult, just time consuming.
 

Attachments

  • DSC00546.JPG
    DSC00546.JPG
    250.2 KB · Views: 286
  • DSC00547.JPG
    DSC00547.JPG
    255.5 KB · Views: 282
Top