


chuzie
Bronco Guru
- Joined
- Jul 21, 2006
- Messages
- 2,697
Seems the opinions are 50/50 when it comes to the capabilities of the Explorer power steering pump and it's ability to effectively turn large tires, handle ram assist, and actuate hydro-boost. Personally, I am running 35" tires and an 11" ram assist connected to a 4x4x2 box. At idle, I have to work way too hard to turn my wheels. This not only sucks in the parking lot but especially on the rocks.
My research on the matter has yielded an array of potential options.
Some include:
1.) Reduce PS pulley ($75.00 from Drivenautoparts.com)
2.) Swap the crappy pressure adapter to a Lee's adapter (~$20 from Lee's Power Steering)
3.) Ditch the Explorer pump and replace it with a modified Saginaw pump and modified Explorer bracket. ($370 from Lee's)
4.) Send the Explorer pump off to Lee's and have them modify it for higher pressure/ flow for about $130.
So these sound like great options so what is my problem?
Well, I am not a fan of aluminum pulleys. They make my belt squeak!
The pressure adapter is a non-issue for me since I am running the stock Explorer pressure hose.
I am not made of $$$ because Uncle Sam is broke!
I seriously considered option 4 but the folks at Lee's convinced me that the modified pump would be maxed out with my setup and even then it would only put out about 1,600 PSI.
I recently stumbled upon a couple of old threads, here on classic, about the pump issue and found that some folks tried to stuff the internals from a 2004 F-350 Super Duty (6.0 diesel) into our Explorer pump housing. Just to be clear, this was not my idea. I am just gathering all the info into one place. I think Lars deserves all the credit. I would also like to add these numbers have not been personally verified so please feel free to provide your two cents for corrections.
Those threads are:
http://classicbroncos.com/forums/showthread.php?t=131835
and
http://classicbroncos.com/forums/showthread.php?t=189786
Lars successfully performed the swap with no issues and recorded 1,800 PSI (1,300 PSI was recorded prior to the modification) without having swapped the SD pressure relief assembly.
Scrapman1971 stated the SD pump flows at 3GPM vs the 1GPM of the Explorer. I have requested his source material for those numbers.
So, we have the ability to increase PSI and GPM with a little labor and roughly $50 in parts ($25 for pump and $25 for seal kit)? This is a no-brainer, right?
This is Lars's picture of the Explorer pump (left) and SD pump (right).

The case differences are obvious but look at the pump sizes. That is what Lars was aiming for.
During my modification experience I noticed that the guts looked almost identical between the SD and the explorer so I am unsure how this modification makes the increase in pressure and flow but then again, I am just a stupid pilot (glorified bus driver), not an engineer.
My results: Runs great. No leaks. I can finally turn the wheel with my pinky from stop to stop without any hesitation from the system. I still want to put it in 4-LO and get the wheels against an obstacle to see how well it does but the preliminary results are positive.
-----------------------------
-----------------------------
Parts List:
96-01 Explorer PS pump ($0 if already installed)
03-05 SD 6.0 diesel PS pump Ford P/N STP-102-RM ($25 at junk yard) I would recommend 2004 since they started using this pump in the second quarter of 2003. Not sure if there are some oddball variants out there.
Seal kit ($25 at NAPA NPS 7382)
Phase I
-------
Remove and drain the Explorer pump.
Remove the pulley.
Locate the retaining ring access hole and remove the retaining ring.
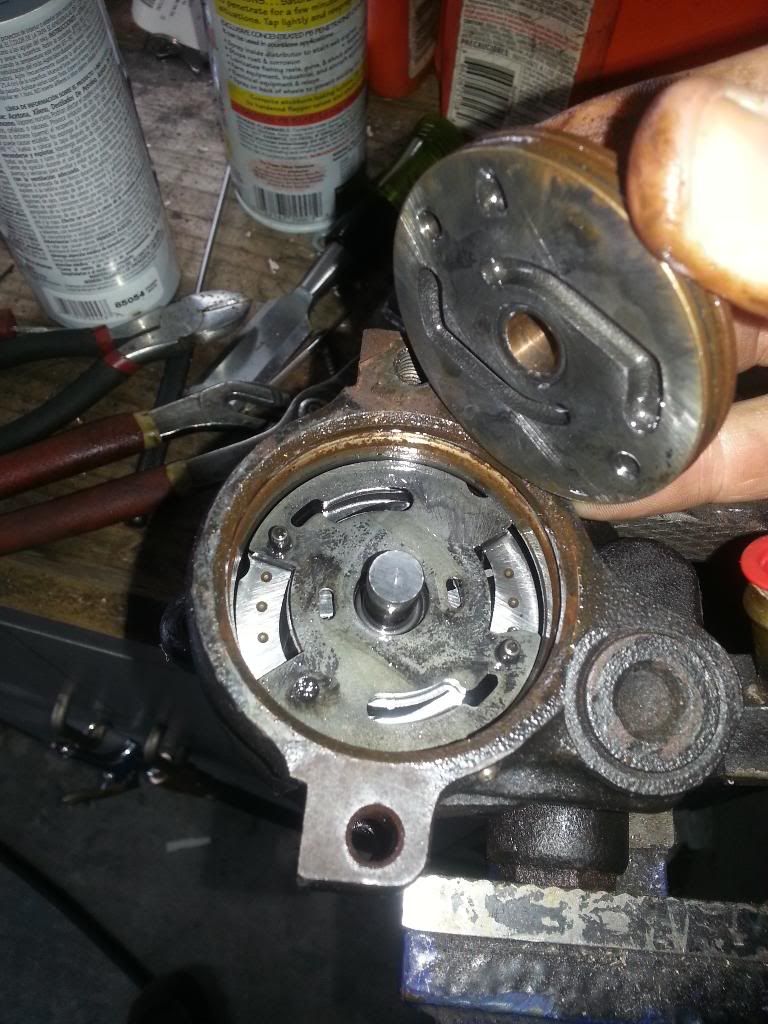
Before removing the back cover, I suggest cleaning the debris to prevent unnecessary contamination. Remove the back cover keeping in mind its crusty old O-ring may make it a little difficult.
Remove the pressure plate.
Remove the retaining ring on the shaft that retains the rotor and shaft but DO NOT remove shaft.
Reinstall the pressure plate. This will help to retain the rotor fins.
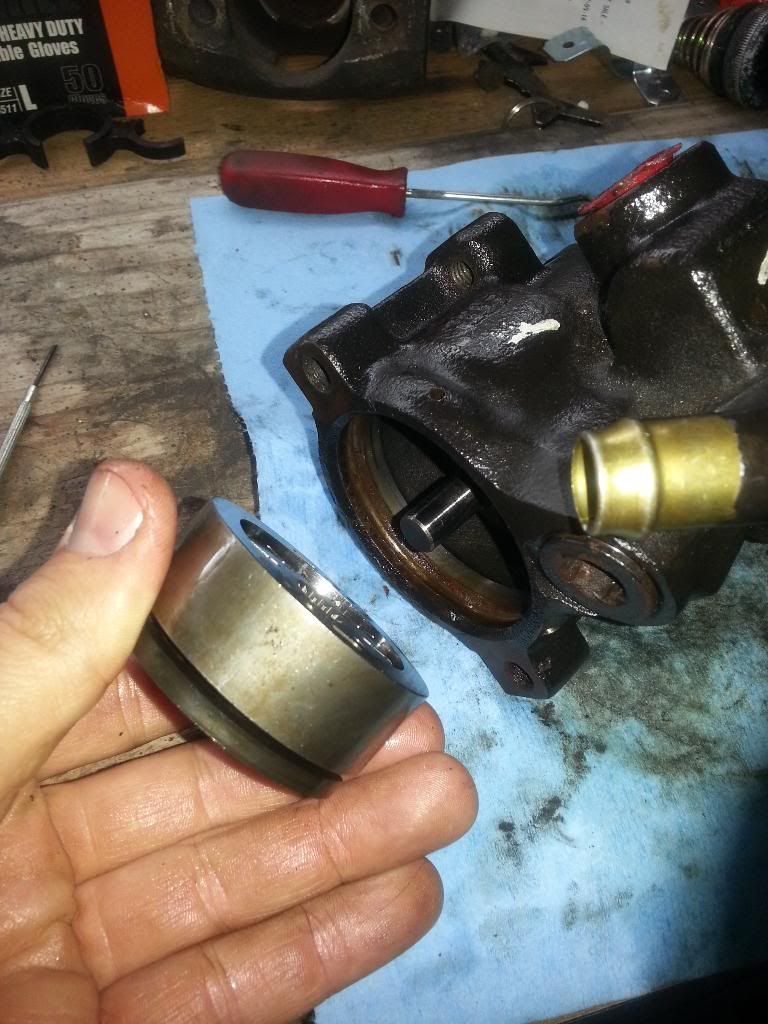
While holding the pressure plate in place, turn the pump upside down and allow the pressure plate, rotor, cam ring, and two dowel pins to slide out together. If the vanes fall out, no biggie. I will tell you how to reinstall them later.
Remove the shaft.
Remove the thrust plate and thrust washer. Notice the concave side of the thrust washer is facing the thrust plate.
Use a seal puller to pull the shaft seal from the front face if so desired.
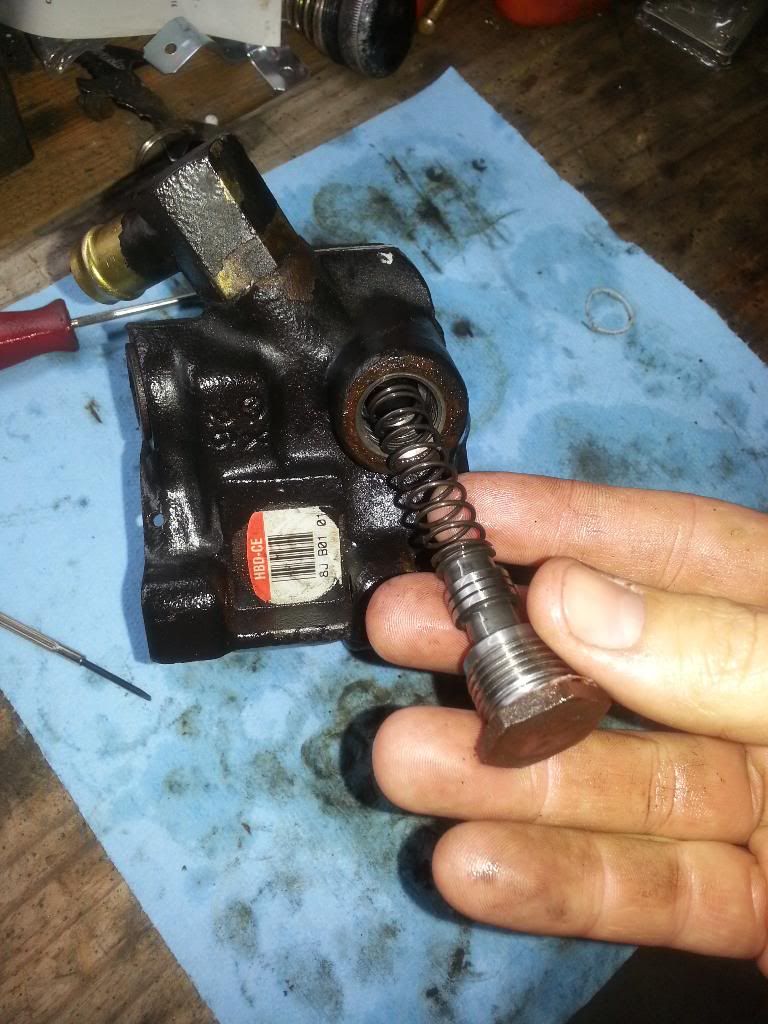
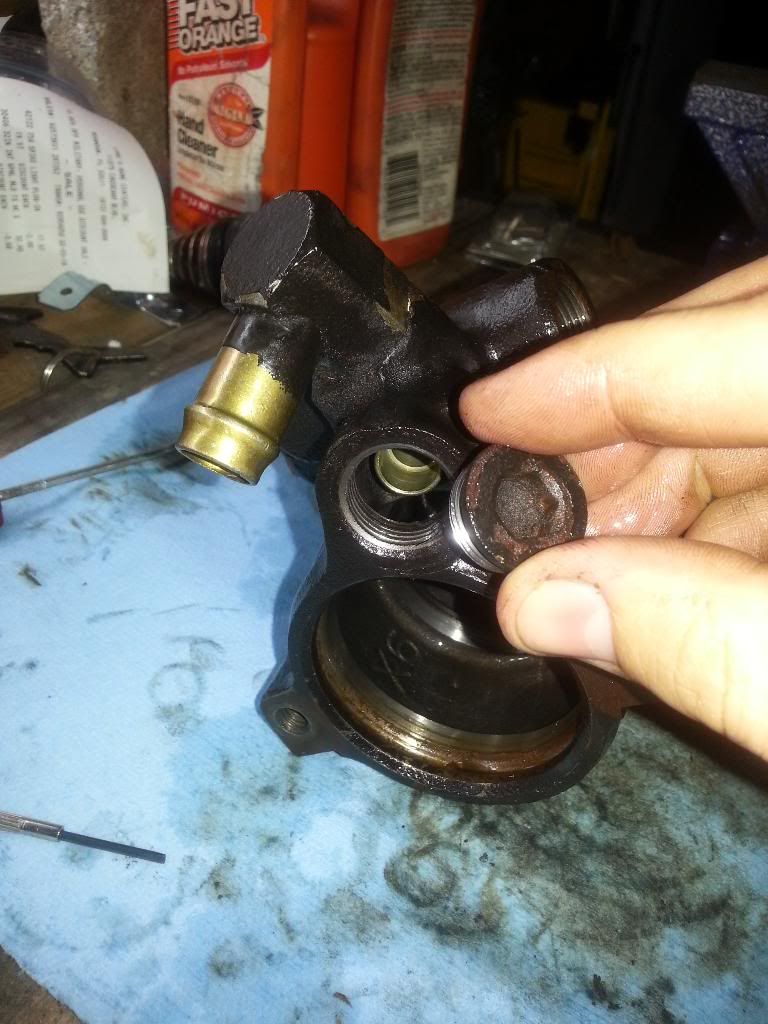
Remove the pressure relief valve assembly. This picture is misleading. The pressure relief valve does not rest in the plug; it is backwards. I threw it together for the picture and failed to realize my mistake. Whoops!
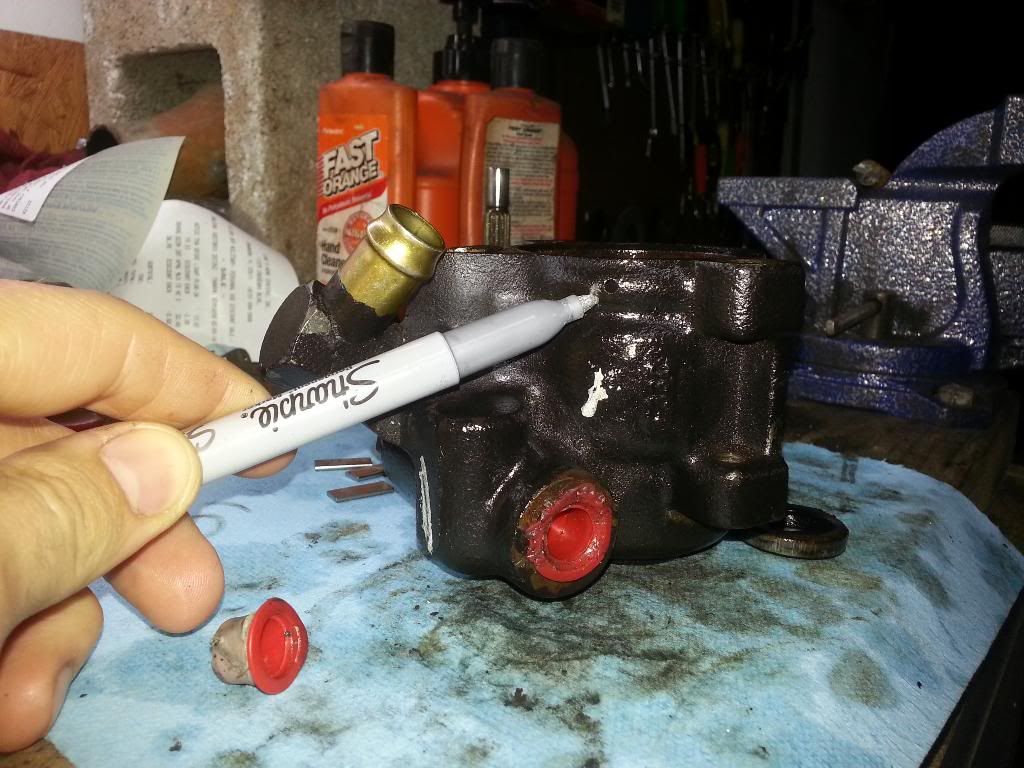
Remove the plug from the unused pressure switch port.
Phase I complete.
Phase II
-------
Dismantle the SD pump the same as above.
Here are the two cases side by side with the SD on the left and Explorer on the right. There are two cast pillars on the lower wall in the Explorer case and a single partial pillar on the SD.
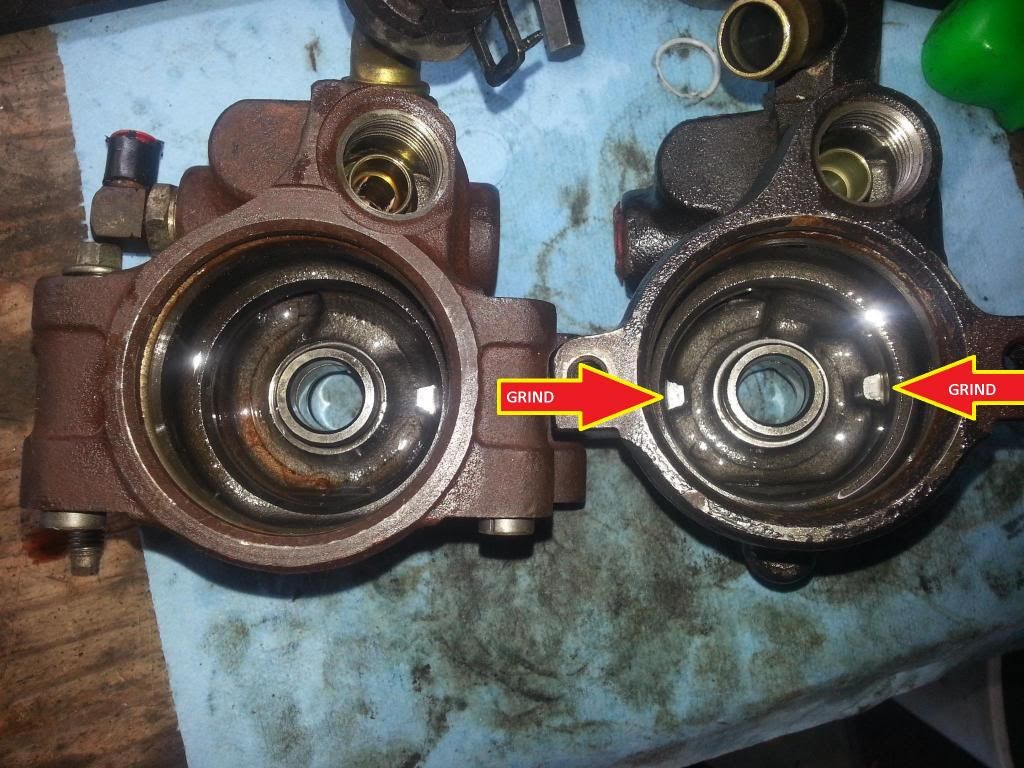
I used a Dremel to match the Explorer case to the SD case as much as possible.
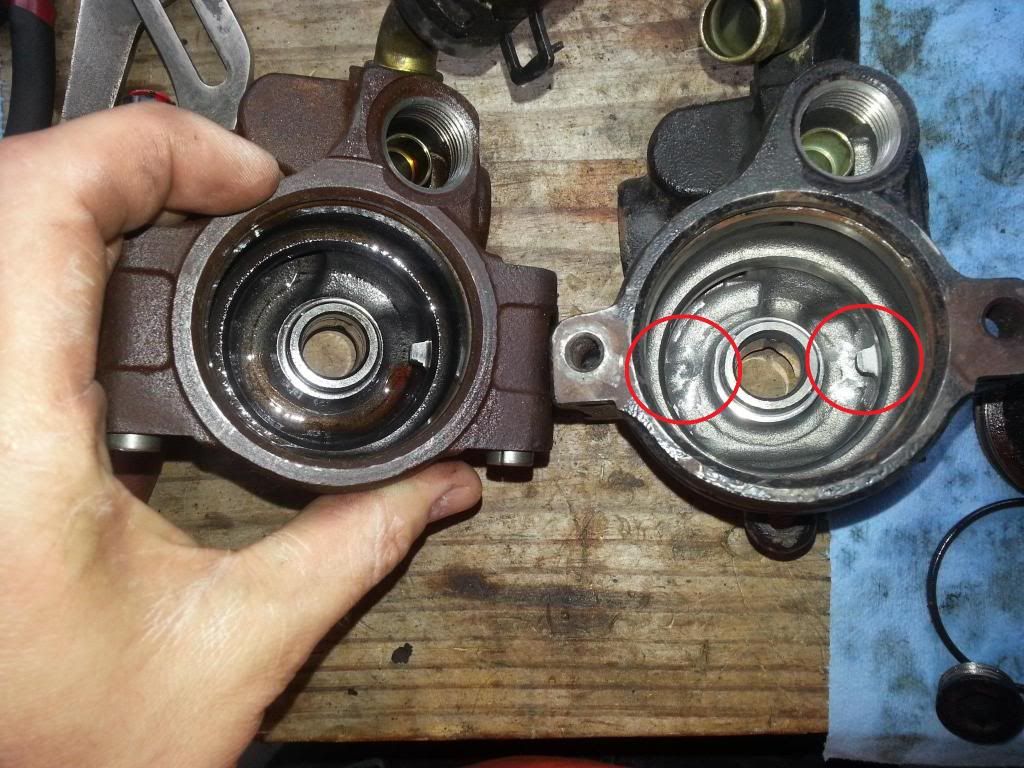
With the cases matched, I used brake cleaner and compressed air to evacuate all the contamination I introduced into the case.
Phase II complete.
Phase III
---------
Time to cram the SD guts into the Explorer housing. Installation is the reverse of removal. This is a great time to change all the seals.
A few items to note:
Make sure the convex side of the thrust washer is facing the thrust plate.
Lube all the seals.
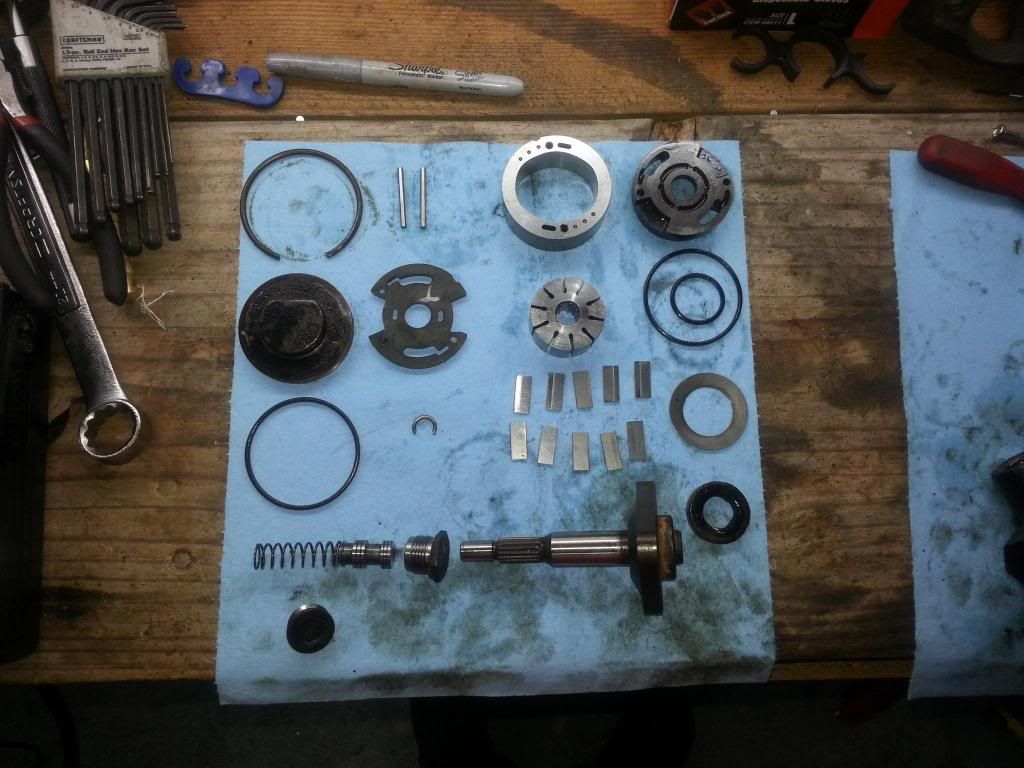
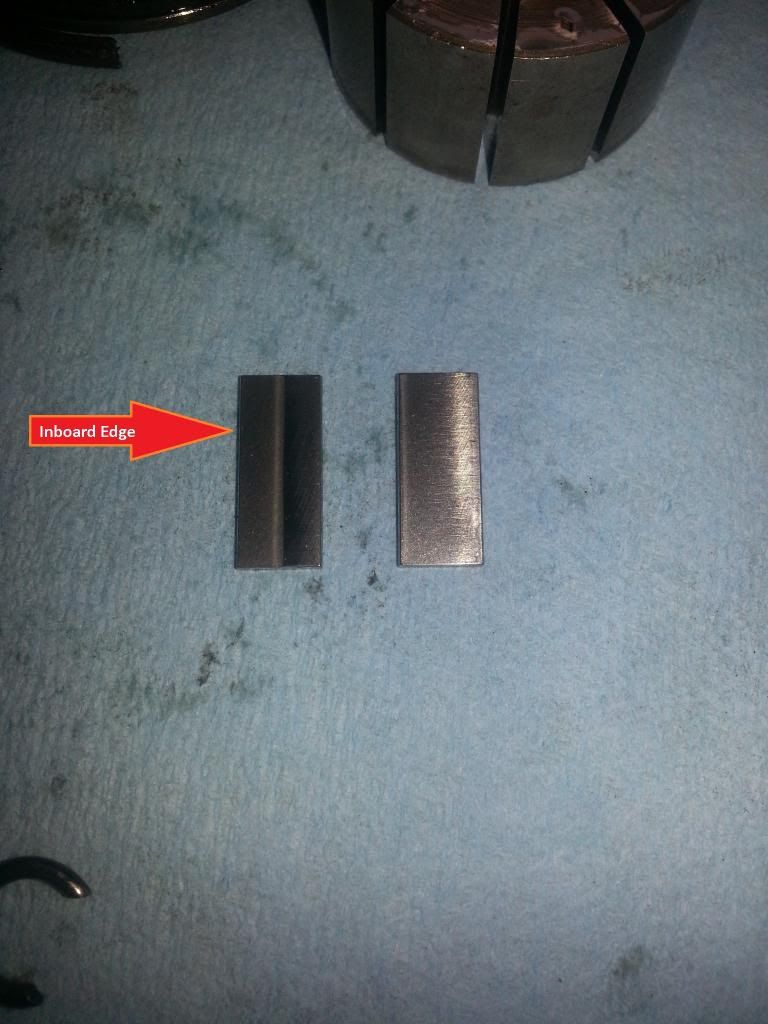
Ensure the vanes are installed properly if they fell out. The picture below shows how the vanes have a smooth side and a partial glazed side (caused by wear). With the rotor facing up (identify UP by the subset in the center for the snap ring). Place the vane at the 9 o'clock position with the double panel side facing you and the smooth side facing 12 o'clock. This is how they came out and is how they should go back in. The directions say to make sure the rounded edges are toward the cam ring but the edges of these vanes look the same on both sides in my opinion.
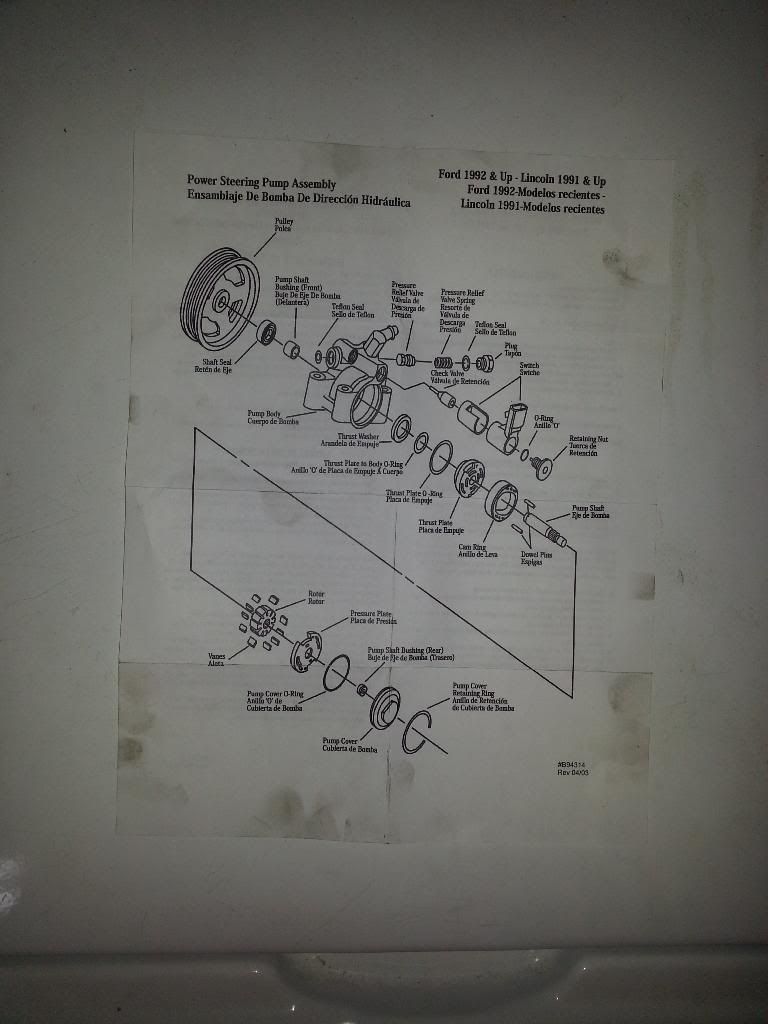
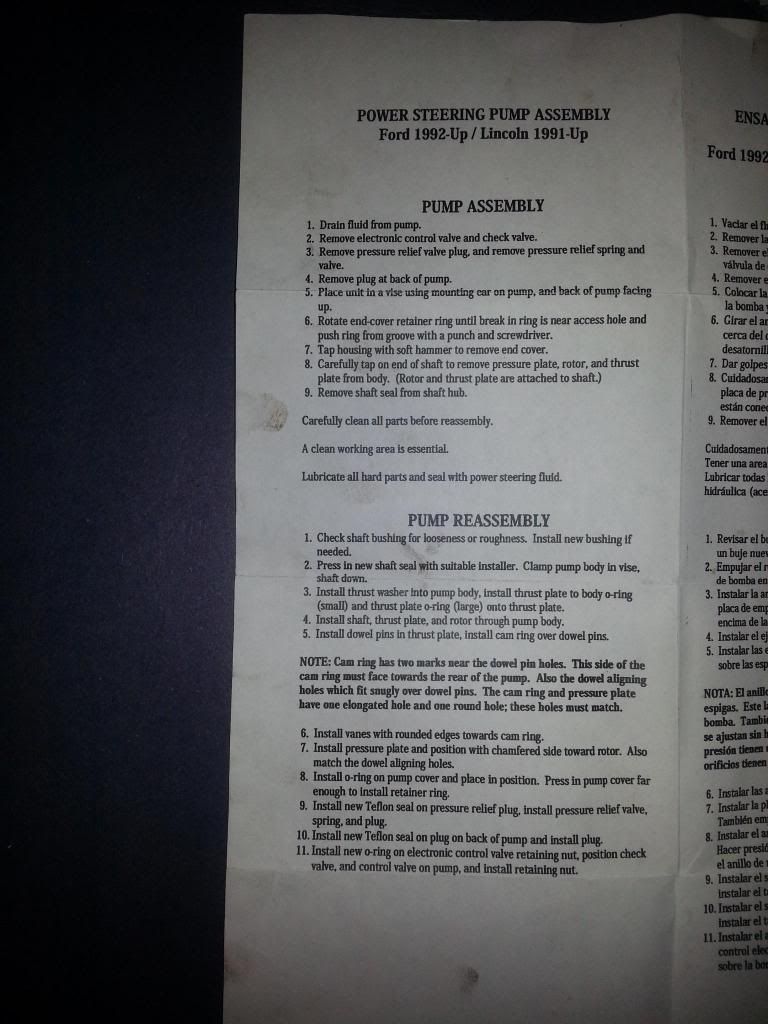
Here is an IPB and instruction sheet that came with the seals. Good for reference and sanity check.
Seal everything else back up and install.
Doneski.

Enjoy.
My research on the matter has yielded an array of potential options.
Some include:
1.) Reduce PS pulley ($75.00 from Drivenautoparts.com)
2.) Swap the crappy pressure adapter to a Lee's adapter (~$20 from Lee's Power Steering)
3.) Ditch the Explorer pump and replace it with a modified Saginaw pump and modified Explorer bracket. ($370 from Lee's)
4.) Send the Explorer pump off to Lee's and have them modify it for higher pressure/ flow for about $130.
So these sound like great options so what is my problem?
Well, I am not a fan of aluminum pulleys. They make my belt squeak!
The pressure adapter is a non-issue for me since I am running the stock Explorer pressure hose.
I am not made of $$$ because Uncle Sam is broke!
I seriously considered option 4 but the folks at Lee's convinced me that the modified pump would be maxed out with my setup and even then it would only put out about 1,600 PSI.
I recently stumbled upon a couple of old threads, here on classic, about the pump issue and found that some folks tried to stuff the internals from a 2004 F-350 Super Duty (6.0 diesel) into our Explorer pump housing. Just to be clear, this was not my idea. I am just gathering all the info into one place. I think Lars deserves all the credit. I would also like to add these numbers have not been personally verified so please feel free to provide your two cents for corrections.
Those threads are:
http://classicbroncos.com/forums/showthread.php?t=131835
and
http://classicbroncos.com/forums/showthread.php?t=189786
Lars successfully performed the swap with no issues and recorded 1,800 PSI (1,300 PSI was recorded prior to the modification) without having swapped the SD pressure relief assembly.
Scrapman1971 stated the SD pump flows at 3GPM vs the 1GPM of the Explorer. I have requested his source material for those numbers.
So, we have the ability to increase PSI and GPM with a little labor and roughly $50 in parts ($25 for pump and $25 for seal kit)? This is a no-brainer, right?
This is Lars's picture of the Explorer pump (left) and SD pump (right).
The case differences are obvious but look at the pump sizes. That is what Lars was aiming for.
During my modification experience I noticed that the guts looked almost identical between the SD and the explorer so I am unsure how this modification makes the increase in pressure and flow but then again, I am just a stupid pilot (glorified bus driver), not an engineer.
My results: Runs great. No leaks. I can finally turn the wheel with my pinky from stop to stop without any hesitation from the system. I still want to put it in 4-LO and get the wheels against an obstacle to see how well it does but the preliminary results are positive.
-----------------------------
-----------------------------
Parts List:
96-01 Explorer PS pump ($0 if already installed)
03-05 SD 6.0 diesel PS pump Ford P/N STP-102-RM ($25 at junk yard) I would recommend 2004 since they started using this pump in the second quarter of 2003. Not sure if there are some oddball variants out there.
Seal kit ($25 at NAPA NPS 7382)
Phase I
-------
Remove and drain the Explorer pump.
Remove the pulley.
Locate the retaining ring access hole and remove the retaining ring.

Before removing the back cover, I suggest cleaning the debris to prevent unnecessary contamination. Remove the back cover keeping in mind its crusty old O-ring may make it a little difficult.
Remove the pressure plate.
Remove the retaining ring on the shaft that retains the rotor and shaft but DO NOT remove shaft.
Reinstall the pressure plate. This will help to retain the rotor fins.

While holding the pressure plate in place, turn the pump upside down and allow the pressure plate, rotor, cam ring, and two dowel pins to slide out together. If the vanes fall out, no biggie. I will tell you how to reinstall them later.

Remove the shaft.
Remove the thrust plate and thrust washer. Notice the concave side of the thrust washer is facing the thrust plate.
Use a seal puller to pull the shaft seal from the front face if so desired.
Remove the pressure relief valve assembly. This picture is misleading. The pressure relief valve does not rest in the plug; it is backwards. I threw it together for the picture and failed to realize my mistake. Whoops!

Remove the plug from the unused pressure switch port.

Phase I complete.

Phase II
-------
Dismantle the SD pump the same as above.
Here are the two cases side by side with the SD on the left and Explorer on the right. There are two cast pillars on the lower wall in the Explorer case and a single partial pillar on the SD.

I used a Dremel to match the Explorer case to the SD case as much as possible.

With the cases matched, I used brake cleaner and compressed air to evacuate all the contamination I introduced into the case.
Phase II complete.
Phase III
---------
Time to cram the SD guts into the Explorer housing. Installation is the reverse of removal. This is a great time to change all the seals.
A few items to note:
Make sure the convex side of the thrust washer is facing the thrust plate.
Lube all the seals.
Ensure the vanes are installed properly if they fell out. The picture below shows how the vanes have a smooth side and a partial glazed side (caused by wear). With the rotor facing up (identify UP by the subset in the center for the snap ring). Place the vane at the 9 o'clock position with the double panel side facing you and the smooth side facing 12 o'clock. This is how they came out and is how they should go back in. The directions say to make sure the rounded edges are toward the cam ring but the edges of these vanes look the same on both sides in my opinion.

Here is an IPB and instruction sheet that came with the seals. Good for reference and sanity check.


Seal everything else back up and install.
Doneski.
Enjoy.
Last edited:
