• Welcome to ClassicBroncos! - You are currently viewing the forums as a GUEST. To take advantage of all the site features, please take a moment to register. It's fast, simple and absolutely free. So please join our community today!
    If you have problems registering or can't log into your account, please contact Admin.

Power Window Installation Q's and Tips

JaxLax

Bronco Guru
Joined
Apr 22, 2002
Messages
3,309
Loc.
Jacksonville, FL
I'm prepping to do the install of my BC Broncos power window kit and I've gone through the instructions and tried to make sure I've jumped every hurdle once so it will go smoothly.

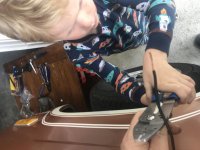
I want it to be easier/more planned out as when my 6 yo helps; I can't take on a bunch of side quests to solve issues that arise.

I've hit a potential stopping point and want to see if anyone else has dealt with this.
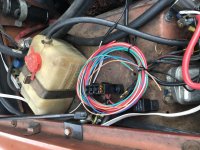
On step 8 of the instructions (this link opens their pdf) it says to fish the wire through the opening behind the dash in the kick panel.

I've jammed my hand up on the drivers side and located the opening!

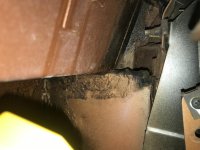
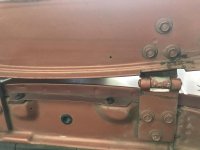
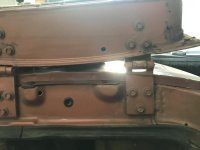
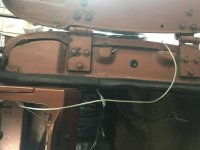
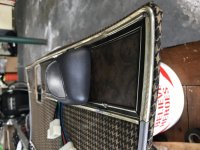
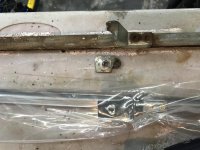
The issue is that the passenger side does not have the same hole? Or it feels like it has been filled? I did not remove the glove box, but I was able to get my fingers visible between the dash/kick panel/door gasket to confirm where I was in the world and then moved over and found the same point where the hole through the kick panel is, but where the drivers I could bend my finger down and into the pillar, the top of the passenger side is solid/bent over?

Am I just missing the spot since I can't bend in the proper way? Could it be capped off?

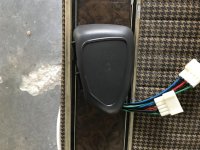
I'd like to keep the wiring inside the jamb for cleanliness, but coming out and along the strap isn't awful. Adding some velcro to the wires to keep them in or using WH "new" hidden strap (something like Mitch did in this video). I'm not a big fan of the push pins/interrupts for the doors, so the wiring will be put into loom.

OR I guess if it is capped, I could remove the glove box and drill a hole as high up in the jamb (behind/hidden by the dash) and go that route, but I'm not trying to add too much time and effort to the install already.

I will be replacing all the felts and channels along with this install (and spraying cleaner and then coating the latch gears with silicon) so this will be an all weekend job with a 6 yo in tow.

If anyone has a thought or dealt with this type of problem before; I'd love to hear how you solved it.
 
OP
OP
JaxLax

JaxLax

Bronco Guru
Joined
Apr 22, 2002
Messages
3,309
Loc.
Jacksonville, FL
Well, I spent about 4 hours today getting things prepped for the boy and I tomorrow.

Looks like the felts and other window parts aren't going to make it here by the weekend, so the full install of the windows will have to wait until then.

But today I was able to drill the holes in the doors and pillars for the wire routing and got some place holder snake (random 18 awg wires around the garage) in on both sides. So at least that 3 hour fight won't have to be repeated with the boy in tow.

A TIP! For those of you having issues fishing the wires through, I ended up taking a coat hanger and cutting/bending it straight and using that to fish through initially. I was trouble getting it to the hole, so I'd pull it out and do some small bends at a time. But the real hint for me was to REMOVE THE TWO FENDER BOLTS. Both times I got stuck/jammed against them and/or the lower one wouldn't allow me to tilt/twist the line to get the point to move. I also ended up removing the glove box. It made the access to the hole and such infinitely easier.

Once I broke down and did those two things, both went in about 30 minutes total.

I also got the auxiliary fuse panel mounted, but stopped there since I want the boy to have the opportunity to cut/terminate the wires as that's one of the few things that he can do easily.

So tomorrow (Saturday) I'm hoping he and I can:
1. get the Aux panel fully wired up (the hot wire and the battery power)
2. get the A/C moved off the battery terminal and into the 1st slot of the aux panel (30 amp fuse)
3. move the radio hot power to the middle slot in the panel (20 amp even though the radio has a built in one at the unit).
4. mount the new tachometer
5. drill the hole in the column cover for tach wires and connect all, but coil wire (to the same radio position 2nd in the aux panel)
6. if there's time we'll put in the dash/power section of the windows and get it hooked to the 3rd position (30 amp) and leave the connectors hanging

If we can pull off those 6 things, then we'll have a good setup ready.

Then next weekend would be:
1. remove all window parts
2. while I alter the panels and install the pods; have the boy spray clean and silicone the latch gears inside and out and test them
3. install the new channels/felts/tracks where needed
4. install new electric motors
5. fish wires out doors to body and have the boy connect the pins while I change sides
6. test operations and reinstall door trim

I'd be happy there.
I've still got two small things to button up that will be delivered on Monday
1. new coil harness will need tach wire attached for operation
2. add nuts to the side emblems
 

Attachments

  • 3CB52247-DE6A-438A-9DA9-35A0EC36F569.jpg
    3CB52247-DE6A-438A-9DA9-35A0EC36F569.jpg
    97.2 KB · Views: 92
  • FF275F59-C6F8-4ECB-9632-642F52D1C664.jpg
    FF275F59-C6F8-4ECB-9632-642F52D1C664.jpg
    55.2 KB · Views: 94
  • 8344866C-3682-4C21-BA00-2E2474BFFC16.jpg
    8344866C-3682-4C21-BA00-2E2474BFFC16.jpg
    55.2 KB · Views: 89
  • D626AE2D-6EE5-4E8D-A412-F9931F4BCE40.jpg
    D626AE2D-6EE5-4E8D-A412-F9931F4BCE40.jpg
    60.5 KB · Views: 94
  • CC44C9C6-9CFE-4C88-BCC7-536E0FB4DE36.jpg
    CC44C9C6-9CFE-4C88-BCC7-536E0FB4DE36.jpg
    126.9 KB · Views: 93
Last edited:
OP
OP
JaxLax

JaxLax

Bronco Guru
Joined
Apr 22, 2002
Messages
3,309
Loc.
Jacksonville, FL
The boy does good work when he keeps his interest.

We got it all done AND he did the majority of the work!
He wasn’t keen on using the torch for the heat shrink and needed help clamping/stripping a few things, but all in all it’s all his work.

Removed and added hole to the column cover. Then the wires through and ran them into the bay and reinstalled it all after clamping the tech down.

Then we got the ign hot relay and panel fully wired.
Swapped the AC circuit from battery hot to a new 30 amp fused circuit and tested.
Then moved the radio hot and doubled it with the tach in circuit two and tested both for function.
Then wired up the power window power and ground to the 3rd circuit (no fuse yet since the wiring isn’t done). We got the behind the dash window wiring in too.
Then did somelooming to clean up all the new wires and just make it look better since we were done in the engine compartment.

Should get the rest of the parts on Monday!
Next weekend will be installing the window motors, cleaning and lubing the door latches, installing new felts and channels too.

Hopefully we’ll have another nice day and solid attention span.
 

Attachments

  • 4440A7E3-BBA8-40D7-B089-F742F07FA7C5.jpg
    4440A7E3-BBA8-40D7-B089-F742F07FA7C5.jpg
    87.1 KB · Views: 97
  • EDEBD84C-75F7-476D-A2D7-7C375476C73A.jpg
    EDEBD84C-75F7-476D-A2D7-7C375476C73A.jpg
    102.1 KB · Views: 98

LUBr LuvR

Contributor
Bronco Guru
Joined
Dec 31, 2015
Messages
1,968
That’s some awesome stuff right there, making memories and having your son learn life skills. Heck if it doesn’t involve swiping on a screen most teens can’t pay attention for more than a few minutes. I bet he’s awful proud to say he’s helping his Dad build a Bronco!
 
OP
OP
JaxLax

JaxLax

Bronco Guru
Joined
Apr 22, 2002
Messages
3,309
Loc.
Jacksonville, FL
Kids were gone so I spent a little time finishing up some quick stuff and, like before, getting some of the pre-work/menial tasks done to keep his interest.

I installed a new coil pigtail (no more alligator clips!) since the boy can't reach back there and I doubt he'd want to use the torch next to the carb.

Then I went ahead and removed the door panels to install/setup the switch pods.

I do have some issues with the BCB kit on the pods. I understand that they are probably personal issues, but I want to make sure others are aware of them if you are trying to install yours under the same circumstances.

The issues: the pods are too big for a stock panel to sit flush AND the enclosed screws are too short if you mount them in a stock panel.

I understand that both issues are negated if you have non-stock panels (probably the metal ones) that are single depth/more rigid.

I've added some photos below of what I did for the pods. I did not have a diagram F2 (from the instructions), so I made my own template for the holes/positioning. I did my best to balance/level it in panel, but the edges sit on top of the edges above the leather. I'm not happy or upset, just the way it is. In the future I'll probably go to some different switches when I pull everything apart in a few years, so this is sufficient for now. And for all I know, I'll end up not noticing it once the panels give and settle a little under the pressure..

And for the short screws you could either source some longer ones or (as I did) clear some space off the back of the panel. Again, not happy or upset. I didn't want to remove too much and give up panel integrity and I didn't want to have to source other parts. But as these panels will someday be replaced, the loss of less than a square inch of panel won't really ruin the structure and it gets the job done.

But once I got those off I was able to double check the condition of the tracks and, of course, the one that sticks had a mount broken off and the other side was missing a bolt %). So I'll go out and source another bolt at Lowes today and now I'm extra happy I decided to replace all the tracks anyways so I'm not out here waiting for that to be shipped!

Hopefully today I'll get home early and the boy and I can get the lower tracks out and let him start on cleaning the door latches. Just try to get as much done as we can since he has a baseball game tomorrow and that will all but kill the day (not enough time to work since it takes an hour or so to get going/clean up).
 

Attachments

  • AB131C2F-AA59-43EB-8320-BC0C0F54A0D5.jpg
    AB131C2F-AA59-43EB-8320-BC0C0F54A0D5.jpg
    130.6 KB · Views: 60
  • 61D6E91D-8E24-4671-9EEC-8592A9BE32BB.jpg
    61D6E91D-8E24-4671-9EEC-8592A9BE32BB.jpg
    194 KB · Views: 59
  • 92240962-17F1-4C82-9C87-2AFC381871E8.jpg
    92240962-17F1-4C82-9C87-2AFC381871E8.jpg
    155 KB · Views: 62
  • EDA825E6-F00D-4493-92E2-2A86980DA7D4.jpg
    EDA825E6-F00D-4493-92E2-2A86980DA7D4.jpg
    131.2 KB · Views: 60
  • B33201A9-B73D-4DCB-8AED-20FF549CE51F.jpg
    B33201A9-B73D-4DCB-8AED-20FF549CE51F.jpg
    94.9 KB · Views: 65
  • 4B756796-C19C-4C60-A39D-4FF27FC4777C.jpg
    4B756796-C19C-4C60-A39D-4FF27FC4777C.jpg
    107 KB · Views: 61
Last edited:
OP
OP
JaxLax

JaxLax

Bronco Guru
Joined
Apr 22, 2002
Messages
3,309
Loc.
Jacksonville, FL
Well I’m only hitting more snags and issues along the way.
How are you supposed to get the switch wiring back into the doors if the new electric motor covers the old crank hole?
Am I going to have to loosen them and hold/hang the door panel while I finish the install?
Cut an access panel?

This is becoming an exercise in futility. I thought kits like this were supposed to make it easier?
 

Attachments

  • 13483419-F206-41D0-8BB0-89AB3B4C10A1.jpg
    13483419-F206-41D0-8BB0-89AB3B4C10A1.jpg
    105 KB · Views: 44
OP
OP
JaxLax

JaxLax

Bronco Guru
Joined
Apr 22, 2002
Messages
3,309
Loc.
Jacksonville, FL
They're in.

Final verdicts:
TBP 12 piece felts: Awesome. Fit nice. Had an argument with the rubber trim L-piece when some of the edge/sealer pushed out over the trim. But it'll wear/fall off soon.

If you're going that far, take the time to remove/clean/grease up your latches and the inner rods. Added an extra hour or two (the boy doesn't work real fast and I still gave them a final once over when he wasn't looking), but the result of doors that close with a hip tap and basically jump off the striker is worth it.

BCB Window kit: Conflicted. Everything works, but the instructions and fit/finish aren't what I was hoping for. To end on a high note, I'll go with issues first.
The bad: Instructions lack a few points on steps, mine did not include the pod mount diagram, or omit things. The switch pods are larger than the flat leather opening on a stock panel. I understand that these are a universal pod, but why not include one that doesn't over lap the trim edges? If you have an aftermarket panel, it's not an issue. The screws for the pods are too short for some of the mounting options. You can see above the solution, but again, a non-stock panel may not have this issue. I did not like having to mount the pods to the panel and pass the wire connection through the interstitial space between the motor and door. Then while finishing up and buttoning up the panel is just hanging there in the way.
The good: wiring loom and clips were nice.

But it's in. It's working. Time will tell if it was fully worth it.
 

LSUpete

Contributor
Bronco Guru
Joined
Jul 11, 2001
Messages
2,060
Any chance you could upload those additional photos now?
 

LSUpete

Contributor
Bronco Guru
Joined
Jul 11, 2001
Messages
2,060
What do you want to see specifically?
Just a few shots of the final install product.

Whatever bridges the gap between your last posted photo and the completed project.
 
OP
OP
JaxLax

JaxLax

Bronco Guru
Joined
Apr 22, 2002
Messages
3,309
Loc.
Jacksonville, FL
Been in for a little over a month and getting plenty of usage (it's already 85F here in the afternoons).

Ok, this is one of the best mods I've done beyond the hood/lift gate shocks.
Just makes everything easier. Getting in and not having to either walk around and crank the other side or reach through the cab; sometimes you don't realize how simple this makes things. Also, the boy can't break the switch like he could the cranks.

Huge props to the TBP 12 piece kit. They're great and went in smooth and helped to seal the doors better than my dried out and broken off pieces.

The installation (for me) was frustrating as I had issues with the fishing the wires for the harness and the motor, but looking back; it's been worth it. The motors work well and the pods have settled into the door panels.

Let me know if there's anything that you guys want to know or see and I'll try to help you out.
 

Attachments

  • 7EB0D525-E611-43E6-B548-84D97D19D0EE.jpg
    7EB0D525-E611-43E6-B548-84D97D19D0EE.jpg
    102.4 KB · Views: 38
  • 9FA27BF7-27A8-4FFA-98F0-8BFF45B0A43F.jpg
    9FA27BF7-27A8-4FFA-98F0-8BFF45B0A43F.jpg
    74.2 KB · Views: 39
  • 0043D529-E58A-40D2-823E-3E3C0BE959BD.jpg
    0043D529-E58A-40D2-823E-3E3C0BE959BD.jpg
    93.3 KB · Views: 40
  • 610D17B1-5778-42AD-9AF5-C2435915632E.jpg
    610D17B1-5778-42AD-9AF5-C2435915632E.jpg
    141.4 KB · Views: 37
  • 01083749-48E4-4FE0-B72F-6CFC2A49D60F.jpg
    01083749-48E4-4FE0-B72F-6CFC2A49D60F.jpg
    112.5 KB · Views: 37
  • 8039392B-79F6-4A61-80AF-3C606FF36F51.jpg
    8039392B-79F6-4A61-80AF-3C606FF36F51.jpg
    91.6 KB · Views: 33
Top