• Welcome to ClassicBroncos! - You are currently viewing the forums as a GUEST. To take advantage of all the site features, please take a moment to register. It's fast, simple and absolutely free. So please join our community today!
    If you have problems registering or can't log into your account, please contact Admin.

Granpa's Bronco Build Thread

simmsjeremy

Sr. Member
Joined
Jul 7, 2013
Messages
392
Loc.
Cherry Point
I've been on my build for some time now, to be a bit more specific about six years. I figured now would be a good time to start my own build thread. I think I have come to a point in my build where I have made some pretty good progress but still have much to do and a lot more to learn. I hope you all enjoy.

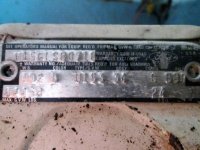
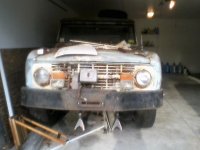
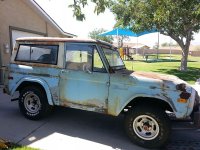
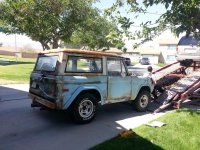
Well I guess we could start with the back story. My Grandfather owned the Bronco for as far back as I can remember. He was the second owner. Bought it off of a gentlemen who owned a cattle ranch in Ocala, Fl. My whole life was pretty rough. Stereotypical broken home to the extreme kind of story. But one of the most positive things I can remember as a child was time spent with my Grandfather. He was the only male figure I ever had growing up. So many good stories relate to the times we would take the Bronco to Georgia on hunting and fishing trips. As I got older my Grandfather parked it and there it stayed under a rusted/ dilapidated tin roof for years. It wasn't till after I had left home, became a Marine, and deployed for the first time to Iraq oh yeah and probably like the millionth time asking to have the Bronco that hey finally submitted to the idea of parting with it even though he hadn't done anything with it in years.

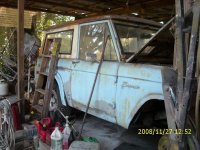
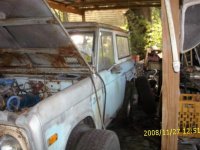
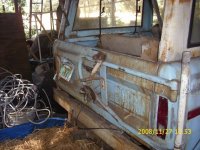
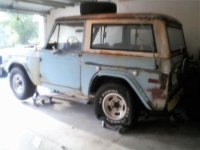
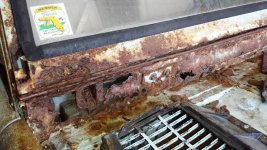
So the year is now 2007 and the Bronco is finally mine. " What the hell do I do now?" I've never worked on cars, new nothing about what it takes to get into the level of requirements I had just submitted myself to. The most I was really confident on at this point was how to change a tire, change the oil, and maybe do some brake work. So little did I know what was to come and how much knowledge I have gained to date. So even after purchasing the Bronco in 07 it wasn't till 2013 that I finally got around to doing something with it. The first action I did was get into cover because at this point it was still sitting in the same spot my Grandfather had parked it so many years ago. At the time I was stationed in California so while home on leave I had a tow company move it to my Mother-in-law's house. There she had an empty garage that would at least get it out of the elements because the rust was getting extensive at this point.

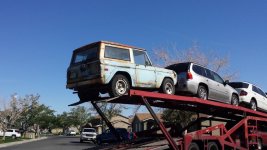
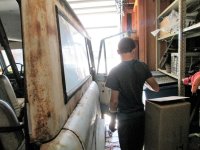
About a year later I finally made an impulsive choice to have the Bronco shipped to California so that I can finally do something with it. I posted in U-Ship It to try and score a bid for a transport company to move it from Ocala, Fl all the way to 29 Palms, CA. Needless to say it sat for over a month with no takers. Turns out people do not want to deal with a car that cant start, stop, or even roll lol. So $1,200 bucks later she finally arrives. Let me tell you this guy that brought me the Bronco, guy was an amazing driver and patient as hell to. Came all the way from Miami. Pulled his rig on base flipped it around in a culdesac with cars parked in the street and backed his trailer right up to the garage. I told him just drop it in the drive way and I will figure out a way to get it into the garage, but he was persistent and adamant that he was going to help me get in the garage before he left. What a great guy.

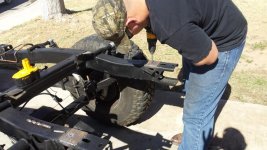
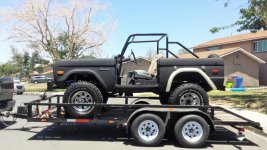
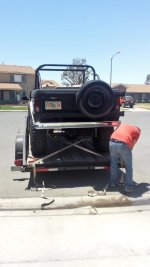
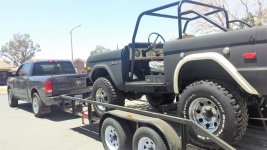
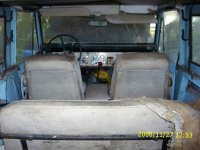
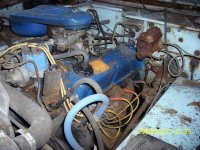
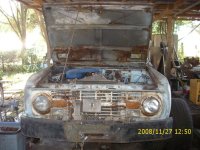
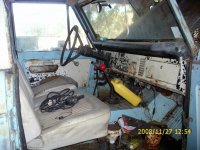
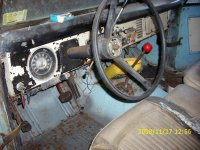
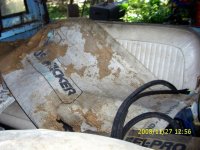
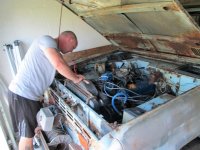
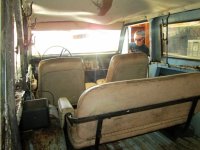
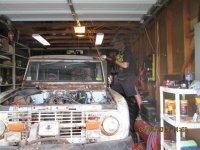
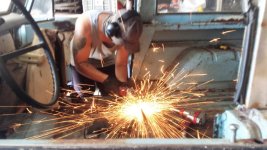
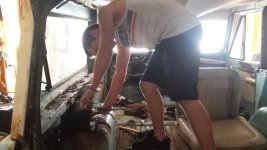
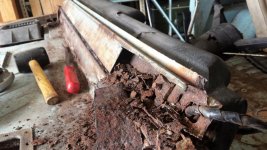
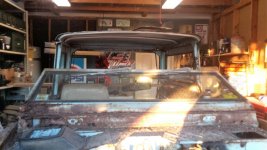
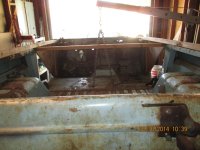
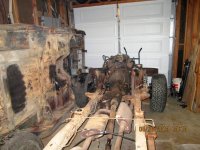
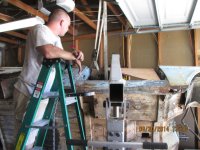
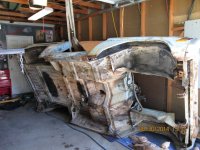
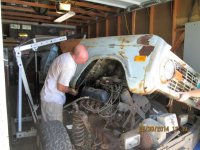
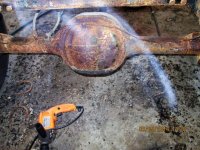
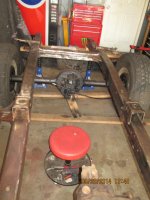
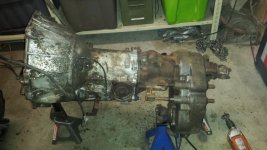
So here we are 2014 and the build begins. So I will stop running my suck and start posting some visual aids. If you're still reading thank you for your interest in my story and once again I hope you enjoy this thread.
 
OP
OP
simmsjeremy

simmsjeremy

Sr. Member
Joined
Jul 7, 2013
Messages
392
Loc.
Cherry Point
So here are the photos I took after purchasing it in 07.
 

Attachments

  • 1 - Vin Tag.jpg
    1 - Vin Tag.jpg
    106.8 KB · Views: 84
  • 2008 - Nanas House Ocala, FL (20081127) 1.jpg
    2008 - Nanas House Ocala, FL (20081127) 1.jpg
    116.3 KB · Views: 105
  • 2008 - Nanas House Ocala, FL (20081127) 2.jpg
    2008 - Nanas House Ocala, FL (20081127) 2.jpg
    90.4 KB · Views: 97
  • 2008 - Nanas House Ocala, FL (20081127) 3.jpg
    2008 - Nanas House Ocala, FL (20081127) 3.jpg
    79.3 KB · Views: 91
  • 2008 - Nanas House Ocala, FL (20081127) 4.jpg
    2008 - Nanas House Ocala, FL (20081127) 4.jpg
    137.4 KB · Views: 87
  • 2008 - Nanas House Ocala, FL (20081127) 5.jpg
    2008 - Nanas House Ocala, FL (20081127) 5.jpg
    83.3 KB · Views: 85
  • 2008 - Nanas House Ocala, FL (20081127) 12.jpg
    2008 - Nanas House Ocala, FL (20081127) 12.jpg
    159.8 KB · Views: 86
  • 2008 - Nanas House Ocala, FL (20081127) 9.jpg
    2008 - Nanas House Ocala, FL (20081127) 9.jpg
    130.5 KB · Views: 85
  • 2008 - Nanas House Ocala, FL (20081127) 8.jpg
    2008 - Nanas House Ocala, FL (20081127) 8.jpg
    138.7 KB · Views: 84
  • 2008 - Nanas House Ocala, FL (20081127) 7.jpg
    2008 - Nanas House Ocala, FL (20081127) 7.jpg
    147.4 KB · Views: 82
  • 2008 - Nanas House Ocala, FL (20081127) 6.jpg
    2008 - Nanas House Ocala, FL (20081127) 6.jpg
    109 KB · Views: 80
OP
OP
simmsjeremy

simmsjeremy

Sr. Member
Joined
Jul 7, 2013
Messages
392
Loc.
Cherry Point
Moving it to Mother-in-law's garage. Finally out of the elements.
 

Attachments

  • 2013 - Janets House Belleview, FL (20130705) 1.jpg
    2013 - Janets House Belleview, FL (20130705) 1.jpg
    57.4 KB · Views: 77
  • 2013 - Janets House Belleview, FL (20130705) 3.jpg
    2013 - Janets House Belleview, FL (20130705) 3.jpg
    110.3 KB · Views: 91
  • 2013 - Janets House Belleview, FL (20130705) 5.jpg
    2013 - Janets House Belleview, FL (20130705) 5.jpg
    80.7 KB · Views: 68
OP
OP
simmsjeremy

simmsjeremy

Sr. Member
Joined
Jul 7, 2013
Messages
392
Loc.
Cherry Point
Arriving in California.
 

Attachments

  • 2014 - Arriving in 29 Palms, California (20140429) 4.jpg
    2014 - Arriving in 29 Palms, California (20140429) 4.jpg
    264.7 KB · Views: 62
  • 2014 - Arriving in 29 Palms, California (20140429) 3.jpg
    2014 - Arriving in 29 Palms, California (20140429) 3.jpg
    188.8 KB · Views: 57
  • 2014 - Arriving in 29 Palms, California (20140429) 2.jpg
    2014 - Arriving in 29 Palms, California (20140429) 2.jpg
    271.1 KB · Views: 58
  • 2014 - Arriving in 29 Palms, California (20140429) 1.jpg
    2014 - Arriving in 29 Palms, California (20140429) 1.jpg
    86.9 KB · Views: 64
OP
OP
simmsjeremy

simmsjeremy

Sr. Member
Joined
Jul 7, 2013
Messages
392
Loc.
Cherry Point
Did I mention my garage in Cali was a single car garage lol? Yeah that makes the initial part of my build that much more exciting IMO.
 

Attachments

  • 2014 - Arriving in 29 Palms, California (20140429) 9.jpg
    2014 - Arriving in 29 Palms, California (20140429) 9.jpg
    137.7 KB · Views: 80
  • 2014 - Arriving in 29 Palms, California (20140429) 8.jpg
    2014 - Arriving in 29 Palms, California (20140429) 8.jpg
    96.2 KB · Views: 67
  • 2014 - Arriving in 29 Palms, California (20140429) 7.jpg
    2014 - Arriving in 29 Palms, California (20140429) 7.jpg
    109.3 KB · Views: 72
  • 2014 - Arriving in 29 Palms, California (20140429) 6.jpg
    2014 - Arriving in 29 Palms, California (20140429) 6.jpg
    98.6 KB · Views: 69
  • 2014 - Arriving in 29 Palms, California (20140429) 5.jpg
    2014 - Arriving in 29 Palms, California (20140429) 5.jpg
    133.2 KB · Views: 70
OP
OP
simmsjeremy

simmsjeremy

Sr. Member
Joined
Jul 7, 2013
Messages
392
Loc.
Cherry Point
So now we are all caught up on the story line. So the next venture was to figure out what was required to get this on the road. My initial thought was "okay change the fluids, battery, brakes, and a new fuel tank." Ha that was a joke and very short lived planned. No sooner than I started turning the wrench this feeling of " I can do so much more" sets in and things escalated very quickly. Stay tuned...
 

Justafordguy

Contributor
Bronco Guru
Joined
Sep 26, 2009
Messages
6,253
Great story, thanks for sharing. I can't wait to see your progress.
 

Howard2x4x4

Contributor
Bronco Guru
Joined
Apr 19, 2014
Messages
2,300
Double big yappers on keepin' that ball rollin' and gettin' that Bronc back on its hooves, or feet or tires or whatever! Love your pic, btw.
 
OP
OP
simmsjeremy

simmsjeremy

Sr. Member
Joined
Jul 7, 2013
Messages
392
Loc.
Cherry Point
Okay so we have set the stage for the build but before I continue on and potentially loose vital information to my readers I want to ensure I get a few points across that I personally discovered while taking on this project and hopefully it helps someone else out who may be in similar shoes as I was/am.

1) Have a plan but don't fall in love with it because it's going to change and then change again.
2) Utilize and rely on your sources heavily. I use CB, youtube, Hanes, Chilton, and old shop manuals. Between all of these your are sure to learn a lot
3) Build a budget. I think this one is probably the most key. I didn't really establish a budget until a few years ago and I have to say it was probably one of my greatest limiting factors of progression. My assumption was "I will throw extra money at when I get a chance." That would actually leave me sometimes with months to even a year of little to no progression. Additionally it doesn't need to be anything extravagant. To get on task and keep me on task I created a separate account in which each pay cycle I would deposit $150.00 bucks, and that has been doing me pretty well. I also built an excel document to track all my spending. This is something really cool IMO because it shows the cost of every part from sheet metal to bolt and tracks where you got it from, part number, taxes, and shipping. The end state shows you exactly how you spend on everything and what your running total is.
4) Saved the best for last. Because I wasn't mechanically inclined going into the build I relied heavily on what the people on this forum would tell me to do. Me being cheap and stubborn I would take what they would say and try and figure out where I could cut corners due to knowledge, experience, and financial shortfalls. Let me say this, don't do that. My Grandfather always taught me a moto growing up and I feel bad for not abiding by this and it is simple. " Any job worth doing is worth doing it right, so do it right the first time so you don't have to do it again." Well needless to say I learned that lesson the hard way and have and continue to have to go back and redo jobs that I may have presumed was complete but actually were not.
 
OP
OP
simmsjeremy

simmsjeremy

Sr. Member
Joined
Jul 7, 2013
Messages
392
Loc.
Cherry Point
So back to the build. So step one as mentioned before was fluids, brakes, and fuel tank. Here are some pictures for your viewing pleasure.
 

Attachments

  • 2014 - Front End Rebuild [Differental Gears] (20140520) 2.jpg
    2014 - Front End Rebuild [Differental Gears] (20140520) 2.jpg
    68 KB · Views: 53
  • 2014 - Fuel System (20140520) [Main Tank] {13 Gallon} 9.jpg
    2014 - Fuel System (20140520) [Main Tank] {13 Gallon} 9.jpg
    94 KB · Views: 51
  • 2014 - Fuel System [Sending Unit] (20150303) {Main} 18.jpg
    2014 - Fuel System [Sending Unit] (20150303) {Main} 18.jpg
    55.7 KB · Views: 47
  • 2014 - Brake Overhaul (20140509) [Rear Axle] 25.jpg
    2014 - Brake Overhaul (20140509) [Rear Axle] 25.jpg
    83 KB · Views: 47
OP
OP
simmsjeremy

simmsjeremy

Sr. Member
Joined
Jul 7, 2013
Messages
392
Loc.
Cherry Point
As mentioned before, as soon as I began wrenching on stuff I had this overwhelming feeling that what I was currently doing wasn't enough and that if I could do what I this then I can do that so on and so forth. So now things pick up. So I immediately move to replacing all the steering components.
 

Attachments

  • 2014 - Front End Rebuild [Ball Joints] (20140531) 2.jpg
    2014 - Front End Rebuild [Ball Joints] (20140531) 2.jpg
    85.3 KB · Views: 50
  • 2014 - Front End Rebuild [Steering Knuckle] (20140519) 3.jpg
    2014 - Front End Rebuild [Steering Knuckle] (20140519) 3.jpg
    84 KB · Views: 41
  • 2014 - Front End Rebuild [Ball Joints] (20140531) 8.jpg
    2014 - Front End Rebuild [Ball Joints] (20140531) 8.jpg
    117.3 KB · Views: 43
  • 2014 - Front End Rebuild [Steering Linkage] (20140519) 1.jpg
    2014 - Front End Rebuild [Steering Linkage] (20140519) 1.jpg
    119.8 KB · Views: 41
  • 2014 - Front End Rebuild [Steering Linkage] (20140609) 16.jpg
    2014 - Front End Rebuild [Steering Linkage] (20140609) 16.jpg
    107.8 KB · Views: 39
OP
OP
simmsjeremy

simmsjeremy

Sr. Member
Joined
Jul 7, 2013
Messages
392
Loc.
Cherry Point
After completing that project I thought to myself " man I can do anything" ha...oh boy... So all these new parts mixing with this old crusty metal didn't jive with me. I needed everything to be clean and new looking. So then I began a tear down. I had made the decision I was going to do a full frame off restoration, with no experience mind you and in a single car garage.

*WARNING*
The photos you are about to see may disturbing to some...
 

Attachments

  • 2014 - Teardown (20140803) 6.jpg
    2014 - Teardown (20140803) 6.jpg
    127 KB · Views: 61
  • 2014 - Teardown (20140718) 5.jpg
    2014 - Teardown (20140718) 5.jpg
    91.1 KB · Views: 60
  • 2014 - Teardown (20140718) 1.jpg
    2014 - Teardown (20140718) 1.jpg
    64.6 KB · Views: 57
  • 2014 - Windshield Frame (20140825) 8.jpg
    2014 - Windshield Frame (20140825) 8.jpg
    112.6 KB · Views: 54
  • 2014 - Teardown (20140807) 12.jpg
    2014 - Teardown (20140807) 12.jpg
    80.1 KB · Views: 52
  • 2014 - Teardown (20140830) 26.jpg
    2014 - Teardown (20140830) 26.jpg
    89.6 KB · Views: 51
  • 2014 - Teardown (20140830) 60.jpg
    2014 - Teardown (20140830) 60.jpg
    123.8 KB · Views: 53
  • 2014 - Teardown (20140830) 58.jpg
    2014 - Teardown (20140830) 58.jpg
    103.9 KB · Views: 58
  • 2014 - Teardown (20140830) 55.jpg
    2014 - Teardown (20140830) 55.jpg
    115.4 KB · Views: 54
  • 2014 - Teardown (20140830) 52.jpg
    2014 - Teardown (20140830) 52.jpg
    130.3 KB · Views: 52
  • 2014 - Teardown (20140830) 40.jpg
    2014 - Teardown (20140830) 40.jpg
    113.2 KB · Views: 54

1strodeo

Squirrel Watcher
Joined
Sep 15, 2016
Messages
3,596
Loc.
Wisconsin
Great story and even better Grandpa Jeremy! And thank you for your service Marine!!

Reminds me of when I had a 66 Mustang as my DD back from '02-'05, then we got shipped off to Alaska and couldn't bring it with us (well we could have, but it was $2500 shipping and honestly, how often are you gonna drive a 66 Mustang in Alaska??) Anyhoo, we ended up doing a double-tour so the Mustang sat on Brooks Air Base in San Antonio for 6 years. When we finally got back to the lower 48 my Priority #1 was going to get my Mustang!! This was not only because I loved it and missed it, but Brooks was closing on Oct 1st....we arrived to Dayton on Sept 19th!!! Talk about luck

I grabbed tools, my air compressor and the 16 ft dual axle (but no brakes) utility trailer we had just pulled 4,500 miles from Anchorage to Dayton, then proceeded to drive 1200 miles to Texas to fetch it. It had been parked outside but on jackstands and covered; went through 3-4 covers as I recall, had a friend that would replace them for me. I pretty much loaded it on the trailer with a come-along (not sure where the 'friend' was that day %)) before discovering the 10K ratchet straps I brought to tie it down actually performed better- mostly because they were much LONGER - than the come-along. 1200 miles back to our new temporary home...on base...with a 1-car garage ;D

Funny, even when I was within the last 20 miles of a 1200 mile trip the Mustang grill would still sometimes 'spook' me in the rear view mirror, like someone was on my ass!! ;D Remember though this is a 15' car on a 16' trailer, so it was pretty much yeah almost in the bed of the truck.

Ended up spending about 4 years restoring it, 1 year enjoying it and sold it so I could buy me a 66 Bronco ;) which has now been 'under the knife' for so long I also own a 72 Bronco LOL thanks for sharing your story, and listening to mine....if you're still with me. Keep after it!
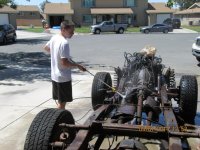
 
OP
OP
simmsjeremy

simmsjeremy

Sr. Member
Joined
Jul 7, 2013
Messages
392
Loc.
Cherry Point
So with the body now removed from the frame the focus became from the ground up.
 

Attachments

  • 2014 - Teardown (20140901) 71.jpg
    2014 - Teardown (20140901) 71.jpg
    123.1 KB · Views: 51
  • 2014 - Rear Axle Rebuild (20140905) 12.jpg
    2014 - Rear Axle Rebuild (20140905) 12.jpg
    170.6 KB · Views: 49
  • 2014 - Frame Work (20140920) 1.jpg
    2014 - Frame Work (20140920) 1.jpg
    98.5 KB · Views: 50
  • 2014 - Trans Clean Up (20141211) {C4, Dana 20 Transfer, J-Shift} 3.jpg
    2014 - Trans Clean Up (20141211) {C4, Dana 20 Transfer, J-Shift} 3.jpg
    81.5 KB · Views: 45
  • 2014 - Frame Work (20140929) 6.jpg
    2014 - Frame Work (20140929) 6.jpg
    113.7 KB · Views: 50
  • 2014 - Suspension Overhaul (20141101) [Shock Mounts] {TBP 2.5 inch Suspension Lift, 2 inch Body .jpg
    2014 - Suspension Overhaul (20141101) [Shock Mounts] {TBP 2.5 inch Suspension Lift, 2 inch Body .jpg
    82.3 KB · Views: 42
  • 2015 - Reassembly (20150208) 3.jpg
    2015 - Reassembly (20150208) 3.jpg
    108.4 KB · Views: 48
  • 2015 - Reassembly (20150208) 2.jpg
    2015 - Reassembly (20150208) 2.jpg
    123.2 KB · Views: 56
OP
OP
simmsjeremy

simmsjeremy

Sr. Member
Joined
Jul 7, 2013
Messages
392
Loc.
Cherry Point
Great story 1strodeo. Just goes to show how each and everyone of us have a story to tell and the commitment we are willing to go through for our love of autos. Thanks for you support and I hope you enjoy the rest of the story.
 
OP
OP
simmsjeremy

simmsjeremy

Sr. Member
Joined
Jul 7, 2013
Messages
392
Loc.
Cherry Point
So within the first year I have been extremely busy plugging away at my newly discovered hobby. Completely obsessed with my Bronco, so much so that it begins to affect my marriage lol I'm sure we have been there before. But she loves me and the Bronco but it was getting to the point that all I would do is talk about it lol. Anyways the inevitable happens. Boom orders to PCS (permanent change of station). Where am I going? All the way back across the country to NC... Well I new at this point I wasn't going to drop another 1200 bucks to have my rig shipped across the US. So... I frantically reassemble as much of the Bronco as I can and load it on the trailer. Took me three days of travel to cross the US and just about each time I would stop somebody would come over looking at it, commenting, or asking questions. It was then I kinda knew I was in a good place and making descent progress. Unfortunately about two years will go buy without any significant progress. No sooner than I check into my new unit I was assigned to deploy so that meant 6-12 months of work ups and then a hefty amount of time away. It wasn't till 2017 that any real progress began again.
 

Attachments

  • 2015 - Leaving California (20150607) 3.jpg
    2015 - Leaving California (20150607) 3.jpg
    114.3 KB · Views: 59
  • 2015 - Leaving California (20150607) 6.jpg
    2015 - Leaving California (20150607) 6.jpg
    60.4 KB · Views: 57
  • 2015 - Leaving California (20150607) 7.jpg
    2015 - Leaving California (20150607) 7.jpg
    97.8 KB · Views: 57
Top