• Welcome to ClassicBroncos! - You are currently viewing the forums as a GUEST. To take advantage of all the site features, please take a moment to register. It's fast, simple and absolutely free. So please join our community today!
    If you have problems registering or can't log into your account, please contact Admin.

Another 73 Stroppe

mjschneidy

Full Member
Joined
Nov 21, 2016
Messages
224
Wiring

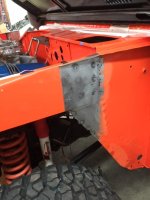
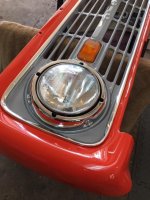
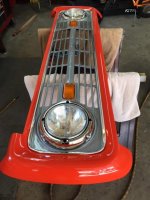
With the front clip done and waiting for paint we decided to tackle the wire harness since it was mostly out anyway.

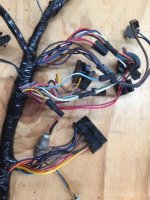
I decided to use a harness from another 73 and keep my original intact. I also had a parts harness to cut circuits from as needed. Found many of the OE terminals and correct non-adhesive wrap online.

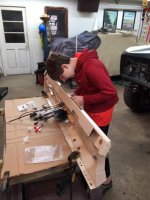
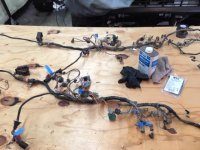
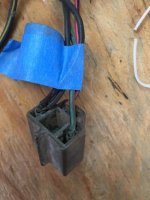
Started by laying it out on a 4x8 sheet of plywood and then marking all areas that need attention with blue tape. We then stripped off all the wrap, cleaned, and repaired where needed. Looks pretty good, even put back the OE part number tag. I'm a sucker for details, that's what makes it fun for me.

I also laid in a tach wire to be used later. It runs through the center bulk head grommet with the other engine related wires. Used a vintage looking connector so it doesn't stand out.
 

Attachments

  • IMG_1052.JPG
    IMG_1052.JPG
    51.9 KB · Views: 62
  • IMG_1046.JPG
    IMG_1046.JPG
    67.6 KB · Views: 57
  • IMG_1056.JPG
    IMG_1056.JPG
    60.1 KB · Views: 52
  • IMG_1059.JPG
    IMG_1059.JPG
    79.6 KB · Views: 57
  • IMG_1062.JPG
    IMG_1062.JPG
    79.4 KB · Views: 54
Last edited:

mjschneidy

Full Member
Joined
Nov 21, 2016
Messages
224
Dash

With the harness out and still waiting for warmer weather we decided to refresh the dash.

I tracked down the correct Light Parchment paint color and had the formula converted to a single stage urethane. I should post that in the tech forum for future reference, I have the mixing formula details for PPG. It started out my local PPG rep said it was discontinued, I pressed and he found a Lacquer formula, I pressed harder and he became more motivated. Its a very good match. My dash had been painted Wimbledon White but I found area on the back that still had the OE paint. First photo shows a test spot, you'll need to look close to see it.

Replaced most all the chrome bits and installed a RetroSound radio and speaker. Son Max put most of it together.

We also freshened up the speedo and gauges. All the florescent orange on the needles was long gone from sitting many years out in the AZ sun with no top.
 

Attachments

  • IMG_1086.JPG
    IMG_1086.JPG
    49.6 KB · Views: 79
  • IMG_1084.JPG
    IMG_1084.JPG
    60 KB · Views: 72
  • IMG_1081.JPG
    IMG_1081.JPG
    64.5 KB · Views: 84
  • IMG_1079.JPG
    IMG_1079.JPG
    40.7 KB · Views: 71
  • IMG_1077.JPG
    IMG_1077.JPG
    33.6 KB · Views: 76
  • IMG_1072.JPG
    IMG_1072.JPG
    67.3 KB · Views: 79
  • IMG_1073.JPG
    IMG_1073.JPG
    25.9 KB · Views: 78
  • IMG_1067.JPG
    IMG_1067.JPG
    79 KB · Views: 74

mjschneidy

Full Member
Joined
Nov 21, 2016
Messages
224
Metal Replacement

Forgot the cowl to inner fender repairs. This is really the only metal I'm replacing due to rust, the truck is fairly rust free. Driver side had some heavy pitting where it traps water between the two panels and would have blown out when I attempted to weld the inner fenders to it. Passenger side was just ugly from it being upside down once. This is really the only damage or evidence I have found. Every thing else was correctly repaired or replaced long ago.

As you can see I painted the firewall and sides already, I'll paint the front clip off the truck and then marry the two up only leaving me to spot in the area at the inner fender to cowl attachment, fender gusset, and a small length of the inner fender where it connects to the side cowl after welding. This was the best way for me to get a factory looking assembly with spot welds and paint without taking the body off the frame.

Last photo is with new metal in and finished out. Minimal bondo at the seam will be needed after I spot weld the inner to it.
 

Attachments

  • IMG_1029.JPG
    IMG_1029.JPG
    53.5 KB · Views: 105
  • IMG_1027.JPG
    IMG_1027.JPG
    48.5 KB · Views: 100
  • IMG_1032.JPG
    IMG_1032.JPG
    41.8 KB · Views: 98
  • IMG_1031.JPG
    IMG_1031.JPG
    44.5 KB · Views: 101

mjschneidy

Full Member
Joined
Nov 21, 2016
Messages
224
So next I need to find some really good carpet and seat covers. I like the carpet in this Stroppe. I don't think it original but loosely resembles the OE vinyl mat. Anyone know anything about it? Also I'd like to do seat covers that match the OE parchment but with a bit more contour or padding, TMI ?

And.....I need a better steering wheel or reproduction, Andrew ? Mine is rough from its years of sun exposure.
 

Attachments

  • DSC02253.jpg
    DSC02253.jpg
    117.7 KB · Views: 155
  • DSC02254.jpg
    DSC02254.jpg
    121.9 KB · Views: 149

mjschneidy

Full Member
Joined
Nov 21, 2016
Messages
224
I want to also take the opportunity to thank Todd, Tony, and Andrew for all the history/info they have shared, its really helped motivate me on this project. I actually made contact with the previous owner before Todd/Tony rescued it from the AZ storage lot. If I ever find out why everything under the hood swapped sides at one point or why I keep finding blue paint in odd places I'll be sure to share. Also David for being a willing reference. And son Max for help and encouragement.
 

Bajabrewer

Contributor
Bronco Guru
Joined
Jan 28, 2012
Messages
1,437
Looks like great progress! I've been spending time working on my 66 so the Baja is being neglected right now. Keep the questions coming - I'd love to see it this summer sometime.

David A
 

BajaBronco

Contributor
Bronco Guru
Joined
Apr 30, 2003
Messages
3,932
Hey Mike, - Great progress, glad you are bringing it back the right way!

That carpet - is something we had done to a 73 owned by a list member on here. I remember being in charge of it and picking out the marine carpet for it. It was rubber backed I believe and for sure had to be custom sewn and laid, but yes, we were going for the parchment mat look.

I have repro steering wheels. Rubber is less dense and more or less hard, but looks just like an unworn original which was the goal of many (to get rid of the wear areas). We only made 80 or so and are down in the high 30s I think? will have to count....
 
OP
OP
toddz69

toddz69

Sponsor/Vendor
Bronco Guru
Joined
Nov 28, 2001
Messages
10,096
Looks great!! Man, I never would've imagined this truck would look this good again.

So you found Tom?

Todd Z.
 

mjschneidy

Full Member
Joined
Nov 21, 2016
Messages
224
So you found Tom? Todd Z.

Well I found Tom Sr, he said it wasn't his but likely one of his sons. I sent a few of the photos you sent me, he promised to pass them along. Hope to hear from someone soon.

Andrew - I'll send you an e-mail about steering wheels. Thanks for the carpet info, seems one off so I'll stop looking. Time to hit up my local upholstery guy or just put black in it.
 

Master Chief

Contributor
Bronco Guru
Joined
Nov 24, 2006
Messages
1,204
This looks like it is coming along nicely Mike. I really like how you approach the small details such as the spot welding. It also appears that you cleaned those headers up to brand new. Did you have them recoated?

Roger
 

mjschneidy

Full Member
Joined
Nov 21, 2016
Messages
224
Long overdue update

Front clip has been back on for a while now. I painted it off the truck and then spot painted and blending in the area connecting it to the cowl side panels. Photos of replacing metal on the cowl sides posted earlier. Came out good I think, looks factory installed and painted which was the goal.
 

Attachments

  • IMG_1120.JPG
    IMG_1120.JPG
    34.3 KB · Views: 64
  • IMG_1119.JPG
    IMG_1119.JPG
    56.9 KB · Views: 66
  • IMG_1118.JPG
    IMG_1118.JPG
    56.8 KB · Views: 71
  • IMG_1116.JPG
    IMG_1116.JPG
    60 KB · Views: 72
  • IMG_1154.JPG
    IMG_1154.JPG
    43.7 KB · Views: 65

mjschneidy

Full Member
Joined
Nov 21, 2016
Messages
224
Dash back in along with a shifter deleted column and floor shifter for the NV3550.

Twin stick and boot are from JB Custom Fab, and the trans shifter is from Coreshifters. Its a great shifter for this application, positioned just right.
 

Attachments

  • Shifter 2.jpg
    Shifter 2.jpg
    53.7 KB · Views: 65
  • IMG_1169.JPG
    IMG_1169.JPG
    38.5 KB · Views: 74
  • IMG_1166.JPG
    IMG_1166.JPG
    48.8 KB · Views: 73

mjschneidy

Full Member
Joined
Nov 21, 2016
Messages
224
Thanks guys! I'm about to stop for the year, get back to driving and enjoying. Targeting Ford Product Development Center (PDC) car show July 19th.

Will take on the rest of the interior and a few other misc items this winter.
 
Last edited:

mjschneidy

Full Member
Joined
Nov 21, 2016
Messages
224
Last piece to be road worthy again !

NOS grill assembled and ready to install. Bronco came to me with a fiberglass grill and hood. Glad to have the right hardware back in place. Went with the smaller turn signals, prefer the look.
 

Attachments

  • IMG_1196 (1).JPG
    IMG_1196 (1).JPG
    74.7 KB · Views: 41
  • IMG_1195.JPG
    IMG_1195.JPG
    67.8 KB · Views: 38

mjschneidy

Full Member
Joined
Nov 21, 2016
Messages
224
DONE ! For now...

Pretty much done for a while. All back together and on the road again. I'll do seats, carpet, and a hardtop this winter but really don't plan to go much further. Plan has always been to be a great driver and I think I'm there. Underhood has come a long way and looks great once again. Neat progression looking at photos, first 2 as found by KRMAN and Todd Z about 17 yrs ago, next 2 are as I started restoring about a year ago, and then the finished look.

Would love to find that 302 HP air cleaner decal in a 347 flavor if anyone has seen such a beast.
 

Attachments

  • Engine 4.jpg
    Engine 4.jpg
    92.7 KB · Views: 65
  • Engine 3.jpg
    Engine 3.jpg
    87.7 KB · Views: 67
  • engine 2.jpg
    engine 2.jpg
    91.2 KB · Views: 62
  • IMG_0743v1.jpg
    IMG_0743v1.jpg
    91.8 KB · Views: 64
  • IMG_0742v1.jpg
    IMG_0742v1.jpg
    95.4 KB · Views: 64
  • krmanbaja8.jpg
    krmanbaja8.jpg
    119.9 KB · Views: 64
  • krmanbaja2.jpg
    krmanbaja2.jpg
    105.5 KB · Views: 66

mjschneidy

Full Member
Joined
Nov 21, 2016
Messages
224
And here it is at its first car show, Ford Product Development employee show last week.

attachment.php
 

Attachments

  • IMG_0323.jpg
    IMG_0323.jpg
    146.1 KB · Views: 50
  • IMG_0325.jpg
    IMG_0325.jpg
    163.1 KB · Views: 304
Top