• Welcome to ClassicBroncos! - You are currently viewing the forums as a GUEST. To take advantage of all the site features, please take a moment to register. It's fast, simple and absolutely free. So please join our community today!
    If you have problems registering or can't log into your account, please contact Admin.

4X4X2 Steering Box - Front or Rear Hole?

Tias

New Member
Joined
Nov 5, 2015
Messages
33
Loc.
Vancouver, BC
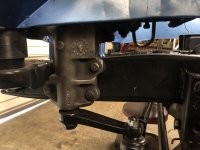
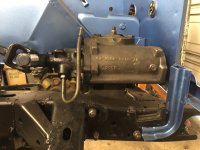
I am tackling some of the odd jobs on my frame before sending it off for blasting. This includes setting it up for a 4X4X2 steering box. Looking through the various past threads, it looks like there are two main options for locating the box:
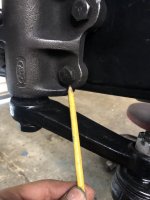
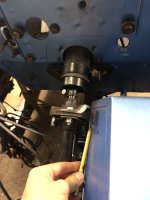
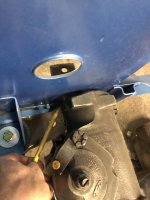
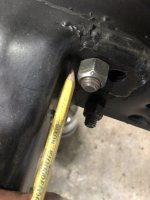
1) front bottom hole - this will require clearencing the cross member for the new top rear hole
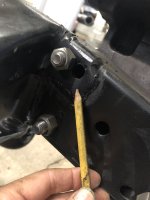
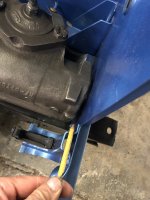
2) bottom rear hole - this will require clearencing the body mount bracket

I am not sure which way to go. Any pros/cons in regards to steering geometry or other issues for either these options other than dealing the frame modifications?

It sounds like a reinforcement plate as well as new beefier sleeves are a must, regardless of where the box finds it home.
 

sykanr0ng

Bronco Guru
Joined
Aug 11, 2014
Messages
5,363
Some people have found that they need to notch the crossmember to clear the back two bolts, locating it forward may help with that clearance.
 

SHX669

Bronco Guru
Joined
Jan 9, 2009
Messages
1,997
Check out WCB site...pretty detailed write up but they do sell a thick plate to reinforce the frame. Not promoting, just remember seeing their writeup West Coast Broncos


http://www.wcb4x4.com/tech/diyrockcrawler.shtml
I went with the WCB 4x4x2 and reinforcing plate and don't remember having to clearance anything. Maybe I mounted it forward or a little lower . I think with the HD mounting plate you only use one of the holes through the frame . The other mounting holes on the gear bolt to the mounting plate. Lije Nvrstk said WCB has a pretty good writeup .
 
OP
OP
T

Tias

New Member
Joined
Nov 5, 2015
Messages
33
Loc.
Vancouver, BC
Thanks for the input and the link to the WCB4x4 write-up. So this is where I am getting confused, and possibly overthinking things. The WCB4x4 bracket/adapter looks like it lowers the box by about an inch or so, so that it sits pretty close to flush on the frame. The BC Broncos reinforcement plate keeps the box output sector at about the same height as the original box, but moves it a bit further back (possibly, I am going by various photos from others that have installed the plate/box). And a third variation is to keep the rear lower hole and fab my own plate, but this would require cutting into the body mount bracket.

So... am I just overthinking this and all options work reasonably well considering the amount of adjustment available in setting up the front axle?
 

BruiserOutdoors

Full Member
Joined
Aug 22, 2013
Messages
741
with the WCB adapter plate option not available anymore, does anybody know how WCB accomplished no clearance issues versus the BCbroncos plate? I cant seem to open the WCB link anymore and cant find the old pdf of the 4x4x2 conversion either.

I have the BC plate and it will require some crossmember modifications, which I would prefer to avoid.

Sorry to bring this back from the dead but my frame is at a shop getting worked on so I need a solution sooner than later.
 

nvrstuk

Contributor
Just a Bronco driver for over 50 yrs!
Joined
Jul 31, 2001
Messages
8,674
How thick is the BC Broncos plate? Heck if it's 5/8" or more weld it to the frame after drilling and tapping where your Box needs to be. I did that with 3/4" plate. No crossmember interference with a stock frame (which I don't have) but this is an easy solution.
Done

If someone thinks 5/8 of an inch plate isn't deep enough for tapping fine threads check the thickness of a 1/2" nut.
 

Madgyver

Bronco Madman
Joined
Jul 30, 2001
Messages
14,695
move it forward 1.5"-2". it worked great on the FireBronco.
I'd post a pic but can't, pic posting status expired.
you made find the pic in the link on my sig below "firebronco"
 

BanditBronco

Sr. Member
Joined
Jul 2, 2008
Messages
689
I have a BC plate and used the bottom hole to locate the box forward enough to have to clearance the body mount and have no crossmember clearance issues. Also helps with tie rod to drag link clearance in full bump/full articulation situations. Make sure to install the sleeves, that is where all the strength lies.
 

BruiserOutdoors

Full Member
Joined
Aug 22, 2013
Messages
741
I have a BC plate and used the bottom hole to locate the box forward enough to have to clearance the body mount and have no crossmember clearance issues. Also helps with tie rod to drag link clearance in full bump/full articulation situations. Make sure to install the sleeves, that is where all the strength lies.
pics? are you saying you had to modify the body mount?
 

BruiserOutdoors

Full Member
Joined
Aug 22, 2013
Messages
741
How thick is the BC Broncos plate? Heck if it's 5/8" or more weld it to the frame after drilling and tapping where your Box needs to be. I did that with 3/4" plate. No crossmember interference with a stock frame (which I don't have) but this is an easy solution.
Done

If someone thinks 5/8 of an inch plate isn't deep enough for tapping fine threads check the thickness of a 1/2" nut.
1/4" with preexisting holes, a set for the factory box and a set for the 4x4x2 box.

I am OK not using this plate and creating my own if needed.
 

jamesroney

Contributor
Sr. Member
Joined
Sep 11, 2007
Messages
1,712
Loc.
Fremont, CA
1/4" with preexisting holes, a set for the factory box and a set for the 4x4x2 box.

I am OK not using this plate and creating my own if needed.
That's a funny plate. I never knew whether it went on the inside of the frame, or sandwiched between the frame and steering box.
I have done a few of these conversions, and a couple of different ways. I bought the WCB plate a long time ago, installed it, removed it, and always hated it. It moves the steering box outboard, and then you have issues with the steering coupler universal joint.

I just finished this install on my 1970, and it came out fine. The crossmember interference issue is mostly nonsense. But the core support issue is legit, especially if you have a body lift. The only welding that I did was to extend the crossmember flange at bolt 2, so that it gave a nice landing spot for the nut. You can see that I added an additional hole for the original Saginaw location in case I ever want to run that box. So yeah, build up the area near the crossmember, locate the box at bolt #1, and clearance the core support bracket for hole #3.
(hole #1 is the one at the 4 o'clock position on the box, hole #2 is at the 2 o'clock position, and hole #3 is at the 8 o'clock position.

Also, if you are building a pre-74 Bronco, I have found that shortening the column and eliminating the shift levers is a better way to go. This puts the rag joint higher on the inner apron, and it clears without any inner apron changes. I use cut splines and pinch bolts with captive connections as much as possible. When people see it, they say nothing.
 

Attachments

  • B2D13EAC-8651-4C2C-B1E4-98E61FB84C7E.jpeg
    B2D13EAC-8651-4C2C-B1E4-98E61FB84C7E.jpeg
    157.4 KB · Views: 89
  • 486F42BD-EAD2-4C40-ABBE-98A51D4BD537.jpeg
    486F42BD-EAD2-4C40-ABBE-98A51D4BD537.jpeg
    142.4 KB · Views: 80
  • 2E768A53-5EFF-4114-9F4A-1710477482F4.jpeg
    2E768A53-5EFF-4114-9F4A-1710477482F4.jpeg
    130.9 KB · Views: 68
  • 5AD9CF40-E54B-4427-9B05-3B750CEEC6E3.jpeg
    5AD9CF40-E54B-4427-9B05-3B750CEEC6E3.jpeg
    129.4 KB · Views: 67
  • 7AB64513-8CCC-4DA6-9A63-59B00FE9CBE7.jpeg
    7AB64513-8CCC-4DA6-9A63-59B00FE9CBE7.jpeg
    157.2 KB · Views: 75
  • 4D692672-8D91-4615-A405-BF3FCC977BEB.jpeg
    4D692672-8D91-4615-A405-BF3FCC977BEB.jpeg
    173.8 KB · Views: 70
  • 61252389-EB77-4F73-93D0-E6424C8F9265.jpeg
    61252389-EB77-4F73-93D0-E6424C8F9265.jpeg
    118.5 KB · Views: 67
  • E3C81799-747F-40D1-B59D-09DD7EE2328E.jpeg
    E3C81799-747F-40D1-B59D-09DD7EE2328E.jpeg
    136.9 KB · Views: 66
  • AEEA624B-8582-41A5-933F-4301A0CC5A76.jpeg
    AEEA624B-8582-41A5-933F-4301A0CC5A76.jpeg
    112.3 KB · Views: 64
  • 2117B70A-625A-4E0A-841F-7D69E1A8801F.jpeg
    2117B70A-625A-4E0A-841F-7D69E1A8801F.jpeg
    211.2 KB · Views: 85
Last edited:

BruiserOutdoors

Full Member
Joined
Aug 22, 2013
Messages
741
Just clearance the corner for the box, takes roughly 30 seconds. You can kinda see it in James first picture.
sorry for the ignorance, I don't have access to the frame or box as its at the shop. But to clarify, you only have to clearance the corner of the body mount if you re-use the factory rear bottom hole?
 

BanditBronco

Sr. Member
Joined
Jul 2, 2008
Messages
689
sorry for the ignorance, I don't have access to the frame or box as its at the shop. But to clarify, you only have to clearance the corner of the body mount if you re-use the factory rear bottom hole?
Correct, the mount is welded to the frame in an "upside down U" shape and you just have to trim the corner of it out where it is welded to the frame to allow clearance for the front of the steering box to slide under the mount a little.

I am not going to 100% say yes, it is the stock rear bottom hole because it has been so long since I have done mine. Once you have the plate, the frame, and yourself in one place and hold it up there, it will make sense what options you have pretty quick.
 

papy

Contributor
Sr. Member
Joined
Jun 13, 2012
Messages
796
That's a funny plate. I never knew whether it went on the inside of the frame, or sandwiched between the frame and steering box.
I have done a few of these conversions, and a couple of different ways. I bought the WCB plate a long time ago, installed it, removed it, and always hated it. It moves the steering box outboard, and then you have issues with the steering coupler universal joint.

I just finished this install on my 1970, and it came out fine. The crossmember interference issue is mostly nonsense. But the core support issue is legit, especially if you have a body lift. The only welding that I did was to extend the crossmember flange at bolt 2, so that it gave a nice landing spot for the nut. You can see that I added an additional hole for the original Saginaw location in case I ever want to run that box. So yeah, build up the area near the crossmember, locate the box at bolt #1, and clearance the core support bracket for hole #3.
(hole #1 is the one at the 4 o'clock position on the box, hole #2 is at the 2 o'clock position, and hole #3 is at the 8 o'clock position.

Also, if you are building a pre-74 Bronco, I have found that shortening the column and eliminating the shift levers is a better way to go. This puts the rag joint higher on the inner apron, and it clears without any inner apron changes. I use cut splines and pinch bolts with captive connections as much as possible. When people see it, they say nothing.
not trying to rob the thread here however I was just wondering if you have any issues with the frame flexing/twisting with that big box not having a reinforcing plate between the box/frame? I was under the assumption that the late was needed for that. I am planning the same swap in the near future on my 67 and I like the ease of your install.
 

DirtDonk

Contributor
Bronco Guru
Joined
Nov 3, 2003
Messages
47,483
What size tires are you going to run?
How much wheel offset?
It’s not necessarily the power of the box that does the damage. It’s the power trying to move around big heavy tires.
And are you gonna be on the street exclusively, or will you take it off road.

Broncos can crack their frame even with a stock power steering box although that’s actually pretty rare until you add big tires and harder use to the mix.
And even then it’s still fairly rare. But it’s also the reason that we like to reinforce the frame behind the box.

Even though still fairly rare with the power steering, that’s when people started to notice it. After power steering conversions, or when using the original early six turn box. Which could be argued I suppose, had more power to impart into the frame than the four turn box.
I don’t know if that’s actually how the dynamics work in a situation like this, or if it’s more to do with hydraulics. But it seems the “gearing“ of the Steering box could theoretically play a part.

The 4x4x2 box is not necessarily more powerful than the others, it’s just bigger and stronger.
Flexing the frame before snapping the sector shaft so to speak. 🙄😁

Maybe others with more knowledge of how power steering systems work can tell us what forces are really play to crack the frame.
Maybe it’s as simple as the big box being taller also have more leverage against the frame.
That could be a thing too.
 

jamesroney

Contributor
Sr. Member
Joined
Sep 11, 2007
Messages
1,712
Loc.
Fremont, CA
What size tires are you going to run?
How much wheel offset?
It’s not necessarily the power of the box that does the damage. It’s the power trying to move around big heavy tires.
And are you gonna be on the street exclusively, or will you take it off road.

Broncos can crack their frame even with a stock power steering box although that’s actually pretty rare until you add big tires and harder use to the mix.
And even then it’s still fairly rare. But it’s also the reason that we like to reinforce the frame behind the box.

Even though still fairly rare with the power steering, that’s when people started to notice it. After power steering conversions, or when using the original early six turn box. Which could be argued I suppose, had more power to impart into the frame than the four turn box.
I don’t know if that’s actually how the dynamics work in a situation like this, or if it’s more to do with hydraulics. But it seems the “gearing“ of the Steering box could theoretically play a part.

The 4x4x2 box is not necessarily more powerful than the others, it’s just bigger and stronger.
Flexing the frame before snapping the sector shaft so to speak. 🙄😁

Maybe others with more knowledge of how power steering systems work can tell us what forces are really play to crack the frame.
Maybe it’s as simple as the big box being taller also have more leverage against the frame.
That could be a thing too.
1. yup, tire size shouldn't matter, but it does.
2. nope, wheel offset is not as significant.
3. nope, well kinda. It's the unstoppable force versus the immovable object problem. Bigger tires make for a more "immovable object."
4. yup.
5. Agree, but every Bronco I've ever seen with a broken frame has had power steering, and a gorilla for a driver. Never see a manual steering truck with a broken frame.
6. I'm going to say generally that the force needed to destroy the frame is coming from the power steering pump. Yeah, there's a little bit of effort coming from the steering wheel, but it's mostly all coming from the 1200 psi pump pushing on a 2.75 inch piston. That's 7,123 lbs of force from the hydraulics and yeah, maybe another couple hundred from the operator. The 6 turn box will have more mechanical advantage, but only from the additional input by the operator. So maybe +300 lbs instead of +200 lbs. But it's that 7,123 lbs that's making it all happen. And anyone yanking on the steering wheel of a power steering car needs to be flogged.
7. Uhm, this one is false. The Ford 4x4x2 box has a 3.18 diameter piston. The Saginaw 800 box with 70mm has a 2.75 piston. So the 4x4x2 box will push harder. (9,525 lbs vs 7,123 lbs @1200 psi)
8. The forces within the box don't come into play and are conserved within the box. All that matters is the distance from the drag link tie rod end to the frame. Even if the steering box sector shaft was 10 feet long, that wouldn't matter. But the farther the load is applied to the pitman arm...that will impact the torque applied to the frame. So the 4x4x2 box does not have more leverage on the frame. But the old long sector F100 2WD box did have pitman arm that was very far from the frame. And that's why there's a reinforcing bracket for that box.
If you want to keep the frame from cracking on your Bronco, remove the belt from your power steering pump when off road.
 
Top