• Welcome to ClassicBroncos! - You are currently viewing the forums as a GUEST. To take advantage of all the site features, please take a moment to register. It's fast, simple and absolutely free. So please join our community today!
    If you have problems registering or can't log into your account, please contact Admin.

first Bronco in 23 years

OP
OP
U

unimogger

Full Member
Joined
Aug 7, 2019
Messages
214
Loc.
Philthadelphia
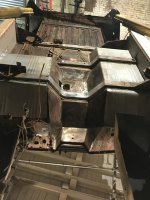
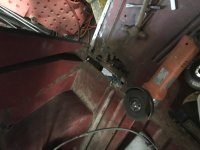
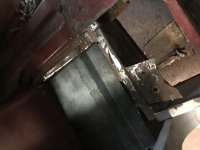
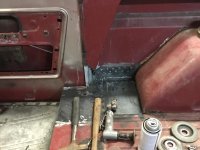
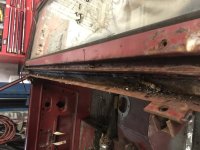
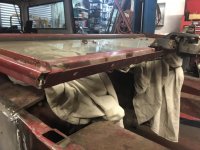
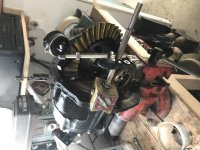
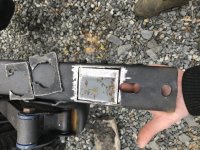
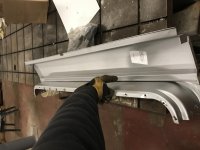
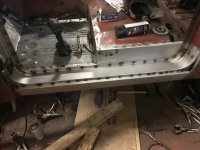
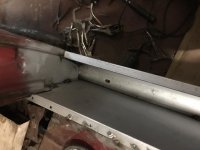
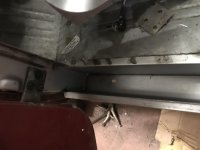
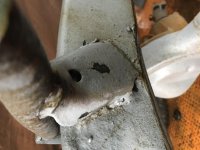
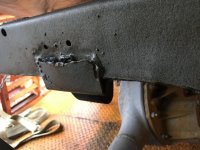
Busy day today. Made some shims and got the drivers side door to fit better, before doing the rocker. In hindsight, I wish I had left a little more room, but it's workable for sure. I might put the hinges on the milling machine, and take a 1/16th off the back of them though. I've gotten a few messages about why the rockers had to come apart, so I took some better pics. You can see, that overlap where the two parts are spot welded together is sloppy. Measured, it was over 1/8 different from end to end! And too big even at the small end.. and the spot welds wander down to the very edge of the overlap. Someone asleep at quality control
Anyway, the door shuts well, though not as nicely as the passenger side. Might be the latch
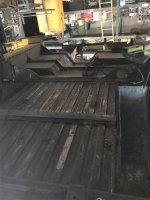
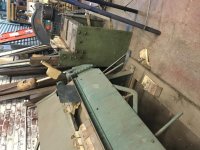
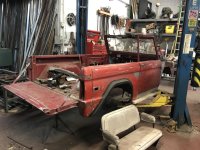
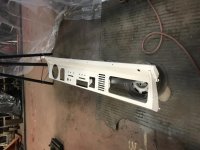
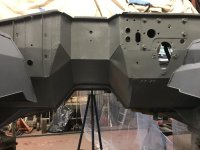
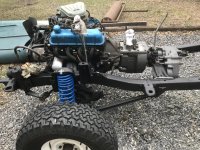
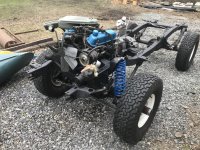
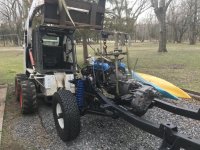
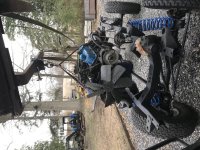
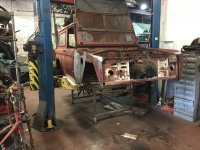
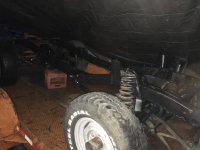
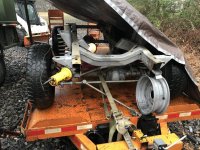
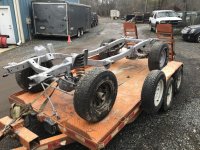
Took the body off, which was actually quite a fight. My lift arms were too long for the short bronco, and kept getting hung on the tires or spring perch. Then the front passenger side mount wasn't fully cut, and I accidentally bent the inner fender down a few inches. Bleh. But at least it's done.
SD
 

Attachments

  • Umq0r7phRLeh5cDOnjLmag.jpg
    Umq0r7phRLeh5cDOnjLmag.jpg
    75.8 KB · Views: 69
  • N0nbX289Q3mGJsSyFnDaDw.jpg
    N0nbX289Q3mGJsSyFnDaDw.jpg
    135.7 KB · Views: 56
  • QQZgdwB3Qou5fpHhpJgpPQ.jpg
    QQZgdwB3Qou5fpHhpJgpPQ.jpg
    121.7 KB · Views: 62
  • iSDMPrsrQi+BV%dEMXhmoQ.jpg
    iSDMPrsrQi+BV%dEMXhmoQ.jpg
    91.2 KB · Views: 67
  • +i6uIehKRVmY0DoT32ebnA.jpg
    +i6uIehKRVmY0DoT32ebnA.jpg
    63.1 KB · Views: 62
  • Z49HsnLuQEKUturJwpUSaQ.jpg
    Z49HsnLuQEKUturJwpUSaQ.jpg
    56.1 KB · Views: 63
  • Ns4lvzmrRtyyGoL0shyyMw.jpg
    Ns4lvzmrRtyyGoL0shyyMw.jpg
    70.9 KB · Views: 60
  • ut976c1yTziK23q%uiXuyQ.jpg
    ut976c1yTziK23q%uiXuyQ.jpg
    64.4 KB · Views: 61
OP
OP
U

unimogger

Full Member
Joined
Aug 7, 2019
Messages
214
Loc.
Philthadelphia
Frame is back from blasting. Of course it started raining on my way back with it, so I improvised a tent and cooked it dry with some propane torpedo heaters. Got a heat gun pointed down each frame rail, really got it warm, and then hosed it down with some black epoxy
Whatever layer of steel mounts the rear bump stop, it has caught a ton of moisture and needs to be repaired, as do the rear shock mounts and some rear frame sections. Nothing terrible
 

Attachments

  • 63F8B710-975F-44D6-BA22-02EDBCC0C1A6.jpg
    63F8B710-975F-44D6-BA22-02EDBCC0C1A6.jpg
    84.3 KB · Views: 54
  • 33E31BBC-2415-4B04-A35D-EBE672AF3F13.jpg
    33E31BBC-2415-4B04-A35D-EBE672AF3F13.jpg
    173.2 KB · Views: 55
  • C6B55CFF-8C78-44FD-9351-007C864AF87B.jpg
    C6B55CFF-8C78-44FD-9351-007C864AF87B.jpg
    89 KB · Views: 55
  • 567F0E2D-140C-4228-8D44-25867E5BE7C7.jpg
    567F0E2D-140C-4228-8D44-25867E5BE7C7.jpg
    111.8 KB · Views: 58
  • 14245C89-C559-423F-A4B8-8A62976FF039.jpg
    14245C89-C559-423F-A4B8-8A62976FF039.jpg
    174.1 KB · Views: 57
  • C8B4ACD8-4E4E-474B-816D-48FDB57575DA.jpg
    C8B4ACD8-4E4E-474B-816D-48FDB57575DA.jpg
    144.8 KB · Views: 52

Revelation

Bronco Guru
Joined
Oct 9, 2004
Messages
4,810
Looking good. A lot of work but moving fast. how are you handling the no title situation?
 
OP
OP
U

unimogger

Full Member
Joined
Aug 7, 2019
Messages
214
Loc.
Philthadelphia
My crew ran out of stuff to do while I was out running errands today, so they surprised me and stripped the entire underside. I was trying to figure out how to flip it and take it to be blasted, and they said screw it’ and did it all with wire knot wheels on 4” grinders. Amazing.
It’s in decent shape considering it’s an original east coast truck.
 

Attachments

  • 9724D060-336F-48C8-B3B4-3A153CDD9119.jpg
    9724D060-336F-48C8-B3B4-3A153CDD9119.jpg
    106.8 KB · Views: 66
  • ECB13DC0-30F6-422F-A7FD-FB3D88160D12.jpg
    ECB13DC0-30F6-422F-A7FD-FB3D88160D12.jpg
    75.3 KB · Views: 64
OP
OP
U

unimogger

Full Member
Joined
Aug 7, 2019
Messages
214
Loc.
Philthadelphia
Blasted and painted the stock wheels today. Almost went w Wimbledon white but thought it was a bit too yellow. Instead I picked a white that’s the same hue, but about halfway between pure white and Wimbledon white.
Grabbed some nice dog dish caps off a 65 ford truck, should look sweet
 

Attachments

  • 6A90B77D-6E85-4385-ACDC-54C6B225924F.jpg
    6A90B77D-6E85-4385-ACDC-54C6B225924F.jpg
    97.1 KB · Views: 29
  • FEF09730-B5CF-4DEE-B08E-C9DD98D79665.jpg
    FEF09730-B5CF-4DEE-B08E-C9DD98D79665.jpg
    112.1 KB · Views: 31

sprdv1

Contributor
REBEL
Joined
Mar 8, 2007
Messages
81,747
Blasted and painted the stock wheels today. Almost went w Wimbledon white but thought it was a bit too yellow. Instead I picked a white that’s the same hue, but about halfway between pure white and Wimbledon white.
Grabbed some nice dog dish caps off a 65 ford truck, should look sweet

Fixed......
 

Attachments

  • SB Whls01.jpg
    SB Whls01.jpg
    189.3 KB · Views: 16
  • SB Whls02.jpg
    SB Whls02.jpg
    166.4 KB · Views: 16

sprdv1

Contributor
REBEL
Joined
Mar 8, 2007
Messages
81,747
My crew ran out of stuff to do while I was out running errands today, so they surprised me and stripped the entire underside. I was trying to figure out how to flip it and take it to be blasted, and they said screw it’ and did it all with wire knot wheels on 4” grinders. Amazing.
It’s in decent shape considering it’s an original east coast truck.

a little better...… :)
 

Attachments

  • Uside01.jpg
    Uside01.jpg
    181.2 KB · Views: 36
  • Uside02.jpg
    Uside02.jpg
    144.6 KB · Views: 30
OP
OP
U

unimogger

Full Member
Joined
Aug 7, 2019
Messages
214
Loc.
Philthadelphia
I'll figure out posting everything right side up tonight. I tried the other day and it didn't work so I sorta gave up. Thanks for taking care of it
 
OP
OP
U

unimogger

Full Member
Joined
Aug 7, 2019
Messages
214
Loc.
Philthadelphia
Scored a set of barely run 33/10.5 BFG tires from Facebook marketplace, and got them mounted up. Then I cut out the last of the rust under the seats today. Not great, there’s rust in every seam that leads to the wheel wells. Which is why this is as far as I’m going this time. If I pick at it any farther back, I’ll have the inner and outer quarters off and this will be sitting for another year..
Here’s what replacing, and a pic of the rear floor. You can see why I’m not eager to dig into that. Can o’worms waiting to happen.
 

Attachments

  • E41FE522-0E3B-4120-8816-97BEBC955CF4.jpg
    E41FE522-0E3B-4120-8816-97BEBC955CF4.jpg
    85.3 KB · Views: 57
  • 27CB7A84-60E1-4E0D-A67B-DD77EAC9B546.jpg
    27CB7A84-60E1-4E0D-A67B-DD77EAC9B546.jpg
    79 KB · Views: 59
  • 2B18BBBF-2975-44A1-AE5C-54C16D268720.jpg
    2B18BBBF-2975-44A1-AE5C-54C16D268720.jpg
    76.1 KB · Views: 58
  • 46837014-E68E-40A1-AE92-139621B43625.jpg
    46837014-E68E-40A1-AE92-139621B43625.jpg
    66.9 KB · Views: 57
  • 952B4BB0-91F1-4687-B2D3-C8C78CEE3565.jpg
    952B4BB0-91F1-4687-B2D3-C8C78CEE3565.jpg
    81 KB · Views: 71
OP
OP
U

unimogger

Full Member
Joined
Aug 7, 2019
Messages
214
Loc.
Philthadelphia
Making parts out of 16 gauge
 

Attachments

  • 0174458C-ECF1-4347-9B71-9EB913B78097.jpg
    0174458C-ECF1-4347-9B71-9EB913B78097.jpg
    114.9 KB · Views: 41
  • BB0CD3F4-3A33-4614-916C-D29B0190418F.jpg
    BB0CD3F4-3A33-4614-916C-D29B0190418F.jpg
    63.5 KB · Views: 38
  • 5E26C28E-06B8-4233-A7E0-06FB03D394D4.jpg
    5E26C28E-06B8-4233-A7E0-06FB03D394D4.jpg
    62.9 KB · Views: 38
OP
OP
U

unimogger

Full Member
Joined
Aug 7, 2019
Messages
214
Loc.
Philthadelphia
Update: It's been cold and wet, which has finally slowed me down.
I have the frame at home behind my barn, and have been slowly going through the axles. I pulled the front apart, replaced the pinion seal, inner axle seals, and then installed the disc knuckles with all new everything. Currently the rear axle has one axles out, and one stuck in. Heating the axle end casting made no difference. So, tomorrow I'll weld a big slide hammer to an old ford wheel.. that should do it. New wheel bearings, pinion seal/ crush sleeve, and drain plug for the housing are all waiting.
I have all new brake hardware, hoses, and will bend up new hard lines, and do a 3/8 stainless hardline for the fuel supply.
The body is back at my shop on the lift still. Now that much of the floor/ rockers/ door posts are repaired, I removed the hardtop. After that the windshield folded down and removed the dash. A few surprises: the windshield frame is really solid, and the wiring harness is in great shape. I had been hoping to salvage the wiring (I know I know), but it's in surprising condition. After pulling the tape off, the wiring is flexible, and barely any oxidation on the terminals. Just a few cuts and splices to solder up..
The rear of the tub did sag when I pulled the hardtop, which opened up the door gaps.. and thats not unexpected. But I do wonder how rigid these bodies are when they're in good solid shape? My supports are under the rockers so all of the rear weight was just hanging, currently I have a saw horse under the very back. Does a new tub flex like this if the rear is unsupported? Anyway, given the movement, I can't get the body out to be blasted on its own, so I'll have to get it back on the frame. I'm going to epoxy and rhino line the underside before it goes back on though..
I'll post some pics from my mobile. Might even get them right side up
 
OP
OP
U

unimogger

Full Member
Joined
Aug 7, 2019
Messages
214
Loc.
Philthadelphia
Pictures
 

Attachments

  • 93CAECFA-4AA8-42B4-A616-FFF69BC291DB.jpg
    93CAECFA-4AA8-42B4-A616-FFF69BC291DB.jpg
    138.7 KB · Views: 49
  • 830FAE77-432F-4B2D-AA04-EC9FFF3E6165.jpg
    830FAE77-432F-4B2D-AA04-EC9FFF3E6165.jpg
    91.4 KB · Views: 50
  • EB470CB6-C6D2-4173-AAA8-87127116D6D5.jpg
    EB470CB6-C6D2-4173-AAA8-87127116D6D5.jpg
    137.2 KB · Views: 55
  • 610685EA-EA20-45EF-BAE9-8F7578B80119.jpg
    610685EA-EA20-45EF-BAE9-8F7578B80119.jpg
    90.1 KB · Views: 43
  • 963BB64F-387D-445C-9CDE-1259EF91064C.jpg
    963BB64F-387D-445C-9CDE-1259EF91064C.jpg
    94.9 KB · Views: 45
OP
OP
U

unimogger

Full Member
Joined
Aug 7, 2019
Messages
214
Loc.
Philthadelphia
Slide hammer did the trick. The housing was full of sludge, outer bearings shot, ring gear is rusted. Gonna hunt for a set of 3.50 gears, as re- gearing both ends is not in the budget right now.
 

Attachments

  • BE62DFD0-3280-4984-AE9E-5282A5B2E109.jpg
    BE62DFD0-3280-4984-AE9E-5282A5B2E109.jpg
    208.6 KB · Views: 28
  • 1696A4BF-7C8C-4BD6-A288-D0FB0F18BC6F.jpg
    1696A4BF-7C8C-4BD6-A288-D0FB0F18BC6F.jpg
    66.5 KB · Views: 28
  • 3BDE260E-35D7-4F5B-A639-ACC66B14A0DF.jpg
    3BDE260E-35D7-4F5B-A639-ACC66B14A0DF.jpg
    86.7 KB · Views: 30
OP
OP
U

unimogger

Full Member
Joined
Aug 7, 2019
Messages
214
Loc.
Philthadelphia
Making progress
Picked up a good used center 9" section with the correct gears, rebuilt my trak-lock and installed it. New bearings and brakes, welded a drain fitting onto the housing while out was apart.
Got the underside in epoxy, seam sealed the joints, and then grey Rhino Liner. Man that stuff does deaden the sound!
Dash board had a bazillion holes drilled all over, which got welded up and sanded smooth. The radio had been hacked, and rather than weld it back up I opened to to a standard DIN chases size. Sprayed it down with a few coats of the same white as the wheels.
Can't wait to get the body back on it.. I hate having one project take up three spaces.
 

Attachments

  • 0FD75A9D-23B4-4D3C-AA47-40ABAAF4859C.jpg
    0FD75A9D-23B4-4D3C-AA47-40ABAAF4859C.jpg
    83.9 KB · Views: 34
  • FA66FC0B-C6FC-4C7C-A7A0-0181636468D2.jpg
    FA66FC0B-C6FC-4C7C-A7A0-0181636468D2.jpg
    88.9 KB · Views: 37
  • FB90A5B8-2B3A-406A-94FF-679D7AC045B6.jpg
    FB90A5B8-2B3A-406A-94FF-679D7AC045B6.jpg
    135.3 KB · Views: 34
  • 07E58D1B-BB0E-4AE7-A013-B8023DF2EBF0.jpg
    07E58D1B-BB0E-4AE7-A013-B8023DF2EBF0.jpg
    104.2 KB · Views: 35
Last edited:
OP
OP
U

unimogger

Full Member
Joined
Aug 7, 2019
Messages
214
Loc.
Philthadelphia
Chassis wrapping up.
Hard and soft lines run, 2.5” Duff springs installed, all new brakes, bearings, seals, and bushings throughout.
Still have to extend the front shock towers and repair the rear shock mounts, but it’s about ready to set the body back on. Didn’t plan to do as much as I did, somehow I told myself that it was in better condition than it was.
 

Attachments

  • 1D313890-FAE7-49C0-BBBD-7CC7F72E5253.jpg
    1D313890-FAE7-49C0-BBBD-7CC7F72E5253.jpg
    180.1 KB · Views: 39
OP
OP
U

unimogger

Full Member
Joined
Aug 7, 2019
Messages
214
Loc.
Philthadelphia
The engine was in my way, so nothing I could do but drop it back into the frame.
I love how easy it is working on the bare frame.
 

Attachments

  • DC969700-0252-40CC-8D1A-CCE302419D60.jpg
    DC969700-0252-40CC-8D1A-CCE302419D60.jpg
    185.3 KB · Views: 35
  • 271C8280-2ABE-4F54-B3AA-87BAD0E1F87C.jpg
    271C8280-2ABE-4F54-B3AA-87BAD0E1F87C.jpg
    218.2 KB · Views: 29
  • 0B322D28-1E74-46EB-8772-1DD63001EC8A.jpg
    0B322D28-1E74-46EB-8772-1DD63001EC8A.jpg
    163.6 KB · Views: 29
  • A2F9A9BB-E9DD-45DC-AEC2-C1A5390200F0.jpg
    A2F9A9BB-E9DD-45DC-AEC2-C1A5390200F0.jpg
    184.6 KB · Views: 29
OP
OP
U

unimogger

Full Member
Joined
Aug 7, 2019
Messages
214
Loc.
Philthadelphia
Some rear frame repairs. Rear body mounts, shock mounts and bump stops were all shot. Started cutting repair pieces out of 3/16 plate
 

Attachments

  • EF2F20B8-13C1-48E9-9163-5AA6FAA41D56.jpg
    EF2F20B8-13C1-48E9-9163-5AA6FAA41D56.jpg
    188.5 KB · Views: 24
  • 6E3EDFEC-0454-4AD5-8E19-410AA23CA5CF.jpg
    6E3EDFEC-0454-4AD5-8E19-410AA23CA5CF.jpg
    137 KB · Views: 30
  • 3A4F33F8-744A-445E-B509-EA9845BEED36.jpg
    3A4F33F8-744A-445E-B509-EA9845BEED36.jpg
    125.8 KB · Views: 23
  • 2D2F4B26-FCA6-4CFF-8C26-EE3F5A9380EF.jpg
    2D2F4B26-FCA6-4CFF-8C26-EE3F5A9380EF.jpg
    124.7 KB · Views: 23
  • 7586F7D3-CC76-4E9D-BD2F-F206DDA6393D.jpg
    7586F7D3-CC76-4E9D-BD2F-F206DDA6393D.jpg
    113.7 KB · Views: 26
Top