• Welcome to ClassicBroncos! - You are currently viewing the forums as a GUEST. To take advantage of all the site features, please take a moment to register. It's fast, simple and absolutely free. So please join our community today!
    If you have problems registering or can't log into your account, please contact Admin.

Cheaper Than Therapy: A Build Thread

OP
OP
M

marjama

Contributor
Sr. Member
Joined
Nov 24, 2004
Messages
413
Very spiffy solve! That Bronc of yours will be an engineering marvel!

Thanks! I was a little concerned after I hacked out the large section of the frame. Ha!

When mine is back on the road I need to drive out your way to check this thing out. I'm so impressed with the quality of your work :cool:

Sounds good Jaromy - it'd be cool to put together a little locals Bronco gathering later this year!
 
OP
OP
M

marjama

Contributor
Sr. Member
Joined
Nov 24, 2004
Messages
413
Distractions...

Bringing my build thread from the dead...haven't updated this in two months, but I'm back on track!

Since I last posted I've bought a new daily driver, sold my daily pickup...and then my dad dropped off a 1970 F250 highboy that he gifted me. He bought new in '70 (pic attached!), used it as his work truck for years. It was parked at the beach for a year while he built a house for one of the other farmers on the side...and it got rusty. He did a basic restoration with a low buck paint job to refresh it. Then some ding-dongs stole the carb and a bunch of engine parts, one of the guys backed a truck into it, and rust started coming out of the seams. It hadn't run for 20 years...but I just drove it into the shop on it's own power yesterday! I've been distracted. Super excited to have the highboy though! Trying hard not to go out and buy a bunch of parts to do a diesel swap...ha!
 

Attachments

  • AEQT4087.jpg
    AEQT4087.jpg
    176.1 KB · Views: 63
OP
OP
M

marjama

Contributor
Sr. Member
Joined
Nov 24, 2004
Messages
413
Front Air Bump Mounting

Back to the Bronco - I was stuck on the problem of how to get the air bumps mounted and still keep a low ride height. With the shock mounts I created and the size of the Spidertrax front 9" diff, there just isn't a lot of space. The bump wanted to be up inside the frame...so I spent a ton of time articulating the axles to find space. Keep in mind, I also don't have the coilover springs yet, so this is based on some assumptions...

Some random photos in this set: first pic is suspension at full travel - you can see a small metal block there representing the bump location. Second is interesting because it shows how far a panhard front swings side to side - even with the longest bar I can stick in there, it's significant!

Following photos are just general clearance pics, the frame cut with the bump mocked up, the odd way the front hits under articulation, and what the arrangement looks like installed. More to follow later today...
 

Attachments

  • _MG_6240.jpg
    _MG_6240.jpg
    107.5 KB · Views: 92
  • _MG_6238.jpg
    _MG_6238.jpg
    96.1 KB · Views: 87
  • IMG_8003.jpg
    IMG_8003.jpg
    88.7 KB · Views: 84
  • IMG_8016.jpg
    IMG_8016.jpg
    113.4 KB · Views: 82
  • IMG_8051.jpg
    IMG_8051.jpg
    86.8 KB · Views: 83
  • CHML7213.jpg
    CHML7213.jpg
    112 KB · Views: 78

JSmall

Bronco Guru
Joined
Feb 18, 2004
Messages
3,223
That's it!!! Now I know I need to start over on mine :cool: Looking good
 
OP
OP
M

marjama

Contributor
Sr. Member
Joined
Nov 24, 2004
Messages
413
That's it!!! Now I know I need to start over on mine :cool: Looking good

Jaromy, I think you have it all wrong...what you mean to say is "it's time to buy another Bronco and start a new project"! Ha!

I think that is the thing I love the most about build threads. It keeps me inspired to build things!
 
OP
OP
M

marjama

Contributor
Sr. Member
Joined
Nov 24, 2004
Messages
413
Front air bump cans...

If I randomly sneak in posts, I should be able to catch this thread up to where I'm at today...

Now that you've seen the mounting location mocked up, you may see the challenge I was up against. I just didn't have room outside the frame rail to mount the typical two pinch bolt style can. I also wasn't sure I wanted to trust a single bolt to retain the air bump (because...well...they are expensive and the thought of one slipping down sounded like a bad thing!).

The pics show what I came up with - two parallel pinch bolts at the top above the frame. The bottom lip on the bump is enough that should never push through the DOM tube...even knowing the force that would be required, my engineering brain wanted a pinch bolt at the bottom as well. I spent a lot of time contemplating this, and finally just moved on with the design shown. I think it'll work a-ok.

I'm sure there are easier ways to make parts like these...but you can see my method here. Last pic is the bolt access behind the shock tower.

Still need to create the targets / landing pads on the axle for the fronts - they are elevated up a bit from the tube to deal with the housing on the drivers side. I have 'em cut out, but need to do a bunch of fitting to get it sitting against the housing...otherwise, fronts are good to go!
 

Attachments

  • IMG_8068.jpg
    IMG_8068.jpg
    136 KB · Views: 74
  • IMG_8070.jpg
    IMG_8070.jpg
    107.2 KB · Views: 73
  • IMG_8073.jpg
    IMG_8073.jpg
    104.9 KB · Views: 73
  • IMG_8074.jpg
    IMG_8074.jpg
    102.5 KB · Views: 97
  • IMG_8077.jpg
    IMG_8077.jpg
    81.3 KB · Views: 88

JSmall

Bronco Guru
Joined
Feb 18, 2004
Messages
3,223
Jaromy, I think you have it all wrong...what you mean to say is "it's time to buy another Bronco and start a new project"! Ha!

I think that is the thing I love the most about build threads. It keeps me inspired to build things!

That is possible ;D I need to befriend you and all your tools before I start another :D:D:D
 
OP
OP
M

marjama

Contributor
Sr. Member
Joined
Nov 24, 2004
Messages
413
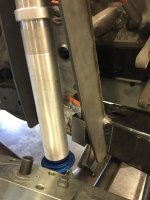
Rear bump and shock mounts...

Ok, carrying on!

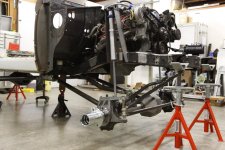
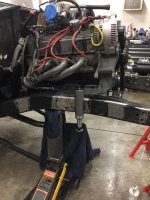
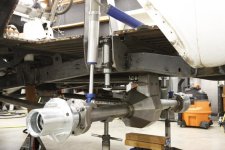
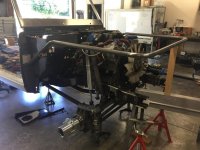
The rear bump mounts were a little less constrained...at full articulation there is room for the pinch bolts. However the distance from the axle to the frame at full bump is quite small. I ended up doing a more standard double pinch bolt for the bump mount, and then incorporated it into the coil over mount.

Bump stop mounts are a bit of a compromise...depending on the application, you'd typically want to be in line with the shock if possible to protect the shock. I'm set up at both ends so the bumps go solid with 1/4" showing on the shock shafts (I'll add back in a bump rubber there as well). In articulation, I can bottom the shock long before the air bump is fully compressed. This is generally ok since you won't normally be hitting full articulated travel at speed, but it is a compromise. The goal is to avoid putting full bottoming force into the shock mount...otherwise the design needs to adjust for that. (Yes, I'm talking to all of you with ORI's :))

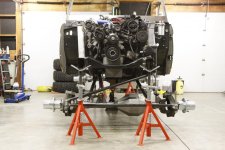
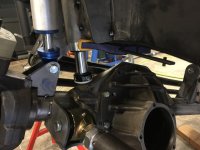
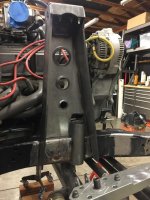
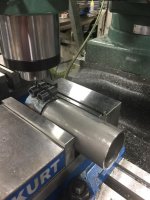
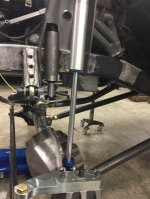
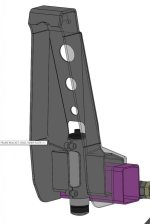
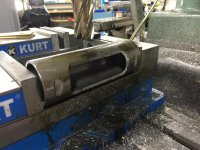
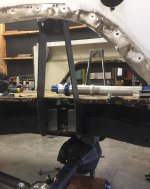
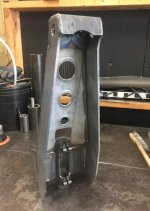
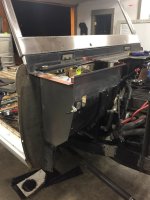
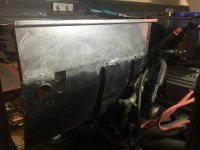
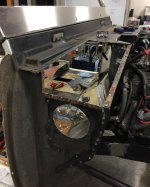
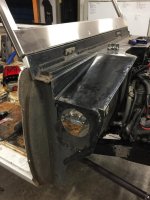
Pic's shown...original solidworks model, machining the bump cans, bosses welded on cans, can mount added to rear shock mount assembly, everything tacked up, fully welded rear shock & bump mount, tacked back in, and the full assembly.

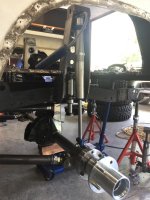
Same as the front, still need to install the bump targets. Both front and rear towers will get tied together at the top...somehow. Haven't sorted that out yet. Feeling pretty good about the progress!
 

Attachments

  • REAR SHOCK MOUNT ASSY.jpg
    REAR SHOCK MOUNT ASSY.jpg
    44.6 KB · Views: 82
  • IMG_8086.jpg
    IMG_8086.jpg
    125 KB · Views: 74
  • IMG_8090.jpg
    IMG_8090.jpg
    114 KB · Views: 73
  • IMG_8111.jpg
    IMG_8111.jpg
    88.7 KB · Views: 78
  • _MG_6250.jpg
    _MG_6250.jpg
    84.3 KB · Views: 85
  • IMG_8127.jpg
    IMG_8127.jpg
    86.4 KB · Views: 81
  • _MG_6257.jpg
    _MG_6257.jpg
    92.5 KB · Views: 88
  • IMG_8131.jpg
    IMG_8131.jpg
    106.2 KB · Views: 83
OP
OP
M

marjama

Contributor
Sr. Member
Joined
Nov 24, 2004
Messages
413
That is possible ;D I need to befriend you and all your tools before I start another :D:D:D

Ha...sounds good! I'm quite lucky to have access to so much these days. I do have quite a few tools at home, but I use the shop at work all the time as well!
 
OP
OP
M

marjama

Contributor
Sr. Member
Joined
Nov 24, 2004
Messages
413
Looking very nice. Great job.

Thanks rcmbronc! Trying to keep on it, but it's tough to find time to make progress. Next step is tubing the front end to support the fenders, grill, radiator, etc.
 
OP
OP
M

marjama

Contributor
Sr. Member
Joined
Nov 24, 2004
Messages
413
Merry Christmas gang!

Hard to believe it has been 7 months since my last update. Geez. As always, life happened...and my dad 'gifted' me a 1970 F250 highboy that has been distracting me (it hasn't run in 20 years or so...got it running, and have been rebuilding the axles and brakes because it's definitely would not stop!). I'm clearly not going to hit my goal of getting this thing on the rolling before the end of the year, but I'm still working on it!

Just for a little visual Bronco excitement...here's my latest acquisition for the Bronco. Going with Wilwood's forged superlites all around. I was trying really hard to use a set of Brembos from a '14 Camaro SS (these are probably one of the lowest cost Brembo sets you can find online), but I just couldn't get 'em to bolt up in the front! Those Solid Industries knuckles are just too massive! Radial mount Wilwood's to the rescue. Now to figure out how to make mounts for them...

I'm still trying to sort out the tube front end. Getting closer, but nothing pic-worthy just yet! I'll get back on this project and post more updates in the coming months (I hope...ha!). Here's to a great 2019 and an even better 2020!
 

Attachments

  • IMG_20191220_162207.jpg
    IMG_20191220_162207.jpg
    88.7 KB · Views: 47

.94 OR

Contributor
Bronco Guru
Joined
Jul 5, 2009
Messages
1,663
Go ahead and sneak some Hi-Boy shots in here by accident... ;D
 

JSmall

Bronco Guru
Joined
Feb 18, 2004
Messages
3,223
I’m going to need some updates soon :cool:. I plan to go with a full float fabricated 9” soon so your pics are helping me make that decision ;D
 
OP
OP
M

marjama

Contributor
Sr. Member
Joined
Nov 24, 2004
Messages
413
I’m going to need some updates soon :cool:. I plan to go with a full float fabricated 9” soon so your pics are helping me make that decision ;D

Man, Jaromy...I wish I had more pics to share! I feel like you've done 90% of the things I was thinking of doing anyway, so maybe you should just go first? Ha!

I'm finally getting caught up on other projects. I haven't ever really stopped on this one, but have nothing interesting to share just yet. I need to take about a month off of work so I can just wrap up a bunch of stuff! That said, I'm working from home full time as a result of this whole COVID-19 thing, so...I have been taking some breaks ;D More to come!

Hope all of you are staying healthy!
 

JSmall

Bronco Guru
Joined
Feb 18, 2004
Messages
3,223
Man, Jaromy...I wish I had more pics to share! I feel like you've done 90% of the things I was thinking of doing anyway, so maybe you should just go first? Ha!

I'm finally getting caught up on other projects. I haven't ever really stopped on this one, but have nothing interesting to share just yet. I need to take about a month off of work so I can just wrap up a bunch of stuff! That said, I'm working from home full time as a result of this whole COVID-19 thing, so...I have been taking some breaks ;D More to come!

Hope all of you are staying healthy!

I may have done it already, but it’s not as nice as what you’re doing :cool:. I’m looking forward to some updates.
 
OP
OP
M

marjama

Contributor
Sr. Member
Joined
Nov 24, 2004
Messages
413
Go ahead and sneak some Hi-Boy shots in here by accident... ;D

I'm not sure the Highboy is all that exciting yet, but...it's out of the shop for now, and out of the way! I installed an offset tie rod today using Ruffstuff GM 1T tie rod ends, and ran into a weird issue...the jam nuts they supplied weren't the same wrench size. I sent them a message, but I think I'm done ordering from them. I know a lot of people love 'em, so YMMV...

For those of you who just jumped into the thread, my dad gave me the Highboy. He bought it new in '71, put some time and money into it about 20 years ago and soon after one of the guys on the farm bumped it with a potato truck, followed by some low-life's stealing the carb and distributor out of it. That's how it sat for the last 20 years. I cleaned all of the mouse sh^t out of it, got it running, and found out the brake system was seized up...which led to a full rebuild of the rear D60, and swapping in a '77 disc D44-HD that I also rebuilt. Finally pulled it out of the shop and parked it. Pretty sure it's getting a 24V Cummins in it, but that is for another day and a different thread (maybe in a different forum)! Attached photo is where it stands today, looking pretty much the same. It's a big project...rust in some seams, and just a little beat up!

So, I'm back on the Bronco...while I finish up a master bath remodel. I'm just a glutton for punishment! Ha! Stay tuned!
 

Attachments

  • IMG_20200406_183727.jpg
    IMG_20200406_183727.jpg
    185.3 KB · Views: 49
OP
OP
M

marjama

Contributor
Sr. Member
Joined
Nov 24, 2004
Messages
413
Hey gang...I'm back at work on the Bronco and thought I'd post some updates. Looking at my build thread I did sneak in a few projects here and there, but not a lot has happened on the Bronco for a while.

Let's start here...passenger fresh air inlet delete. I can't remember the last time it was functional in my EB, and it takes up valuable real estate...so out it goes! I still need to make the top panel, but need to roll some beads into it first. Still have a few changes to make to the firewall as well, but this was far enough to get on to the next step...the engine cage / fender mounts.
 

Attachments

  • IMG_8265.jpg
    IMG_8265.jpg
    89.6 KB · Views: 53
  • IMG_8260.jpg
    IMG_8260.jpg
    96.7 KB · Views: 56
  • IMG_8248.jpg
    IMG_8248.jpg
    82.9 KB · Views: 55
  • IMG_8222.jpg
    IMG_8222.jpg
    111.7 KB · Views: 61
  • IMG_8221.jpg
    IMG_8221.jpg
    104.4 KB · Views: 58
OP
OP
M

marjama

Contributor
Sr. Member
Joined
Nov 24, 2004
Messages
413
I had it in my mind to bend up the main hoop for the engine cage & fender supports in one piece. I like to learn everything the hard way (by screwing things up!), but still managed to pull it off in a relatively decent manner...after I made the handy plane of bend gauge shown.

In the midst of this, I knew I was going to sell off my 'vintage' High Country Hood in favor of one of the more modern hoods that have support on the bottom and decided on the Buckaroo hood from WH. (Shortly after I saw that Jeromy installed the same hood...I swear I'm not copying your build! I like your style though :) )

This was like last September...it has been a while!

Having the hood was critical to make sure everything cleared. I've been temped to go back to a hood latch rather than just hood pins, so I brought the hoop just behind the part of the hood intended for latching. This causes problems later. Stay tuned!
 

Attachments

  • IMG_8340.jpg
    IMG_8340.jpg
    175.9 KB · Views: 54
  • IMG_8341.jpg
    IMG_8341.jpg
    111.9 KB · Views: 56
  • IMG_8343.jpg
    IMG_8343.jpg
    102 KB · Views: 59
  • IMG_8362.jpg
    IMG_8362.jpg
    91 KB · Views: 67
Top