• Welcome to ClassicBroncos! - You are currently viewing the forums as a GUEST. To take advantage of all the site features, please take a moment to register. It's fast, simple and absolutely free. So please join our community today!
    If you have problems registering or can't log into your account, please contact Admin.

Cheaper Than Therapy: A Build Thread

OP
OP
M

marjama

Contributor
Sr. Member
Joined
Nov 24, 2004
Messages
413
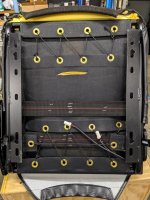
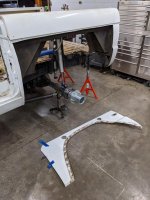
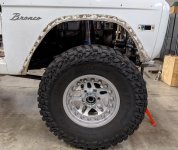
This brings us up to pretty much where I'm at today...time for some serious sheet metal trimming!

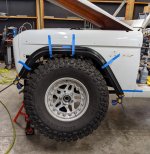
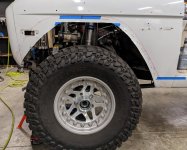
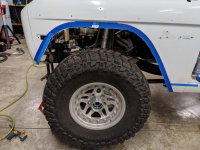
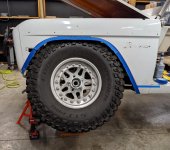
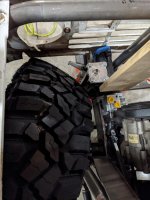
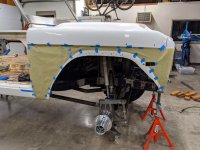
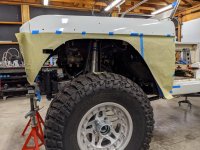
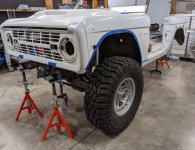
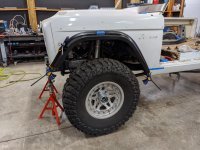
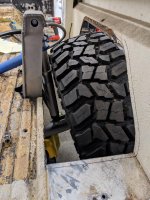
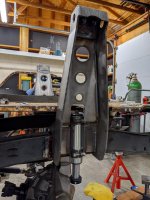
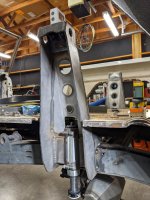
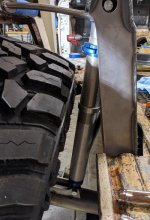
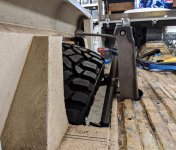
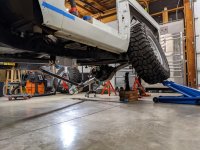
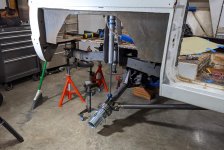
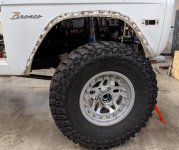
In the attached images, this is at ride height. I'm still aiming for 6" of up travel in the front, and it is pushed forward 3" (this is a silly combination when it comes to everything fitting...but I want it as low as possible. Who doesn't like a challenge? ;D ) The tires contact the fender with the tire barely turned. Time to bust out the trimming tools!
 

Attachments

  • PXL_20201106_034347577.jpg
    PXL_20201106_034347577.jpg
    125.3 KB · Views: 61
  • PXL_20201106_034404475.jpg
    PXL_20201106_034404475.jpg
    124.8 KB · Views: 64

kman67

Contributor
Jr. Member
Joined
Apr 8, 2005
Messages
99
Loc.
Aptos
I made a tube support like this about 10 years ago, but without a bottom tube to support the upper tube. Now it is starting to bend down, so you definitely need something to support the upper tube. Is there enough room to go behind the headlights?
BTW, nice fab work!!

At this point I went back to work on the engine cage in an attempt to finalize the core support structure. Man, I burned SO much time on the drivers side tube...I think I made three different versions! Trying to hold the front plane flat with bends in two planes...joining into a bend. WTF was I thinking?!

I was pretty happy with the end result! Until I put the tires back on and started cycling the suspension. SO. MUCH. TIME. WASTED. More on this later...but hey, at least I got a lot more practice with multi plane bends and hand fitting tubes. Fortunately I wasn't using DOM after the first attempt

Public Service Announcement: If you are building something ridiculous and you are going to spend a ton of time on something that you know is at risk of contacting other components, don't rely on your gut feeling that it'll clear! :)
 
OP
OP
M

marjama

Contributor
Sr. Member
Joined
Nov 24, 2004
Messages
413
Hey Kman, I'll definitely be adding more tube in there to hold everything up. I've been cycling and trimming a TON of sheet metal and there is room, but it's going to be tight. I will post some pics shortly. (Thanks for the thumbs up on the fab work! :) )

I noticed you are down in Aptos. CA, right? I lived down there for ~5 years when I worked at Fox. I always miss the Santa Cruz area!

I made a tube support like this about 10 years ago, but without a bottom tube to support the upper tube. Now it is starting to bend down, so you definitely need something to support the upper tube. Is there enough room to go behind the headlights?
BTW, nice fab work!!
 
OP
OP
M

marjama

Contributor
Sr. Member
Joined
Nov 24, 2004
Messages
413
So, here's a silly question that I'm pondering...what can be done to limit articulation, but not total vertical travel?

I know. This is the exact opposite of what most guys are looking to do! #thestruggleisreal

A reminder of what I've been attempting to do: 14" travel coilovers, 6" up / 8" down travel, 37" tires, lowest ride height possible (54" to top of the door post currently). The front axle is also moved ~3" forward. WMS is 64" front, 63.5" rear.

I knew getting full articulation was going to be tough, and I knew that at full lock to the passenger side I'd be hitting the steering box in some circumstances. I've trimmed away a ton and have the flares at pretty much the highest point. With the passenger side fully extended, the tire will now clear everything as long as I am steering straight ahead - but it won't clear the lip of the flare. I can trim the flare too, but I'd rather find some other solutions.

I'm going to try to limit the travel on the passenger side to 12" and see what that gets me. Any ideas to limit articulation without limiting the full shock travel?

I know I'm trying to do some silly stuff here. If I raised the ride height by 2" it would all probably clear just fine. Once I add in coil springs, charge the air bumps and everything else to make it drive normally I think it is unlikely to ever get to true full articulation. I don't want tire to be able to contact sheet metal or the flare though.

In the pics you can see the flare centered over the tire, and then cut to a 1.5" (I think) tape line. The top view of the tire inside the body is not quite at full compression - I need to trim some more of the grill to get it there. I don't want to keep trimming though if I'm going to limit travel and it's not necessary.

OH...and now you can see why I had to cut out the core support tubes I spend so much freaking time on! Ha! Should have checked things out before I spent so much time on it. Measure twice. Cut once.
 

Attachments

  • PXL_20201109_003509992.jpg
    PXL_20201109_003509992.jpg
    155.2 KB · Views: 49
  • PXL_20201109_004030937.jpg
    PXL_20201109_004030937.jpg
    116.8 KB · Views: 50
  • PXL_20201109_005212692.jpg
    PXL_20201109_005212692.jpg
    116 KB · Views: 44
  • PXL_20201109_143539841.jpg
    PXL_20201109_143539841.jpg
    131.6 KB · Views: 49
  • PXL_20201109_143826459.jpg
    PXL_20201109_143826459.jpg
    141.8 KB · Views: 44
  • PXL_20201109_143804160.jpg
    PXL_20201109_143804160.jpg
    96.5 KB · Views: 47
  • PXL_20201109_143612967.jpg
    PXL_20201109_143612967.jpg
    149.8 KB · Views: 44
OP
OP
M

marjama

Contributor
Sr. Member
Joined
Nov 24, 2004
Messages
413
No big solutions have come to mind yet to get everything to clear at full articulation up front. I tried limiting the shock travel to 12" and that only helped slightly. It looks like I could probably get everything to clear more easily if I reduced my up travel from 6" to 5"...but I don't love that option. I need travel if I'm going to jump this thing someday! ;D
 
OP
OP
M

marjama

Contributor
Sr. Member
Joined
Nov 24, 2004
Messages
413
Heated Seats

Part of the goal of this build is really just to take all of the things I've purchased for the Bronco over the years and actually install them. So, while I contemplate how to resolve the suspension clearance issues...I took on the seat heater installation.

It was a cold afternoon back in September of 2013 when I decided that the Bronco needed heated seats. I ordered a pair of Warmseats waterproof heater kits from Cobraheat. I then proceeded to look at them longingly over the next 7 years. Two days ago the dream of a warm backside finally became reality! (Well, almost...I mean, the truck can't move yet and has no interior...so, it's still a dream!)

In all seriousness - the kits are complete with everything needed to wire them up, and are pretty dang simple to install. I need to get better at taking photos (as usual), but you just need to loosen the seat covers to the point you can slide them in. I trimmed the lower pad to fit, but the upper I left full size and just slid it up in the seat. I did tack them in place with a shot of 3M Super 77, but it's probably not needed. The last image is the pad wiring exiting under the seat.

The link above is to their home site, but you can often find them discounted elsewhere. Seem to work pretty well in a bench test! Installing in a stock Bronco seat would be very similar, other than dealing with hog rings vs paracord and velcro.
 

Attachments

  • PXL_20201114_201712184.jpg
    PXL_20201114_201712184.jpg
    167.3 KB · Views: 27
  • PXL_20201114_025353070.jpg
    PXL_20201114_025353070.jpg
    98.3 KB · Views: 25
  • PXL_20201114_030306574.jpg
    PXL_20201114_030306574.jpg
    132.8 KB · Views: 24
  • PXL_20201114_031848754.jpg
    PXL_20201114_031848754.jpg
    208.6 KB · Views: 22

Howard2x4x4

Contributor
Bronco Guru
Joined
Apr 19, 2014
Messages
2,300
Splendid, absolutely splendid! Great workmanship and vision! I also appreciate the smattering of trial and error (been there, done that!)

Howard in windy and cold but still beautiful west Michigan
 

JeffG

Contributor
Sr. Member
Joined
May 7, 2004
Messages
510
Loc.
San Antonio, TX
I don't have an answer to how to limit articulation, but not total vertical travel.

A couple ideas to gain some extra clearance:

1. Extreme - Narrow the grille and hood and boat tail the front fenders. Not for everyone.

2. A lot of work - cut the fenders at mid-point of tire and lengthen them ~ 2". Of course that would snowball into having to lengthen the hood and make changes to that nice core support you built.

However, it would also allow you to move the Power Steering box forward to clear even more of the tire.
 
OP
OP
M

marjama

Contributor
Sr. Member
Joined
Nov 24, 2004
Messages
413
Splendid, absolutely splendid! Great workmanship and vision! I also appreciate the smattering of trial and error (been there, done that!)

Thanks Howard! Ya just never know what problems you are going to run into until you actually start building stuff!

I don't have an answer to how to limit articulation, but not total vertical travel.

A couple ideas to gain some extra clearance:

1. Extreme - Narrow the grille and hood and boat tail the front fenders. Not for everyone.

2. A lot of work - cut the fenders at mid-point of tire and lengthen them ~ 2". Of course that would snowball into having to lengthen the hood and make changes to that nice core support you built.

However, it would also allow you to move the Power Steering box forward to clear even more of the tire.

Thanks Jeff! Good ideas for sure, but pretty extreme...even for me :) I ended up going with the easy solution. I went from 2" to 3" body lift. Not ideal, but it was the only reasonable solution I could come up with! It would be nice to move the steering box even further forward.
 
OP
OP
M

marjama

Contributor
Sr. Member
Joined
Nov 24, 2004
Messages
413
Front suspension

Code:
As mentioned in my last reply, my solution to getting sheet metal clearance up front was...an extra 1" body lift. Maybe I'm taking this too far since it'll now clear with one side completely compressed and one fully extended (an unlikely situation)...but that's just how I roll. I did realize tonight that I did it without the rotor in place (doh!), which will space the tire out about .350". Shouldn't effect much, but needless to say...I'll be verifying it again.

Pics here show the final drivers side cut, making a paper pattern to transfer the same cut to the opposite side & applied, and then the stance with the flare in place at ride height(ish). It has a pretty decent gap from tire to flare (maybe 8.5"), but that is what is required for 6" up travel and full articulation in this particular combination. I can always lower it a bit if I decide I don't dig it.

On to the next challenge!
 

Attachments

  • PXL_20201115_014453637.jpg
    PXL_20201115_014453637.jpg
    141.5 KB · Views: 56
  • PXL_20201115_012023929.jpg
    PXL_20201115_012023929.jpg
    114.4 KB · Views: 61
  • PXL_20201115_010906983.jpg
    PXL_20201115_010906983.jpg
    124.5 KB · Views: 64
  • PXL_20201115_005152748.jpg
    PXL_20201115_005152748.jpg
    130.4 KB · Views: 68
  • PXL_20201115_014436919.jpg
    PXL_20201115_014436919.jpg
    128.4 KB · Views: 62
OP
OP
M

marjama

Contributor
Sr. Member
Joined
Nov 24, 2004
Messages
413
The next challenge...

So, on to the next challenge...which I found shortly after solving the front.

I've never been able to fully cycle the rear suspension since the rear quarter sheet metal was in the way. The rear quarters have rust in the seams and the wheel base has changed, so they'll be replaced. Time to cut 'em out!

Unfortunately this is what I found. The upper rear shock towers are going to need to move in. In hindsight I probably could have figured this out in my model, but clearly I didn't. This is not an easy change since the rear bump stops also need to move in. I'm going to have to pull them off and cut into the frame to make it happen. This would be much easier with the body removed, but I'm not quite ready to make that happen. So, I think that's the project for this week.

One step forward, two steps back! I was laying under the truck thinking about all of the things I need to do just to get it rolling again. I can see the light at the end of the tunnel...but it's a LONG tunnel! Fortunately I'm not easily discouraged :)
 

Attachments

  • PXL_20201116_023836974.jpg
    PXL_20201116_023836974.jpg
    121.6 KB · Views: 57
  • PXL_20201116_025339572.jpg
    PXL_20201116_025339572.jpg
    156.6 KB · Views: 61

JeffG

Contributor
Sr. Member
Joined
May 7, 2004
Messages
510
Loc.
San Antonio, TX
Don't forget to put the rotor on the rear before you start cutting. Like you mentioned on the front, shouldn't effect much but any extra spacing will help.
 

sprdv1

Contributor
REBEL
Joined
Mar 8, 2007
Messages
81,747
Long as you happy with it,... That's the important part :)

Code:
As mentioned in my last reply, my solution to getting sheet metal clearance up front was...an extra 1" body lift. Maybe I'm taking this too far since it'll now clear with one side completely compressed and one fully extended (an unlikely situation)...but that's just how I roll. I did realize tonight that I did it without the rotor in place (doh!), which will space the tire out about .350". Shouldn't effect much, but needless to say...I'll be verifying it again.

Pics here show the final drivers side cut, making a paper pattern to transfer the same cut to the opposite side & applied, and then the stance with the flare in place at ride height(ish). It has a pretty decent gap from tire to flare (maybe 8.5"), but that is what is required for 6" up travel and full articulation in this particular combination. I can always lower it a bit if I decide I don't dig it.

On to the next challenge!
 
OP
OP
M

marjama

Contributor
Sr. Member
Joined
Nov 24, 2004
Messages
413
Not quite enough!

After finding the potential interference issue in the rear suspension, I started hacking away at it again. Photos below show the shock tower / bump stop mount before, cutting a hole in the frame to recess it by 3/4", tacked back on...and the end result. I'm at about 5/8" now, which is still not really enough. I'm going to shift it a bit more...and move the lower mount a little too. That should get me where I need to be. I hope. I'll be plating the frame a bit once I actually start welding everything solid.

Getting closer!
 

Attachments

  • PXL_20201117_021322703.jpg
    PXL_20201117_021322703.jpg
    112.3 KB · Views: 49
  • PXL_20201117_020318381.jpg
    PXL_20201117_020318381.jpg
    93.7 KB · Views: 53
  • PXL_20201117_015520509.jpg
    PXL_20201117_015520509.jpg
    116.8 KB · Views: 52
  • PXL_20201117_030615341.jpg
    PXL_20201117_030615341.jpg
    101.4 KB · Views: 51
  • PXL_20201117_045926643.jpg
    PXL_20201117_045926643.jpg
    125.6 KB · Views: 55
  • PXL_20201117_052127081.jpg
    PXL_20201117_052127081.jpg
    106.9 KB · Views: 49
OP
OP
M

marjama

Contributor
Sr. Member
Joined
Nov 24, 2004
Messages
413
More progress last night...I'm calling the rear suspension finalized! I moved the rear towers in by 1 1/4", which necessitated cutting pretty far into the frame, and moved the lower shock mounts in by 3/4". I still need to make new lower shock mounts, but it looks like everything works! Clearance between the tire and the wheel well is pretty tight (1/2" at full stuff, but I'm satisfied with that...turns out the extra 1" of body lift was a good move ;D

When I eventually weld everything up solid I'll have to modify the towers a bit, and will plate everything to close the frame back up. Still a lot of work to do, but I'm looking forward to pulling the body off one day and finishing up the frame. Getting closer!

On to the next project...figuring out how to remove & replace the rear quarters!
 

Attachments

  • PXL_20201119_070503041.jpg
    PXL_20201119_070503041.jpg
    172.3 KB · Views: 49
  • PXL_20201119_070443740.jpg
    PXL_20201119_070443740.jpg
    131.9 KB · Views: 44
  • PXL_20201119_045753948.jpg
    PXL_20201119_045753948.jpg
    125.2 KB · Views: 43
  • PXL_20201119_070520843.jpg
    PXL_20201119_070520843.jpg
    115.5 KB · Views: 46

mp

Bronco Guru
Joined
Dec 22, 2001
Messages
2,914
Loc.
Austin, TX
I do have one request that might have been covered in your old build thread. According to your footnote, your are running a Ford EFI with a 700R4? Can you snap a pic of your 700R4 tv bracket and an backstory behind it? Is it a custom piece, modified off the shelf, or an off the shelf, bolt on and goo bracket? Thanks!
 
Top