OP
OP
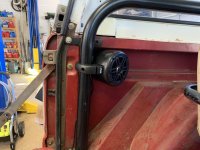
I got the child restraint points installed today to make sure my son and DIL will let the grand kids ride in the Bronco! LEBC Round Up prep!


I got the child restraint points installed today to make sure my son and DIL will let the grand kids ride in the Bronco! LEBC Round Up prep!
I'll take one plz.
Gonna need that soon. Also, I think when I started designing something similar I wasn't sure that the standard straps on the seats would reach down/back that for for the side ones?
Or are you planning to use a three point and this is just a point for the center hook?
Also figuring you measured the standard thickness of the loops to match the welded rings?
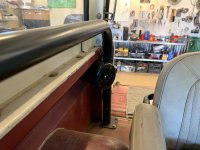
And the rear seat in with new seatbelts . . .

I have a similar set up in my crawler and it worked fine for the car seat they had a year or so ago. They have a new bigger one now. I’m assuming it will work too. We’re going to try it this weekend before the Round Up. Yes, planning to use it as a 3 point connection. And, yes, I chose the rings as close to the thickness of standard loops as I could. The 1 1/2” ID rings from Tractor Supply matched well.
")
I love this build.
Do you have any drawings or is it some plate with welded half rings?
How much for shipping?
No drawings. It's an angle iron with welded on rings. Let me see if this works with the new car seat - you've got me questioning whether it works with the side straps! I may have to modify it some.


Gary in one of the previous pictures of the steering wheel it had tape on it. Was the tape over a section that needed repair (I'm interested in the details on that if so) or was the tape there to help identify "straight" in the event you were in a situation where your drifting around corners?After a break to go to Big Bend I'm back on the Patina Bronco! I got the tire carrier and Ranch Hand bracket installed. I refurbished the tail gate latch but need to fix the tail gate before I reinstall it.


I had to use a 1 inch space to hold the rack off the flare when it's in the Ranch Hand position.

I'm still looking for the tire mounting hardware to actually hang a tire on it!
I also worked on refurbishing the stock steering wheel I picked up from BC Broncos. It was in poor shape with some cracks at the base of the spokes - but it was still the best out of a bunch I looked at!
I filled the cracks with a paintable silicone caulk, used black primer and then painted it in VHT "Black Pearl" paint. I then satin clear coated it.
Here it is cleaned up and ready for prime.

Painted and clear coated.

Next up I need to paint the steering column and mount the refurbished steering wheel.


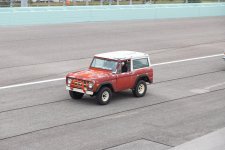
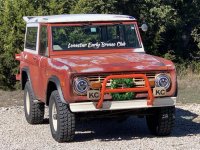
Thought I’d do a quick update to this thread. First I want to document this with a couple pics of Patina Bronco doing some parade laps on Homestead Miami Raceway.
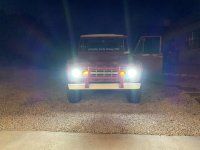
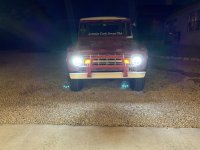
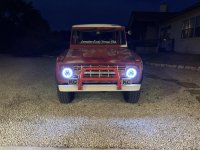
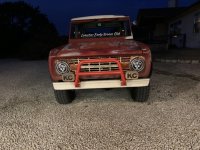
And second, I installed some LED headlights today. I went with some halo lights just for fun! They installed easy. Had to wire up a switch for the halos.
I recognize that good lookin cage;D