• Welcome to ClassicBroncos! - You are currently viewing the forums as a GUEST. To take advantage of all the site features, please take a moment to register. It's fast, simple and absolutely free. So please join our community today!
    If you have problems registering or can't log into your account, please contact Admin.

Replacing Floor Pans = Frame Off Restoration!

OP
OP
MidwestTexan

MidwestTexan

Jr. Member
Joined
Apr 1, 2018
Messages
92
At this point I had it back to a rolling chassis and put the motor, tranny and TC on. I rebuilt the D20 and putting a HD output shaft on from WH. I ran into a few fitment issues. The alternator and d/s header were hitting the frame so I notched them. Then the remote oil filter would not fit as the alternator was in the way. I had to put the mustang timing cover and oil filter adapter which cured all that. Pushing forward!

5d6c9c6adec0059f398ee212eab7ba57.jpg


839375de4fe03d02de6037ea3b093390.jpg


84bd69560319d177a24dd66505f5bee1.jpg


17037db8ee41dfa518430df759a390ac.jpg


Sent from my iPhone using Tapatalk
 

ngsd

Contributor
Bronco Guru
Joined
Mar 2, 2019
Messages
2,531
Just curious on why the fitment issues. I have not got this far yet and while I have only read other posts, there seems to be a lot of discussion that fitment is not an issue overall with certain aftermarket parts. Was something different on yours than those or what makes one work and not another? types of parts, who makes them, or even different conversions from 6 cyl Coyote? Just wondering since I am heading down this path.
 
OP
OP
MidwestTexan

MidwestTexan

Jr. Member
Joined
Apr 1, 2018
Messages
92
Just curious on why the fitment issues. I have not got this far yet and while I have only read other posts, there seems to be a lot of discussion that fitment is not an issue overall with certain aftermarket parts. Was something different on yours than those or what makes one work and not another? types of parts, who makes them, or even different conversions from 6 cyl Coyote? Just wondering since I am heading down this path.

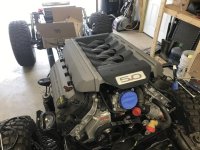
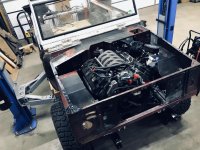
Great question... There are a couple of factors that will cause/help with fitment issues which are motor choice and motor mount choice (there's other little things, that's the main ones I ran into). I went with a 2015 F-150 (Gen 2 and was $2,800) which has a different timing cover. The mustang cover puts the alternator up higher and you wont have to notch the frame (unless you use the KE motor mounts). You will however need to relocate the d/s gusset to the front of the cross member if you want to use the factory oil filter adapter. If not, you will need to use an oil filter relocation kit. Both are easily done. The second factor is the motor mount choice. I initially went with Krawlers Edge motor mounts which the motor sits about 2" lower than the Tumblin mounts which I ended up going with. The main reason I decided to go with Tumblin's mounts was I was concerned with the front end pumpkin hitting my oil pan. Tumblins mounts raised my motor up (also increased engine angle to 6.5*) and you wont have to notch the frame for the alternator. That leads to fitment issues with your brake system. With the Tumblin mounts, I was not able to use my vacuum brake booster system as the booster was hitting the d/s engine cover and I wouldn't have been able to pull my dipstick out. I ended up going with a hydroboost which solved that problem. Then if you go with another brand of headers for example, you may or may not have to notch the frame for them.

Like I said, every time I made a change upstream, it always impacted something downstream which had to be addressed. It's not difficult, just a bit frustrating, especially when you order something and think you've figured it out, just to find out you'll need to change it later.

My advice would be to use one vendor and stick with them. Their parts will all jive together. I used parts from Tumblin, KE, BC, Summit, Jegs, etc. I was able to save money going this route, but ran into some fitment issues as stated above. They are all great companies and you won't go wrong with whichever route you end up going. Feel free to PM as well if you have any questions. And good luck, it will be totally worth it!
 

ngsd

Contributor
Bronco Guru
Joined
Mar 2, 2019
Messages
2,531
Thanks for the detailed response. This is great advice. While I am sure I will have many hurdles along the way, I am trying to learn from others about the pitfalls to avoid and really appreciate your experience being shared for all to learn from.
 

bronkenn

Contributor
Bronco Guy
Joined
Apr 27, 2017
Messages
2,662
Loc.
Southeast Ohio
I like the angle iron bracing. Getting ready to do the same. Question, I don't have a 2 post lift but I have an overhead hoist. Do you think the bracing is solid enough to lift the body up if you used points of of the bracing or do you think there is too much flex there?

I braced mine with angle across the bed and from there to the dash and used it to lift the body with no problemos.
 

Attachments

  • P8060009.jpg
    P8060009.jpg
    92.8 KB · Views: 167
  • body marry3.jpg
    body marry3.jpg
    84.6 KB · Views: 141
OP
OP
MidwestTexan

MidwestTexan

Jr. Member
Joined
Apr 1, 2018
Messages
92
bronkenn, that's a great idea! Looks like it would be much easier to replace the floor pans and kick plates. My braces were kind of a pain to work around.
 
OP
OP
MidwestTexan

MidwestTexan

Jr. Member
Joined
Apr 1, 2018
Messages
92
Everything is basically mocked up. I'm going to raptor line the tub, under carriage and engine bay. I plan on painting the cowl, windshield, door jambs and dash. Then paint the rest of the body this fall. The paint is decent now so It'll do for the summer. I'm ready to enjoy this thing!
 

Attachments

  • IMG_4463.jpg
    IMG_4463.jpg
    118 KB · Views: 204
  • IMG_4071.jpg
    IMG_4071.jpg
    131.1 KB · Views: 197

jmhend

Bronco Guru
Joined
Dec 25, 2007
Messages
2,736
Everything is basically mocked up. I'm going to raptor line the tub, under carriage and engine bay. I plan on painting the cowl, windshield, door jambs and dash. Then paint the rest of the body this fall. The paint is decent now so It'll do for the summer. I'm ready to enjoy this thing!
Great job you are flying through that thing.

Sent from my SM-G930V using Tapatalk
 
OP
OP
MidwestTexan

MidwestTexan

Jr. Member
Joined
Apr 1, 2018
Messages
92
Thanks for the kind words although I'm not really that fast. I started this build two months ago and I'm just getting around to posting pics and some details. I was so focused on trying to complete it that I didn't post anything. I did make notes in a word document so I'm just cutting and pasting! :) I will say the first 80% wasnt too bad... The last 20% is taking 80% of the time!

Here are some pics of the tub after I raptor lined it. I'm super impressed with this product. I have zero painting skill/experience... I think it turned out great!
 

Attachments

  • IMG_4682.jpg
    IMG_4682.jpg
    102.8 KB · Views: 196
  • IMG_4856.jpg
    IMG_4856.jpg
    95.8 KB · Views: 219
  • IMG_4687.jpg
    IMG_4687.jpg
    124.2 KB · Views: 217
  • IMG_4854.jpg
    IMG_4854.jpg
    98.5 KB · Views: 222
  • IMG_4852.jpg
    IMG_4852.jpg
    99.5 KB · Views: 220
  • IMG_4853.jpg
    IMG_4853.jpg
    118.2 KB · Views: 227

sprdv1

Contributor
REBEL
Joined
Mar 8, 2007
Messages
81,747
does look very good chief....

Thanks for the kind words although I'm not really that fast. I started this build two months ago and I'm just getting around to posting pics and some details. I was so focused on trying to complete it that I didn't post anything. I did make notes in a word document so I'm just cutting and pasting! :) I will say the first 80% wasnt too bad... The last 20% is taking 80% of the time!

Here are some pics of the tub after I raptor lined it. I'm super impressed with this product. I have zero painting skill/experience... I think it turned out great!
 
OP
OP
MidwestTexan

MidwestTexan

Jr. Member
Joined
Apr 1, 2018
Messages
92
This is the point I'm at now. I finally got some parts back from the powder coater and I installed the WH extreme duty output shaft for the D20. I went with the hydroboost as the vacuum booster was hitting the valve cover and dipstick. I think I'll like the HB much better as I've read these newer engines don't make good vacuum. I'm going to raptor the inside of the outer fenders and the tailgate over the next few days. I'll also paint the cowl, windshield, dash and door jambs. Hopefully I can fire her up in the next 7-10 days!
 

Attachments

  • IMG_4860.jpg
    IMG_4860.jpg
    113.7 KB · Views: 249
OP
OP
MidwestTexan

MidwestTexan

Jr. Member
Joined
Apr 1, 2018
Messages
92
I've narrowed it down to 3... White, Brittany Blue or Grigio Titans... I know, they couldn't be any different! haha I need to make my mind up by tomorrow and I can't make my mind up.
 

TX SS

Contributor
Sr. Member
Joined
Aug 29, 2013
Messages
753
Loc.
Houston
The raptor liner looks really good. How much product did you use in total?
 
OP
OP
MidwestTexan

MidwestTexan

Jr. Member
Joined
Apr 1, 2018
Messages
92
Thanks! It took 10 liters to do the tub, undercarriage and engine bay. I ordered two more liters to finish the tailgate and inside the outer fenders. One of the reps thought I could do it with 4 although there's no way that would have been possible. I only did two coats too.
 

jmhend

Bronco Guru
Joined
Dec 25, 2007
Messages
2,736
This is the point I'm at now. I finally got some parts back from the powder coater and I installed the WH extreme duty output shaft for the D20. I went with the hydroboost as the vacuum booster was hitting the valve cover and dipstick. I think I'll like the HB much better as I've read these newer engines don't make good vacuum. I'm going to raptor the inside of the outer fenders and the tailgate over the next few days. I'll also paint the cowl, windshield, dash and door jambs. Hopefully I can fire her up in the next 7-10 days!

That Hydroboost bracket is my favorite fits like a glove.
 
Top