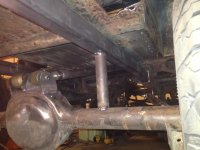
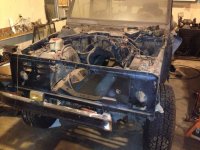
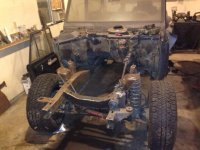
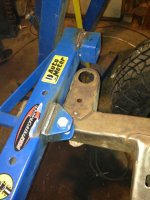
• Welcome to ClassicBroncos! - You are currently viewing the forums as a GUEST. To take advantage of all the site features, please take a moment to register. It's fast, simple and absolutely free. So please join our community today!
    If you have problems registering or can't log into your account, please contact Admin.

1969 4BD1T Diesel & NV4500 conversion on 33's

OP
OP
BradtheWelder

BradtheWelder

Full Member
Joined
Sep 3, 2013
Messages
290
Loc.
Moline IL
I am of little faith. I would have parted it out. You have so much talent and time, and you seem to be trying to make silk purse out of a sow's ear. I wish you well, but I personally have made mistake of sinking time, money, effort, and did I say time into the wrong starting point/rig. Ask 72EB to confirm.

I know I can bring this Bronco back from the dead, its just more work than I wanted to do. I also believe you got to know your skill level also. Some people can fix dilapidated P.O.S. like this, some people will make seriously poor fixes to make it appear like it was fixed like the previous owner. %)

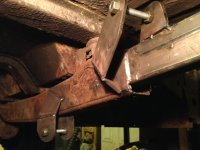
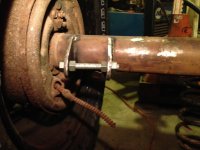
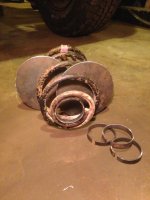
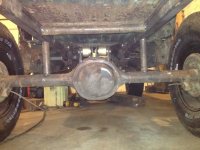
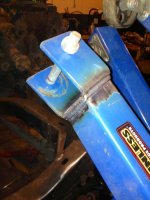
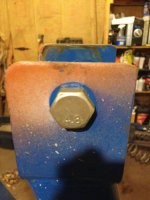
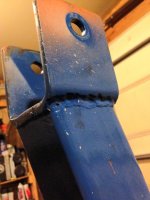
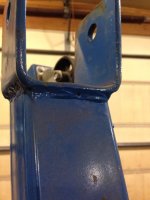
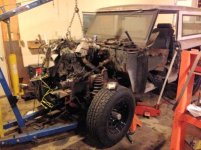
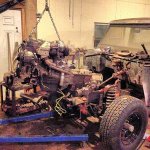
Bringing this one back from being scrapped will be a better story also. The before and after pics are gonna kinda cool.

Good work young man. It looks as though you've climbed MOUNT EVEREST.

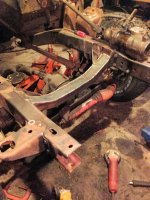
Thanks, I hope I can get through the rest of the body work on this project quickly. Still got a lot to go still. Hopefully the rest will be just as good. :cool:
 
OP
OP
BradtheWelder

BradtheWelder

Full Member
Joined
Sep 3, 2013
Messages
290
Loc.
Moline IL
Started working on the coil mounts yesterday. Made 4 1/2" tall ring that will keep the coils centered and cut out 2 6.5" for the lower buckets. Ill probably weld some nuts to the center of the mounts to bolt down the coil springs. Started to look at where i was gonna mount them but then realized I really don't what the ride height is going to be. So I moved onto the welding the 4 link brackets in. I am supporting the rear of the truck on 2 temporary pieces of tube tacked on to start working on getting the drivetrain in. I got some cleaning up of the frame rails first though. Want to start mounting the drive train this weekend.

When welding brackets on I like to take some threaded rod and 4 nuts to hold the tabs apart and to keep them from getting pulled too far apart. Works perfect every time.
 

Attachments

  • 78.JPG
    78.JPG
    108.3 KB · Views: 7
  • 79.JPG
    79.JPG
    98.3 KB · Views: 8
  • 80.JPG
    80.JPG
    104.4 KB · Views: 7
  • 81.JPG
    81.JPG
    133.9 KB · Views: 8
  • 82.JPG
    82.JPG
    110.7 KB · Views: 10
Last edited:

TwoDalesDad

Bronco Guru
Joined
Jul 19, 2011
Messages
1,515
I feel guilty as all he!! ...The broncos I have are almost pristine in comparison to what your working with. I too am the type of guy who sets him mind on something and come hell or high water....It gets DONE....YOUR WORK IS EXCEPTIONAL....YOU REALLY DO GREAT WORK....KEEP TAKING PHOTOS....AND THANKS FOR SHARING.....
 
OP
OP
BradtheWelder

BradtheWelder

Full Member
Joined
Sep 3, 2013
Messages
290
Loc.
Moline IL
Got my front clip cut off and the motor mounts ground off and cleaned up the frame tonight. Should be putting the drive train in next. Here's the before and after tonight pics.
 

Attachments

  • 83.JPG
    83.JPG
    146.5 KB · Views: 10
  • 84.JPG
    84.JPG
    120.8 KB · Views: 10
Last edited:
OP
OP
BradtheWelder

BradtheWelder

Full Member
Joined
Sep 3, 2013
Messages
290
Loc.
Moline IL
Today I worked for 6 hrs today and on my way home I got a text that a guy wanted to meet to trade a good stock hood for the cowl hood I had. Had to drive 70 miles to trade him but that's not horrible I guess. When I got home I thought about hooking up the engine to take off the stock bellhousing adapter and put my new on but then thought that I am going to have the heaviest thing on my engine hoist ever. The welds on it have always bothered me with the undercut and holes in some of the welds. It also had grade 2 hardware in it. I know grade 5 metric will say 8.8 and grade 8 will say 10.9 on the bolts so I'm assuming 4.8 is grade 2. I'm going to replace the hardware tomorrow.
 

Attachments

  • 90.JPG
    90.JPG
    278.7 KB · Views: 11
  • 89.JPG
    89.JPG
    277.6 KB · Views: 8
  • 87.JPG
    87.JPG
    268.5 KB · Views: 9
  • 86.JPG
    86.JPG
    86.1 KB · Views: 9
  • 85.JPG
    85.JPG
    103 KB · Views: 9
Last edited:
OP
OP
BradtheWelder

BradtheWelder

Full Member
Joined
Sep 3, 2013
Messages
290
Loc.
Moline IL
Worked on getting the adapter on. Spent 1.5 hr or more on just getting the stupid old pilot bearing out. This engine I believe had the original clutch for how rusty it was. The pilot bearing only had 8 of 12 or so bearings left in it. It was completely gone. Didn't want to go any further because I didn't have any brake cleaner for the flywheel. I'll get it tomorrow and put the transmission and starter on it tomorrow.

I used a dremel to break the outer piece of the bearing and chiseled it out. This is the aftermath.
 

Attachments

  • 91.jpg
    91.jpg
    69.6 KB · Views: 7
  • 92.jpg
    92.jpg
    69.2 KB · Views: 6
Last edited:
OP
OP
BradtheWelder

BradtheWelder

Full Member
Joined
Sep 3, 2013
Messages
290
Loc.
Moline IL
Ran into a problem when I tried to get the engine and trans in last night. The crossmember will need to be clearanced a little bit. I won't take it out completely though, but probably going to notch the top 1" or 2" of it. No big deal. This pic was the furthest I could get it in.
 

Attachments

  • 94.jpg
    94.jpg
    58.7 KB · Views: 12
  • 93.jpg
    93.jpg
    115.2 KB · Views: 11
Last edited:
OP
OP
BradtheWelder

BradtheWelder

Full Member
Joined
Sep 3, 2013
Messages
290
Loc.
Moline IL
Cut out the cross member and replated the top. Went to put the engine back in and I'm having some clearance issues again with the intake tube off the turbo. Don't really want to move any of that so I think im going to notch the firewall as shown in the second pic. Seriously starred at it for a hour thinking about how i should get it in there. I will only need to notch it 4" or so.
 

Attachments

  • 95.JPG
    95.JPG
    138.4 KB · Views: 12
  • 96.JPG
    96.JPG
    51.4 KB · Views: 13
Last edited:
OP
OP
BradtheWelder

BradtheWelder

Full Member
Joined
Sep 3, 2013
Messages
290
Loc.
Moline IL
Well been contemplating on what I'm going to do...I did cut the firewall, but now the problem is the oil pan hitting the front differential. I really don't think there is any other way then moving the differential over more to the drivers side. My brothers and I all agree that's what has to happen. Not sure how I'm going to do it but thinking of taking off the knuckle on the drivers side and cutting that side down. Then re tubing the passenger side. Cant move the motor back anymore in the frame. Everything is way harder and tighter than I expected.
 

harleyvet02

New Member
Joined
Jun 22, 2013
Messages
2
I am really impressed. Your fab skills are great and your determination is impressive. I will keep watching.
 

treetopflyer

New Member
Joined
Sep 5, 2003
Messages
33
Loc.
Yuma
Brad, I'm not familiar with Isuzu oil pan, but on the Cummins 4BT, folks have flipped the pan front to back and then notched it to provide further front diff. clearance. I'n sure you have been there multiple times already but check out 4BTswaps.com for some ideas?
 

MPG_Bronco

Full Member
Joined
Apr 16, 2012
Messages
346
Loc.
Chandler
wow, looks great, I like your fab skills, and your get-er-dun attitude. looking forward to more the journey.
 
OP
OP
BradtheWelder

BradtheWelder

Full Member
Joined
Sep 3, 2013
Messages
290
Loc.
Moline IL
Brad, I'm not familiar with Isuzu oil pan, but on the Cummins 4BT, folks have flipped the pan front to back and then notched it to provide further front diff. clearance. I'm sure you have been there multiple times already but check out 4BTswaps.com for some ideas?

The pickup in the pan is already in the back. I will have to show pics of what I'm talking about tonight. I considered clearance cutting it but I think it would be too much. Youll see what I mean when i post the pics up.
 

TwoDalesDad

Bronco Guru
Joined
Jul 19, 2011
Messages
1,515
I have to say a couple of things...ONE...YOUR FABRICATION SKILLS ARE WAY HIGH.....TWO......IT'S A GOOD THING THERE WAS VERY LITTLE RUST ON THIS BRONCO YOU CHOOSE TO BUILD A TOY OUT OF.......THREE.....YOUR DETERMINATION, ALONG WITH YOUR SKILL SET.....MAKES ME THINK.....YOU ARE MY LONG LOST SIBLING.....WHO MY SISTERS DITCHED....AT A TRUCK STOP YEARS AND YEARS AGO......THEY HAD IT MADE....UNTILL A SON WAS BORN......LOL....YOUR PICTURES ARE GREAT KEEP THEM COMING
 
OP
OP
BradtheWelder

BradtheWelder

Full Member
Joined
Sep 3, 2013
Messages
290
Loc.
Moline IL
I have to say a couple of things...ONE...YOUR FABRICATION SKILLS ARE WAY HIGH.....TWO......IT'S A GOOD THING THERE WAS VERY LITTLE RUST ON THIS BRONCO YOU CHOOSE TO BUILD A TOY OUT OF.......THREE.....YOUR DETERMINATION, ALONG WITH YOUR SKILL SET.....MAKES ME THINK.....YOU ARE MY LONG LOST SIBLING.....WHO MY SISTERS DITCHED....AT A TRUCK STOP YEARS AND YEARS AGO......THEY HAD IT MADE....UNTILL A SON WAS BORN......LOL....YOUR PICTURES ARE GREAT KEEP THEM COMING

Thanks for the props of the skills. As for your number 2, look back at the last two pages and you will see this thing is a pile. As for 3, haha that's funny. It weird I can do anything if I actually want to do it but if I don't, I won't most of the time.

Here's some pics of my problems.
 

Attachments

  • 98.JPG
    98.JPG
    59.6 KB · Views: 14
  • 97.JPG
    97.JPG
    110.7 KB · Views: 12
Last edited:

Colorado75Bronc

Full Member
Joined
Jan 27, 2009
Messages
335
Loc.
Colorado Springs
I would suggest you modify the pan or build a new sump section with the sump offset towards the passenger side, that way you can keep the capacity, I'm sure you could easily fabricate a new sump or whole new pan, and it would be much easier than re-tubing the axle
 
Top