• Welcome to ClassicBroncos! - You are currently viewing the forums as a GUEST. To take advantage of all the site features, please take a moment to register. It's fast, simple and absolutely free. So please join our community today!
    If you have problems registering or can't log into your account, please contact Admin.

EZ-Wireing 80 AMP Alternator bypass

lowbush

Bronco Guru
Joined
Sep 13, 2010
Messages
1,807
Loc.
Summerland Key, FL
OK Guys I am literally at the end of my project I am going down to the tag office in a few days to register the thing but I have one last issue:

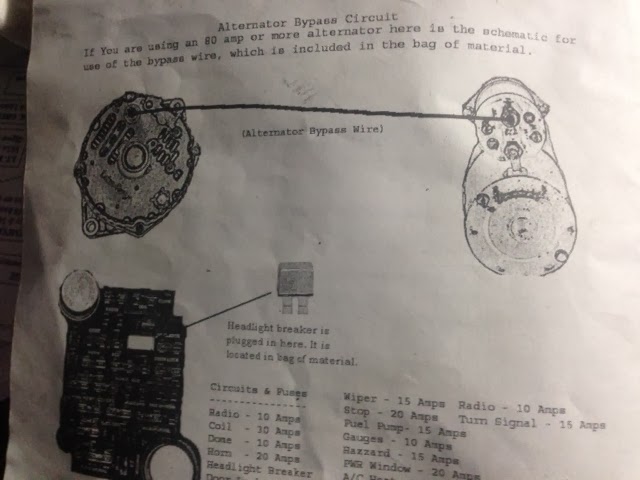
EZ-Wiring says to build a bypass for the alternator by wiring it to the starter If you take a look at the image below you will see what I am talking about.

photo+1.JPG


Now when I do that, the starter stays charged the entire time the engine is on and grinds, like when you try to start and already started vehicle.

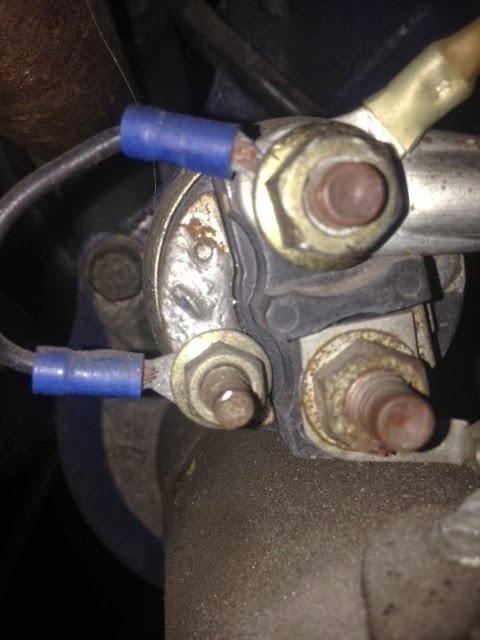
I have the battery to one side of the old ford style starter solenoids that sits on the firewall, the one with 4 post on it. The battery goes to one large post and the starter is connected to the other large post. The starter I have also has a solenoid on it that is jumped with a little black wire. See the images below for reference. I am assuming that the bypass wires to the post on the back of the alternator pictured, that is where I had it wired to, I disconnected it for the time being so it is not attached in the picture. On the other side of the wire at the starter the bypass wire is connected to the large top post. Is there another way to do the alternator bypass that will not leave the starter hot after initial ignition? I admit I don't understand what the bypass is for other than it is a potential fire hazard to not do it, but I don't understand what is being accomplished by doing it, so I cannot formulate an alternative plan to fix the issue. Wiring is the one area that I am not strong in automotives. My gut tells me that this is trying to tie the alternator directly into the battery input on the starter and given my wiring set up it should be routed to the battery side of the firewall solenoid, but I am not sure that that is what is supposed to be accomplished by this bypass.


Starter:
photo+2.JPG


Alternator:

photo+3.JPG
 
Last edited:

Viperwolf1

Contributor
electron whisperer
Joined
Aug 23, 2007
Messages
24,322
You already have the starter solenoid bypassed so it tries to start anytime it has enough current on the big post. I recommend just running the alt bypass to the battery side of the fender solenoid. The reason for it is to provide a low resistance path for the alternator current back to the battery. Typically used when the harness doesn't have a large enough charge wire, like the original harness. Use 6g or larger wire.

Your starter wiring is ok as is. There are better ways to wire it but its fine if it works for you.
 
OP
OP
L

lowbush

Bronco Guru
Joined
Sep 13, 2010
Messages
1,807
Loc.
Summerland Key, FL
Thanks Viper you guys are always quick to respond, I appreciate it. That being said my wiring is now officially done. Which means I am now off to the DMV to register the thing (well tomorrow when they open).
 

707Bronk

Sr. Member
Joined
Mar 18, 2012
Messages
590
X2 on what Viper said.

How did installing your EZ harness go?

I installed mine about two years ago and so far everything is great.

Its a lot more work than the pre-terminated harnesses, but the price savings alone as compared to a Painless allowed me to do other things, like spring teralow kit. Though, with the cost of high quality connectors, shrink tubing, wire loom, etc., it brings the cost up just enough to maybe justify a Centech harness...

Just trying to see others thoughts on these EZ kits...
 
OP
OP
L

lowbush

Bronco Guru
Joined
Sep 13, 2010
Messages
1,807
Loc.
Summerland Key, FL
X2 on what Viper said.

How did installing your EZ harness go?

I installed mine about two years ago and so far everything is great.

Its a lot more work than the pre-terminated harnesses, but the price savings alone as compared to a Painless allowed me to do other things, like spring teralow kit. Though, with the cost of high quality connectors, shrink tubing, wire loom, etc., it brings the cost up just enough to maybe justify a Centech harness...

Just trying to see others thoughts on these EZ kits...


I think it is the best kit for the money, I sold a painless kit that came with one of the two basket case trucks I used to build my truck and bought the EZ kit because I wanted more circuits. I am very happy with the kit and will use it in every project that I do from now on. I bought the mini kit and wish I would have went with the regular one because it has the flashers attached to the fuse block, where with the mini I had to fab a mount but that is a minor gripe. All in all it was a good experience.

Related but not an issue with the harness, I mounted the fuse block near the original location, on the passenger side under the dash near where the glove box would go. Had I to do it over, I would have mounted it on the drivers side firewall external to the cab and then routed the harness across the firewall for the dash gauged and other interior wires and tapped small holes at each location the wires needed to enter the cab. I think this would have been a cleaner set up. That being said it is still a clean setup and I am very happy with it.
 

707Bronk

Sr. Member
Joined
Mar 18, 2012
Messages
590
I think it is the best kit for the money, I sold a painless kit that came with one of the two basket case trucks I used to build my truck and bought the EZ kit because I wanted more circuits. I am very happy with the kit and will use it in every project that I do from now on. I bought the mini kit and wish I would have went with the regular one because it has the flashers attached to the fuse block, where with the mini I had to fab a mount but that is a minor gripe. All in all it was a good experience.

Related but not an issue with the harness, I mounted the fuse block near the original location, on the passenger side under the dash near where the glove box would go. Had I to do it over, I would have mounted it on the drivers side firewall external to the cab and then routed the harness across the firewall for the dash gauged and other interior wires and tapped small holes at each location the wires needed to enter the cab. I think this would have been a cleaner set up. That being said it is still a clean setup and I am very happy with it.

Lol...I got the large fuse box and wish I had gotten the smaller fuse box. On the large fuse box the wires run straight out the back (at least 2") making it impossible to mount it flush against a flat surface. There was very few options of where to mount the fuse box.

The PO on mine had damaged the stock speaker grille in the dash. I really couldn't find a good location for the huge fuse box that was convienient and up high enough (water crossings), and since the stock speaker grille was damaged I just cut it out and mounted it there with a hinged lid. Its really convienient, but kind of looks out of place there. REALLY wish I had gotten the smaller fuse box because there really is no good place to mount the large fuse box.

But, I'm with ya, its a good, straight forward, flexible kit with Good quality wires. Add on some weatherpack connectors and you have a poor mans painless harness with half a dozen extra fused circuits.
 
Top