


Community
Message Forum
Photo Gallery
Event Calendar
Book Reviews
Bronco Wallpaper
Bronco FAQ
Link Back to CB!
Photo Gallery
Event Calendar
Book Reviews
Bronco Wallpaper
Bronco FAQ
Link Back to CB!
Buy / Sell


Bronco Tech
3 Arm Wiper Setup
Fix Motor Mount
Roll Cage Braces
Throttle Body 65mm
Wheel Alignment
Heat Riser Replacement
Vent Window Repair
Center Console Mount
Straighten Bumper
Ford 6R80 6 spd
More Tech...
Fix Motor Mount
Roll Cage Braces
Throttle Body 65mm
Wheel Alignment
Heat Riser Replacement
Vent Window Repair
Center Console Mount
Straighten Bumper
Ford 6R80 6 spd
More Tech...

Install the app
-
Welcome to ClassicBroncos! - You are currently viewing the forums as a GUEST. To take advantage of all the site features, please take a moment to register. It's fast, simple and absolutely free. So please join our community today!If you have problems registering or can't log into your account, please contact Admin.
You are using an out of date browser. It may not display this or other websites correctly.
You should upgrade or use an alternative browser.
You should upgrade or use an alternative browser.
Broncodesign Tub #21 Build - Bare Frame Work
- Thread starter Kurt
- Start date
OP
OP
Kurt
Sr. Member
OP
OP
Kurt
Sr. Member
Woohooo, Loads of fun I'm sure.. Look forward to the progress.
Thanks.... I am as well. Mike is very good to work with.
Mike's a great guy and makes a great product....(don't tell him i said that though) ;D
The tub, halfcab top, and new hood (w/ scoop) are all top-notch products.
And anyone who has met Mike would most likely agree about his character.
The plans are:
- '93 Mustang 5.0 w/ SEFI
- Toploader 4-speed
- 3.5" WH lift
- 33" BFG Mud Terrains
- Old school slots I have if they clean up well.....

- BD Halfcab top with custom Roll-N-Lock bed cover.
- BD 'glass lower doors w/ upper inserts
Last edited:
brianstrange
Bronco Guru
- Joined
- Nov 22, 2011
- Messages
- 1,626
Can I have an order of more pictures, with a side of please sell that tub to me? My build has experienced an enormous amount of progress, and I'm ready for my tub stat! (but I'm patient too) Hee Hee (Quiet Randy)
orangecrush4u
Bronco Guru
Can't wait to see the build... When i have the time and $$ Im going to use his tub for my John H restore
BroncoDesign
Sr. Member
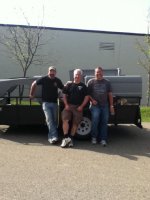
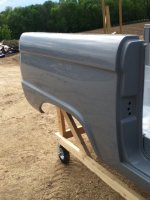
I picked up tub #21 at Broncorama last weekend from my friend Mike Standley, owner of Broncodesign.
After getting it home on Sunday, I added some casters to the wood hauling dolly.
Let the fun begin.............
Who's that ugly fat guy with the facial hair on the left?? %)%);D
Kurt- Lets exchange questions and answers on the thread so everyone knows what we're doing (and you can embarrass me with problems) as "we" (actually you), present the joys and pitfalls of doing a glass tub install. This ain't no Horsepower TV show folks but the real thing with a real budget, warts and all.
Your first question; what High-build primer/sealer? I'll call the PPG rep in the morning since the label on my can is covered in paint that ran down the side. I think it's Omni, now SHOP LINE 2K but let me check. I'm sure there are others that perform as well but I'm a PPG guy. Very forgiving and easy sanding. Some guys like "Slick Sand" but it's basically like spraying/sanding polyester gelcoat- a pain.
My tubs use a specially formulated gelcoat that's easy to sand and promotes paint adhesion. It's not cheap but it IS good. THIS IS IMPORTANT- DO NOT MACHINE SAND THROUGH THE GELCOAT!!! Block down the flashing areas where the mold seams met. Then, scotchbrite the whole surface to give it some tooth. Do a heavy fill prime and start blocking. If it's flat begin w/ 320 dry then transition to 400 wet. Identify the low spots around the seams and fill w/ body filler of choice. You may have to spot prime in areas you filled. Then, spray a light guide coat and fiinish blocking. AGAIN, DON"T GO THROUGH THE GELCOAT. Stay on top of it. If everything looks good to you, seal and topcoat. Thank Joan for putting up with our Bronco insanity and tell Zach wax on!!! wax off!!! ;D;D
Kurt, did you get one of those new hoods with the scoop?
bigpitbull
BRONCO ADDICT
Awesome!!! Keep the progress pics coming!! Do you have any idea in the weight difference switching to a fiberglass tub... I'm sure its a lot.
Tedster100
Chairman of the Bored
- Joined
- Aug 25, 2010
- Messages
- 1,762
Cool, can't wait to see the pictures of the build. I have Mike's hood and soft upper doors. Totally awsome products! You're going to love the removable soft upper doors. I wish all my parts were from BroncoDesign, I bought mine over the years and they were all different brands, grill, hood, doors, tailgate and body with fenders were all different and took a ton of work to get to fit. Stick with Mike and I think you'll have a lot less work to do!
- Joined
- Nov 3, 2003
- Messages
- 48,265
Who's that guy with the facial hair on the left??
That's not facial hair. That's the official custom Broncodesign fiber filter/separator mask!;D
Specially designed and calibrated to stop the most floating shop debris of any filter mask on the market.
Top notch stuff there.
Still a few gaps over the breathing holes though, which causes more of a funnel action, as opposed to a true filter action. But I'm sure there are specialists at work on that small detail as we speak.
Just funnin' with ya. So now I can keep track of this thread too!;D
Paul
OP
OP
Kurt
Sr. Member
Can I have an order of more pictures, with a side of please sell that tub to me? My build has experienced an enormous amount of progress, and I'm ready for my tub stat! (but I'm patient too) Hee Hee (Quiet Randy)
I'll take a few pics of the tub, halfcab top, and hood.
Kurt, did you get one of those new hoods with the scoop?
Yes, I have one of the new hoods with the scoop.
Kurt- Lets exchange questions and answers on the thread so everyone knows what we're doing (and you can embarrass me with problems) as "we" (actually you), present the joys and pitfalls of doing a glass tub install. This ain't no Horsepower TV show folks but the real thing with a real budget, warts and all.
Sounds good.
Your first question; what High-build primer/sealer? I'll call the PPG rep in the morning since the label on my can is covered in paint that ran down the side. I think it's Omni, now SHOP LINE 2K but let me check. I'm sure there are others that perform as well but I'm a PPG guy. Very forgiving and easy sanding. Some guys like "Slick Sand" but it's basically like spraying/sanding polyester gelcoat- a pain.
My tubs use a specially formulated gelcoat that's easy to sand and promotes paint adhesion. It's not cheap but it IS good. THIS IS IMPORTANT- DO NOT MACHINE SAND THROUGH THE GELCOAT!!! Block down the flashing areas where the mold seams met. Then, scotchbrite the whole surface to give it some tooth. Do a heavy fill prime and start blocking. If it's flat begin w/ 320 dry then transition to 400 wet. Identify the low spots around the seams and fill w/ body filler of choice. You may have to spot prime in areas you filled. Then, spray a light guide coat and fiinish blocking. AGAIN, DON"T GO THROUGH THE GELCOAT. Stay on top of it. If everything looks good to you, seal and topcoat. Thank Joan for putting up with our Bronco insanity and tell Zach wax on!!! wax off!!! ;D;D
I'll show this to Joan, as she will be doing the block sanding while Zack and I prep the rolling chassis.......;D
;DAwesome!!! Keep the progress pics coming!! Do you have any idea in the weight difference switching to a fiberglass tub... I'm sure its a lot.
The tub is thicker than my old school Kentrol tub.... I bet there isn't much weight difference between the Broncodesign tub and a metal one.
Cool, can't wait to see the pictures of the build. I have Mike's hood and soft upper doors. Totally awsome products! You're going to love the removable soft upper doors. I wish all my parts were from BroncoDesign, I bought mine over the years and they were all different brands, grill, hood, doors, tailgate and body with fenders were all different and took a ton of work to get to fit. Stick with Mike and I think you'll have a lot less work to do!
Currently, the only non-Broncodesign body panel I intend to use is the new kentrol tailgate I purchased from Mono.
Ya never know.... Mike insisted last year he was not going to make a grill, so I will keep my hopes up on a tailgate.
Broncodesign: Hood, tub, halfcab top, soft upper doors. Future pieces he plans on making are grill, fenders, and lower doors.
Especially with the hood I purchased, I plan on adding BD fender flares. It's more work, but will be harder to identify as a 'glass body.
Last edited:
bknbronco
Bronco Guru
I plan on adding BD fender flares. It's more work, but will be harder to identify as a 'glass body.
You gona glass them flares in??
No way would i destroy a glass tub with molded in flares and bolt up some ugly flares!!!! If i had a steel body id graft the front fenders to the rear. Since the glass tubes are already molded in then your good to go! You should easly get 37's under that glass tub. If its just a trail beater then hack away, but if you want a nice, stock looking bronco then leave them ugly flares off!!!! Id rather have the stock rear half well than a flair!!!
Have fun with the build. Glass is way easyer to work with than steel! Its a huge amount of work to get the glass tub on and everything esle on it but in the end its worth it. Step bits, and a dremmel (use the sheetrock type bit for large holes, and the round grinding stone for fine tuning) are your best friend. Make sure your wear glasses when creating the glass dust.
Im in the process of moding the ebrake parts on mine so i can attach it all to the frame. Does mike glass in the ebrake brackets for ya?
I wouldnt get to excited to start blocking the tub. It will take months till your even close to start body preping%) I probably had 500 hours into my build before i was even close to ready for any body work. I want be blocking mine for a few more years.
I came up with some pretty slick ways to mount the tailgate, taillights, and such. Ask questions if you get stumped, and check out my pics in my build thread.
Last edited:
OP
OP
Kurt
Sr. Member
You gona glass them flares in??
No way would i destroy a glass tub with molded in flares and bolt up some ugly flares!!!! If i had a steel body id graft the front fenders to the rear. Since the glass tubes are already molded in then your good to go! You should easly get 37's under that glass tub. If its just a trail beater then hack away, but if you want a nice, stock looking bronco then leave them ugly flares off!!!! Id rather have the stock rear half well than a flair!!!
;D
The tub comes with (stock) uncut rear quarters. I will mock the body panels on before I make any final decision.
Have fun with the build. Glass is way easyer to work with than steel! Its a huge amount of work to get the glass tub on and everything esle on it but in the end its worth it. Step bits, and a dremmel (use the sheetrock type bit for large holes, and the round grinding stone for fine tuning) are your best friend. Make sure your wear glasses when creating the glass dust.
Im in the process of moding the ebrake parts on mine so i can attach it all to the frame. Does mike glass in the ebrake brackets for ya?
I wouldnt get to excited to start blocking the tub. It will take months till your even close to start body preping%) I probably had 500 hours into my build before i was even close to ready for any body work. I want be blocking mine for a few more years.
I came up with some pretty slick ways to mount the tailgate, taillights, and such. Ask questions if you get stumped, and check out my pics in my build thread.
I will definitely check out your build thread more. If I happen to travel up your way, I would love to check it out in person.
My wife wants to help (that's my story, and I am sticking to it), so I will have her perform tasks such as beadblasting parts, painting the rolling chassis, and especially blocking the tub out while I am doing other things.
The goal is to work on it steadily, and knock one task off at a time, while planning for future tasks.
bknbronco
Bronco Guru
The tub comes with (stock) uncut rear quarters
Wow ya thats sweet. Id leave it alone. Everybody that has a cut bronco, always want another uncut one!
Ya stop by or ask questions. You probably drove right by on the way to monos. Glass tubs leave alot of fabrication up to the builder. You and your wife have fun and enjoy the build!
BroncoDesign
Sr. Member
Awesome!!! Keep the progress pics coming!! Do you have any idea in the weight difference switching to a fiberglass tub... I'm sure its a lot.
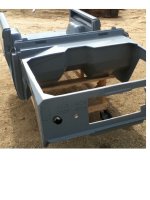
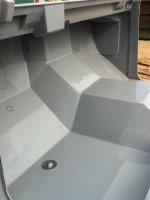
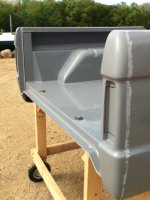
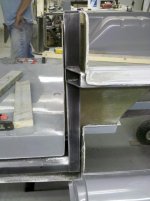
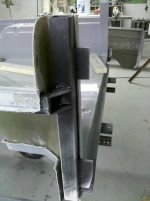
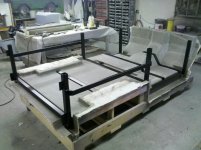
I wish it was lighter but weight is within 40-50 lbs of stock. The reason is the internal frame. It probably weights 100lbs by itself. I need help to set it in the lower skin before we bond the underbody and inner body together. All the fab work Kurt will be doing involves securing parts through the glass into the steel which carries all the weight and loads of the doors, gate, ws frame, steering, and brake assembly. Besides the inner front clip, this is the biggest difference between my product and what's been done previously. Here's some pics;
Attachments
-
 Inner Frame Detail (12).jpg79.6 KB · Views: 265
 -
 Inner Frame Detail (14).jpg68.4 KB · Views: 288
 -
 Inner frame (4).jpg105.4 KB · Views: 277
 -
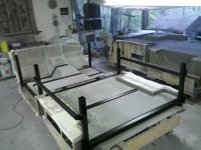 Inner frame (3).jpg90.1 KB · Views: 265
 -
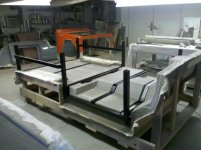 Inner frame (1).jpg83.3 KB · Views: 272
 -
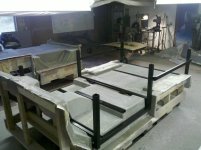 Inner frame (2).jpg91 KB · Views: 292
 -
 Inner Frame Detail (13).jpg63.4 KB · Views: 261
BroncoDesign
Sr. Member
Kurt, did you get one of those new hoods with the scoop?
Pat- yes, we snooker another guy into buying a Mufasa hood. Your work spreads... ;D;D
I sent you an email. Your parts will be done Friday to start the inner hood plug.
BroncoDesign
Sr. Member
That's not facial hair. That's the official custom Broncodesign fiber filter/separator mask!;D
Specially designed and calibrated to stop the most floating shop debris of any filter mask on the market.
My wife hates it but the filter aspect is more true than you know... ;D
BroncoDesign
Sr. Member
You gona glass them flares in??
No way would i destroy a glass tub with molded in flares and bolt up some ugly flares!!!! If i had a steel body id graft the front fenders to the rear. Since the glass tubes are already molded in then your good to go!
Im in the process of moding the ebrake parts on mine so i can attach it all to the frame. Does mike glass in the ebrake brackets for ya?
I wouldnt get to excited to start blocking the tub. It will take months till your even close to start body preping%) I probably had 500 hours into my build before i was even close to ready for any body work.
Like Kurt said, my tubs come uncut, another feature we chose to do to make us a little different. If you break a molded in flare, you've broken the body. A removable flare can be "removed" if damaged, repaired or replaced and put back on. Also, if you want a contrasting color, the flares define where to make the paint meet without having to do any fancy tape work. The edge of the flare also provides detail to the sides. Most fiberglass has a naked bare look because the detail is removed for easy molding. This puts some back.
My favorite tools are a cheap angle grinder w/ cut off wheel (check out my thumb in my avatar) ;D , a die grinder w/tapered carbide burr (giant sized dremel w/ more power! AR AR AR, a one inch drum sander for the die grinder, and a hole saw on my battery drill. Other than the cut off wheel, RUN ALL TOOLS AS S L O W L Y as possible. Less heat equals longer tool life. The fiberglass always wins. Drill at low RPM w/ plent of lubrication or the bit will be done in just a few holes.
BKN is right, get all the fab work out of the way before you get serious about body prep otherwise you'll be fixing what you prepped as you get in there fitting parts.