• Welcome to ClassicBroncos! - You are currently viewing the forums as a GUEST. To take advantage of all the site features, please take a moment to register. It's fast, simple and absolutely free. So please join our community today!
    If you have problems registering or can't log into your account, please contact Admin.

Floor Patch Panels or Replacement Pieces?

bulletpruf

Contributor
Full Member
Joined
Mar 31, 2019
Messages
419
Loc.
San Antonio, TX
The floor pans in my '72 are rusted through. I want to install something that will work for now; it's more of a candidate for a complete tub swap at some point, but I'm not there yet.

Anyway, I'm thinking the floor pans are what I want to do instead of piecing together the rest of the bits. If I need more coverage in places, I can just cut pieces off an old hood that I have to make those.

Here's the bits I'm talking about - https://www.wildhorses4x4.com/product/Floor-Pan-Patch-Panel-Set/Bronco_Floor_Pans
 

Attachments

  • 61504556992__37B10DED-A53E-4F83-85C5-09897216E4E2.jpg
    61504556992__37B10DED-A53E-4F83-85C5-09897216E4E2.jpg
    180.4 KB · Views: 72

thegreatjustino

Contributor
Red Head Grease Monkey
Joined
Jan 23, 2002
Messages
15,839
Loc.
Stockton, CA
Depends on how you want this to come out.

Obviously the cleanest and closest to original install is going to be drilling out the spot welds for each individual piece and replacing those pieces with like kind.

However, you can use the patches you linked to to do a halfway decent job if you get night tight joints and do clean butt welds. Butt welding the patches and cleanly grinding them can make the patches look pretty darn close to OEM.

If you really don't care about looks, do what most people do and create a lap joint. Looks terrible, obviously patched, and anyone can tell they're not original.

All depends on what you're looking for from the final weld in.
 

Scotty

Full Member
Joined
May 24, 2004
Messages
219
I have patch panels similar to those in your link. I ordered them from Tom's and can't specifically state that they are the same, but they look identical. They are labeled as made by "TriPlus" (Taiwan) and are 18 gauge.

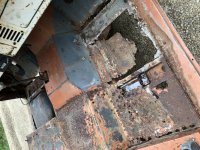
I've been fitting the driver's side piece and trimmed the floor-portion by about an inch on its left (outer) side where it will mount under the inward-facing flange of the inner rocker. I filled in the clutch linkage hole on the lower firewall portion (automatic trans). The lower firewall has a downward-facing 90-degree bend for a flange attachment to the kick panel and an approximately 38-degree bend for about 1 & 3/4" overlap of the transmission tunnel. The issue I'm currently facing is that the lower firewall is still about 1/2" too wide, so one of the bends has to go. This was not a surprise given ford's "precision" in the day and the resulting variability we need in replacement panels. The transmission tunnel has a outward-facing flange to which the original lower firewall attached, so the 38-degree bend and tunnel overlap is not necessary; I will trim it off just to the left of the bend.

This is ongoing and I'm taking it very slow. I need to clean up fill welds from where I drilled out the factory spot welds and (try to) hammer & dolly a small warp near where the fuel tank selector valve attaches. I am (mostly) following recommendations here and using self-tapping sheetmetal screws to hold everything in place until it's all true. Then I will remove the screws and weld-in the holes, one at a time and later grind the welds smooth.

My plan is for lizard skin covered with raptor liner on the underside and insulation & carpet on the inside, so if it isn't perfect I expect it won't be noticeable.
 

tk1218

Bronco Guru
Joined
Nov 23, 2008
Messages
1,067
Loc.
Flower Mound
I’ve used those pans before. For best results do the following

1. Cut/drill out floor leaving about 1 inch of the floor by the tunnel
2. Remove the tabs from the pans
3. Plug weld to the tunnel floor piece that was not cut out
 

Attachments

  • 9A6BA5BC-D5D5-4EE1-BB02-0D3FF15A8767.jpg
    9A6BA5BC-D5D5-4EE1-BB02-0D3FF15A8767.jpg
    66.4 KB · Views: 53
  • 975D7185-A1D7-42D6-A42F-76B8E366CA80.jpg
    975D7185-A1D7-42D6-A42F-76B8E366CA80.jpg
    62.7 KB · Views: 52
  • 08B849C5-E33C-4E5F-A789-C02FE6E4E632.jpg
    08B849C5-E33C-4E5F-A789-C02FE6E4E632.jpg
    82.9 KB · Views: 53
Last edited:
Top