• Welcome to ClassicBroncos! - You are currently viewing the forums as a GUEST. To take advantage of all the site features, please take a moment to register. It's fast, simple and absolutely free. So please join our community today!
    If you have problems registering or can't log into your account, please contact Admin.

Going Hydroboost - question on Prop valve / H-block

bsquared

Contributor
Sr. Member
Joined
Dec 4, 2010
Messages
963
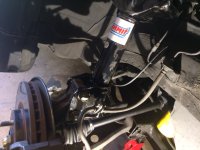
Have gathered most of my stuff for the Hydro conversion and am seeking advice on the proportioning valve. Front disc / rear drum. Stock MC setup has front going to rears and firewall of MC going to fronts, so I'm just run with that on the new setup.

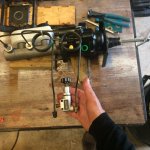
I'm wanting to do away with the H-block and go with just one control valve. That valve goes in the line to the rears, right? (restrict flow to the drums?) Is there any reason to keep the H-Block, other than the warning light? Mine has been out for years. Looks like the 76 and 77 had a fancier H-block, but I'd still like to lose it.

I think it would be more fun to do a few test runs and dial it in once I can lock up all four, don't you?! Please let me know if that block is necessary.

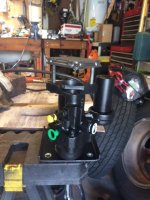
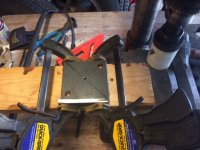
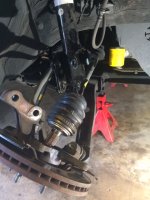
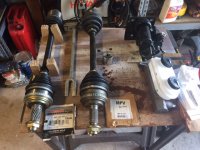
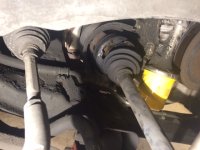
Also, any suggestions on a good power steering fluid cooler, maybe from Summit? Think I found one that's good. Thanks for any help and here's my progress so far. Working on the 1/2" adapter plate between the HB and MC.

Cheers, B2
 

Attachments

  • PlateCheck.JPG
    PlateCheck.JPG
    119.6 KB · Views: 145
  • PlateBore.JPG
    PlateBore.JPG
    117.8 KB · Views: 136
  • PropValvetoRear.JPG
    PropValvetoRear.JPG
    159 KB · Views: 148
  • PropValvetoFront.JPG
    PropValvetoFront.JPG
    130.3 KB · Views: 142

DirtDonk

Contributor
Bronco Guru
Joined
Nov 3, 2003
Messages
48,265
You're pretty much on target. The dash lamp and perhaps ease of using it as a distribution block to replace fewer hard lines could come into play, but really if your plumbing plans work better without it, the brakes will be just fine.

The later ones you mention are actually proportioning valves in addition to their other distribution duties. So that's why they look different and have different features.

I definitely think you should use the manually adjustable valve with hydro setups. With that power it's just nice to be able to fine tune things yourself.
And yes, it goes into the lines for the rear brakes only.
On 99% of vehicles out there, the rearmost reservoir (primary) is plumbed to the front brakes.

Paul
 

DirtDonk

Contributor
Bronco Guru
Joined
Nov 3, 2003
Messages
48,265
I would even start with the valve all the way open, for minimal restriction to the rear. Then adjust it tighter as you go if you feel that the rears are locking up prematurely. Just go a little bit at a time usually until you zero in on your sweet spot.

But try to do this as much as possible with it loaded up as it will be most of the time. Then, if you plan to take trips with the family in this, fiddle with it while the Bronco is fully loaded to see if there is an obvious difference in what it likes. That way you can keep the dial where it's best for most of the time, but quickly go to the other adjustment with no delay for trips when you're fully loaded with camping gear and big burly friends.
Or whatever you think is the best for your uses.

Paul
 

SteveL

Huge chevy guy
Joined
Jun 24, 2001
Messages
11,723
Loc.
Hawthorne ca
Got to test mine on the 66 today. Cruising in traffic the jack ass in front of me slammed on his brakes to let a car put of a driveway. Had a little rear lockup but controllable. I want to add a prop valve to adjust the bias on it. I thought for sure I was gonna be testing 1/4"4x6 bumper on that one.
 

rjrobin2002

Bronco Guru
Joined
Oct 13, 2007
Messages
2,707
The proportioning valve from a Chevy Asto van is absolutely perfect for a disk front/drum rear Bronco. I used the Astro hydro booster, Astro MC, and Astro proportioning block on several Broncos now and they stop like a sports car.
 
OP
OP
bsquared

bsquared

Contributor
Sr. Member
Joined
Dec 4, 2010
Messages
963
Thanks Guys! That's what I needed. Could not survive w/o your input. Many thanks and it's gonna be good! Cheers, B2
 

Rickb1b

Sr. Member
Joined
Feb 29, 2012
Messages
443
I'm in the middle of my hydroboost conversion and am looking for a master cylinder. The one I have works perfect, but is too tall.

The one in your picture looks like it would fit perfect, do you know what the MC came off of?
 
OP
OP
bsquared

bsquared

Contributor
Sr. Member
Joined
Dec 4, 2010
Messages
963
I'm in the middle of my hydroboost conversion and am looking for a master cylinder. The one I have works perfect, but is too tall.

The one in your picture looks like it would fit perfect, do you know what the MC came off of?

Hey Rick,
Yes, I saw someone post their set up and it was a 1985 Dodge 150 truck. Looked like a good set up to me and picked it up at O'Reilly.

Been meaning to get to the HB over the weekend but the CV's and struts on the wife's Pilot took priority. Now for some quality boost time with the Other Woman! Happy 4th, Brothers! B2
 

Attachments

  • IMG_6220.JPG
    IMG_6220.JPG
    111.8 KB · Views: 54
  • IMG_6217.JPG
    IMG_6217.JPG
    117.5 KB · Views: 53
  • IMG_6213.JPG
    IMG_6213.JPG
    134.3 KB · Views: 61
  • IMG_6211.JPG
    IMG_6211.JPG
    98.6 KB · Views: 60

Rickb1b

Sr. Member
Joined
Feb 29, 2012
Messages
443
So does the dodge master cylinder bolt right up to the hydroboost or are there some modifications required.

Wondering about mounting bolt spacing and push rod.
 
OP
OP
bsquared

bsquared

Contributor
Sr. Member
Joined
Dec 4, 2010
Messages
963
So does the dodge master cylinder bolt right up to the hydroboost or are there some modifications required.

Wondering about mounting bolt spacing and push rod.

Hey Rick B, you have to make a 1/2" thick adapter plate to go between the Hydro unit and the master cylinder. That clocks the Hydro unit by 90 degrees, at least that's what all the other kids are doing so I'm playing along. It's the primered piece you see between the two in the attached photos. HP fittings get here today! WooHoo!

I welded two pieces of 1/4" I had handy and drilled 4 holes and bored it 1.5" for the master cylinder. Measures to be 2.75" between the unit and the MC so I'm taking a piece of old MC pedal rod for between the two and the rest of the rod to splice under the dash between the pedal and unit. Pics coming...here's my progress so far.
 

Attachments

  • HardLines1.JPG
    HardLines1.JPG
    117.9 KB · Views: 83
  • HardLines2.JPG
    HardLines2.JPG
    89.5 KB · Views: 70
OP
OP
bsquared

bsquared

Contributor
Sr. Member
Joined
Dec 4, 2010
Messages
963
Hey Gr8Scot,
I could not be happier with the way it turned out! Wicked good upgrade and everything went together like it was meant to be. No issues whatsoever, at least not yet. Making the adapter plate between the HB unit and master cylinder was probably the hardest part of the whole conversion.

Thanks, B2


Sent from my iPad using Tapatalk
 
Top