


Community
Message Forum
Photo Gallery
Event Calendar
Book Reviews
Bronco Wallpaper
Bronco FAQ
Link Back to CB!
Photo Gallery
Event Calendar
Book Reviews
Bronco Wallpaper
Bronco FAQ
Link Back to CB!
Buy / Sell


Bronco Tech
3 Arm Wiper Setup
Fix Motor Mount
Roll Cage Braces
Throttle Body 65mm
Wheel Alignment
Heat Riser Replacement
Vent Window Repair
Center Console Mount
Straighten Bumper
Ford 6R80 6 spd
More Tech...
Fix Motor Mount
Roll Cage Braces
Throttle Body 65mm
Wheel Alignment
Heat Riser Replacement
Vent Window Repair
Center Console Mount
Straighten Bumper
Ford 6R80 6 spd
More Tech...

Install the app
-
Welcome to ClassicBroncos! - You are currently viewing the forums as a GUEST. To take advantage of all the site features, please take a moment to register. It's fast, simple and absolutely free. So please join our community today!If you have problems registering or can't log into your account, please contact Admin.
You are using an out of date browser. It may not display this or other websites correctly.
You should upgrade or use an alternative browser.
You should upgrade or use an alternative browser.
HID H4 Headlights H4 Projector Retrofit - a patient build thread
- Thread starter Heus33
- Start date
OP
OP
Heus33
Bronco Guru
- Joined
- Jun 1, 2005
- Messages
- 7,408
Progress - and modifying the cutoff shield
Time to wire it up and test the output of the G3 Projectors.
Wiring is pretty simple - each wire is labeled and only plugs in one way so its pretty hard to screw this up. There are two separate harnesses - the one with the longer battery wire is for the drivers side. I tapped into the side markers for the power for the angel eyes.
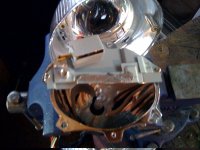
Pic 1 is of the projector wired up and mounted. I've decided to paint that range rover shroud black to complete my blacked out grill look (I'll show this in a future update).
Pic 2 is of the cutoff - I know this is a crappy pic and its too close to the wall and blah blah blah but I wanted to show SOMETHING. PS this is BEFORE the modified cutoff shield. You can see the large slope of light on the right side - this is European spec. Easy way to deal with that below.
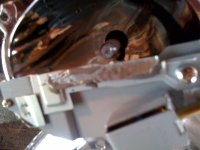
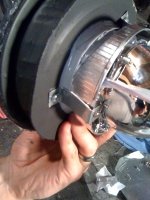
Modifying the cut off shield. All the shield really does is block half of the light from exiting the bowl - thats why when you activate the highbeam the shield retracts and lets the full light shine. Sorry I didn't take a pic of the shield before modification but it looked like ---\___ (kinda). I took a small piece of very thin sheet metal and cut a rectangle then used some JB weld to stick it over the stock shield and remove the slope. I left a small step in their because it does help to have your light a little higher on the right. Kind of hard to tell from the pics but pics 3 and 4 are of the modified shield.
I'll let these dry overnight then put them back together for another pic of the new improved cutoff.
P.S. I started the 2nd housing and its only taken about 1hr to get it nearly ready - waiting for the JB weld on the plastic to bond now so the rest of that one will have to wait until I get more time to put these back together.
P.S.S. Baking the headlight for 10 minutes in the oven at 250* was perfect to remove the glass lens. At that temp it basically popped right off with just a little pressure from a flat head screwdriver. Just a reminder - DO NOT use a heat gun, use the oven method.
Time to wire it up and test the output of the G3 Projectors.
Wiring is pretty simple - each wire is labeled and only plugs in one way so its pretty hard to screw this up. There are two separate harnesses - the one with the longer battery wire is for the drivers side. I tapped into the side markers for the power for the angel eyes.
Pic 1 is of the projector wired up and mounted. I've decided to paint that range rover shroud black to complete my blacked out grill look (I'll show this in a future update).
Pic 2 is of the cutoff - I know this is a crappy pic and its too close to the wall and blah blah blah but I wanted to show SOMETHING. PS this is BEFORE the modified cutoff shield. You can see the large slope of light on the right side - this is European spec. Easy way to deal with that below.
Modifying the cut off shield. All the shield really does is block half of the light from exiting the bowl - thats why when you activate the highbeam the shield retracts and lets the full light shine. Sorry I didn't take a pic of the shield before modification but it looked like ---\___ (kinda). I took a small piece of very thin sheet metal and cut a rectangle then used some JB weld to stick it over the stock shield and remove the slope. I left a small step in their because it does help to have your light a little higher on the right. Kind of hard to tell from the pics but pics 3 and 4 are of the modified shield.
I'll let these dry overnight then put them back together for another pic of the new improved cutoff.
P.S. I started the 2nd housing and its only taken about 1hr to get it nearly ready - waiting for the JB weld on the plastic to bond now so the rest of that one will have to wait until I get more time to put these back together.
P.S.S. Baking the headlight for 10 minutes in the oven at 250* was perfect to remove the glass lens. At that temp it basically popped right off with just a little pressure from a flat head screwdriver. Just a reminder - DO NOT use a heat gun, use the oven method.
Attachments

bronko69er
EB Addict
I'm getting excited to copy this!
OP
OP
Heus33
Bronco Guru
- Joined
- Jun 1, 2005
- Messages
- 7,408
Driver's side is in and mounted ;D
FYI - don't use the sealant that came in the kit to reseal the glass lens. Its a light gray color and you can see the sealant now that its all buttoned up. get some black sealant. That window weld stuff from 3M should work well - its black. I might open these back up and redo it sometime down the line if this bothers me. Its not an eyesore, just not perfect.
Passenger side is nearing completion...
Last edited:
OP
OP
Heus33
Bronco Guru
- Joined
- Jun 1, 2005
- Messages
- 7,408
I've run into a bit of a snag. The first set of headlights had glass lenses and plastic housings that were very easy to remove with the oven method. I cracked the first headlight trying the heat gun method (see first page - do not use the heat gun!!!).
I have another set of headlights but I can't get the lens off!!! Its the same glass lens but has a fiberglass-type housing. Baking at 300 for even 20 min didn't do anything. I'll try again with 400* later today or tomorrow. If that doesn't work I'll have to find another set of headlights with plastic housings.
So just another FYI - if you do this, look for headlights with plastic housings, not fiberglass.
Last edited:
OP
OP
Heus33
Bronco Guru
- Joined
- Jun 1, 2005
- Messages
- 7,408
Nearly finished!!!
I got the other light together last night.
FYI - if you are using the lights with the fiberglass housings it is VERY hard to remove the lens. I tried baking it at 400* for 15min and that didn't help. I ended up using a cutoff wheel and cutting the fiberglass very close to the glass then used a file to file away at the fiberglass until I reached the glass. I could then peel back a section of the housing at a time.
Alternatively you could just cut the fiberglass 1.5" down from the glass and mount the projector from the back. No need to take the glass off. It might not look as nice but it would be easier.
Pics:
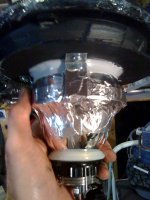
Pic 1 shows the mounts I made out of some sheet metal to secure the housing to the projector. Made three for each and used the existing holes in the projector and small self tapping screws into the plastic.
Pic 2 shows the foil tape I used to seal off the openings. I used several smaller pieces and overlapped them.
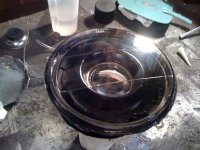
Pic 3 shows the finished product - looks much better with the black sealant and not the light gray stuff that comes with the kit.
I still need to get the lights adjusted - once I do this I'll get some cutoff shots.
I got the other light together last night.
FYI - if you are using the lights with the fiberglass housings it is VERY hard to remove the lens. I tried baking it at 400* for 15min and that didn't help. I ended up using a cutoff wheel and cutting the fiberglass very close to the glass then used a file to file away at the fiberglass until I reached the glass. I could then peel back a section of the housing at a time.
Alternatively you could just cut the fiberglass 1.5" down from the glass and mount the projector from the back. No need to take the glass off. It might not look as nice but it would be easier.
Pics:
Pic 1 shows the mounts I made out of some sheet metal to secure the housing to the projector. Made three for each and used the existing holes in the projector and small self tapping screws into the plastic.
Pic 2 shows the foil tape I used to seal off the openings. I used several smaller pieces and overlapped them.
Pic 3 shows the finished product - looks much better with the black sealant and not the light gray stuff that comes with the kit.
I still need to get the lights adjusted - once I do this I'll get some cutoff shots.
Attachments
OP
OP
Heus33
Bronco Guru
- Joined
- Jun 1, 2005
- Messages
- 7,408
Lessons Learned
A few things to be aware of:
Trimming
I had to trim the battery tray and egged out the mount holes to slide it back 1/4" or so to make room on the passenger side.
Also had to trim/bend the part of the headlight bucket that holds the adjustment spring.
Make sure your plastic mount that you make (the one with the 3" hole in the middle) is trimmed close to the housing - if you leave too much material here it will interfere with the headlight bucket. If you look at the first picture in the post above - thats too much material - I had to trim about 1/4" off all the way around. No need to have that much extra plastic hanging out.
Baking the Headlights
Get the headlights with the PLASTIC housings, not the fiberglass. Baking for 10 min at 300* will make the glass lens removal VERY easy.
Sealing the Headlights
Use black sealant if you're painting your housings black.
Painting
Don't rush - you will likely scratch or get goop on something so let things dry and take your time!
Wiring
Prefit everything and make sure you have room to mount the relays and ballasts. Do this while the battery is out.
OP
OP
Heus33
Bronco Guru
- Joined
- Jun 1, 2005
- Messages
- 7,408
Looking real good Tom, when are you going to start production? ;D
Its really not that much work - just takes a lot of patience. If folks follow this guide you can get this done for around $200. Way better than paying $600+ for an aftermarket set.
It wouldn't take too much additional work to fiberglass the rear of the housing to create a professional looking housing too.
Last edited:
OP
OP
Heus33
Bronco Guru
- Joined
- Jun 1, 2005
- Messages
- 7,408
Did you get these suckers adjusted yet?
Ran into a wiring issue - I think one of the relays might be bad. I'm going to go through it again this weekend. I did adjust the passenger side and took it out at night and let me tell you - even with one headlight it was 10x better than any other setup I've had on there.
OP
OP
Heus33
Bronco Guru
- Joined
- Jun 1, 2005
- Messages
- 7,408
I've been having some intermittent wiring issues with the headlights - not sure if its the relay "controller box" or the ~40 yr old wiring. Only happening on the drivers side. Sometimes I have high beams, sometimes not. I'm going to get some new H4 harnesses tomorrow.
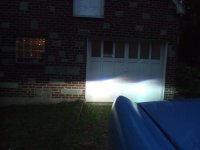
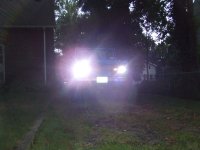
Here are some pics - nothing in the dark yet but you get the idea.
Overall they are great. If I were to do it again Id probably try to make the Morimoto Minis fit instead of these G3s. The quality of the Morimotos are better but these G3s are still very nice. You can see that the cutoff on the drivers side isn't as sharp as I'd like it - that little bit of light leakage in the middle of the garage wall bothers me.
They could probably use a little more fine tuning. The look like they are aimed down but Ive got a slight grade in my driveway so in reality they are a bit higher.
Attachments
Last edited:

OP
OP
Heus33
Bronco Guru
- Joined
- Jun 1, 2005
- Messages
- 7,408
I ordered some new H4 sockets online (local parts store didn't have any - wierd).
Anyways, after using these for awhile I'm very happy with the results but I wish I had taken more time making them look nicer.
A few tips:
*use the same color sealant as you're housings. I should have used black on black.
*make sure when you cut the housing down that the cut is 100% level. If its off a few degrees you'll know.
*take your time and let everything dry - ive got a couple of smudges that I can see
*use enough sealant but not too much (see above - cleaning up leaves smudges).
bronko69er
EB Addict
I thought of a way to ensure a flat cut on the back.... Sitck a die grinder cutoff wheel in the drill press and raise the table to the right height, then just rotate the housing on the table as the wheel makes the cut. Kind of a crude milling operation....
OP
OP
Heus33
Bronco Guru
- Joined
- Jun 1, 2005
- Messages
- 7,408
Are you concerened at all about possible ill effects from covering up the vent slots on the housing with the tape? I would be worried about long drives and overheating these?
Not worried about it - there's a lot of space for air around the headlight location, it'll stay cool. And these things can operate at 300*+ all day.
But then again I rarely drive at night for more than 30-60 minutes. Either way, I think I'm safe.
OP
OP
Heus33
Bronco Guru
- Joined
- Jun 1, 2005
- Messages
- 7,408
So after putting in the G3s do you think the mini-Morimotos would fit without relocating the battery?
Its possible. The Morimotos were a little longer so it would depend on how you choose to mount these. You could move the projector closer to the glass to take up some of the room or you could mod your battery tray. It would depend on the size of your battery too. I'd be willing to bet that you could make it work with a bit of Macgyvering. It would be worth it IMO.
Similar threads
- Replies
- 4
- Views
- 1K
- Replies
- 65
- Views
- 24K
- Replies
- 17
- Views
- 2K
- Replies
- 49
- Views
- 6K