


Community
Message Forum
Photo Gallery
Event Calendar
Book Reviews
Bronco Wallpaper
Bronco FAQ
Link Back to CB!
Photo Gallery
Event Calendar
Book Reviews
Bronco Wallpaper
Bronco FAQ
Link Back to CB!
Buy / Sell


Bronco Tech
3 Arm Wiper Setup
Fix Motor Mount
Roll Cage Braces
Throttle Body 65mm
Wheel Alignment
Heat Riser Replacement
Vent Window Repair
Center Console Mount
Straighten Bumper
Ford 6R80 6 spd
More Tech...
Fix Motor Mount
Roll Cage Braces
Throttle Body 65mm
Wheel Alignment
Heat Riser Replacement
Vent Window Repair
Center Console Mount
Straighten Bumper
Ford 6R80 6 spd
More Tech...

Install the app
-
Welcome to ClassicBroncos! - You are currently viewing the forums as a GUEST. To take advantage of all the site features, please take a moment to register. It's fast, simple and absolutely free. So please join our community today!If you have problems registering or can't log into your account, please contact Admin.
You are using an out of date browser. It may not display this or other websites correctly.
You should upgrade or use an alternative browser.
You should upgrade or use an alternative browser.
migs Bronco Barn - a chronicle of what's happening at the new place
- Thread starter migs
- Start date


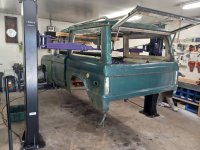
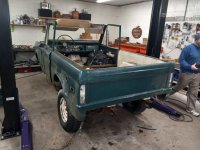
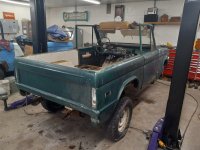
What is the tire size on that yellow 70? I’ve got a complete body redo on my 69 and don’t want to cut. I have 32x11.5 tires and must change size. Heard 30x9.5 tire is largest with no cut. Changing 4” body lift to 3.5 suspension lift and 1” body bushing. Any comets?In other happenings, I finally hung up my retractable "paint booth". I've been meaning to put this curtain wall up since I moved in here and have really been missing it. I originally had it set up at my last place but only had enough room for a roughly 12'x13' space in that smaller garage. Now I have enough length to fit a complete truck inside with plenty of room to move all around it.
View attachment 898159 View attachment 898160
OP
OP
- Joined
- Nov 12, 2011
- Messages
- 1,318
275/70-17 on 17x7 steel dodge ram wheels. Wheel sizing and backspacing is key.
That bronco has the same, 3.5” suspension lift along with a 1” body lift.
You can check out the Long build up of it here
That bronco has the same, 3.5” suspension lift along with a 1” body lift.
You can check out the Long build up of it here
- Joined
- Mar 8, 2007
- Messages
- 81,747
holy smokes!!! just blown away!!!
right.. good stuff right there
- Joined
- Jun 19, 2019
- Messages
- 115
Migs, that POR15 on the oil pan looks so bitchin!
Looks Great!
OP
OP
- Joined
- Nov 12, 2011
- Messages
- 1,318
Thanks all, we're slowly getting there.
So back to buttoning things up underneath, the transmission pan... besides leaking a ton, it was in need of some cosmetic rehabbing.


And after smoothing out some dents, straightening a few flange issues and a short trip through the blast cabinet...


And to hopefully help keep the leakage at bay down the road I made a flange insert piece to help spread the load when tightening the pan bolts.


So back to buttoning things up underneath, the transmission pan... besides leaking a ton, it was in need of some cosmetic rehabbing.
And after smoothing out some dents, straightening a few flange issues and a short trip through the blast cabinet...
And to hopefully help keep the leakage at bay down the road I made a flange insert piece to help spread the load when tightening the pan bolts.
OP
OP
- Joined
- Nov 12, 2011
- Messages
- 1,318
Something discovered when dropping the pan was that the filter wasn't the correct one for the Bronco C4 pan. I found a spare pick up tube and installed it along with the correct filter to better take advantage of that little deep sump in the pan.


And after a little paint along with a new quality gasket the pan was installed.


(Don't worry tasker, that's not pink....... it's osha safety purple)
And after a little paint along with a new quality gasket the pan was installed.
(Don't worry tasker, that's not pink....... it's osha safety purple)
HOW did you know I would see this???Something discovered when dropping the pan was that the filter wasn't the correct one for the Bronco C4 pan. I found a spare pick up tube and installed it along with the correct filter to better take advantage of that little deep sump in the pan.
View attachment 899784 View attachment 899785
And after a little paint along with a new quality gasket the pan was installed.
View attachment 899786 View attachment 899787 View attachment 899788
(Don't worry tasker, that's not pink....... it's osha safety purple)

- Joined
- Mar 8, 2007
- Messages
- 81,747
Something discovered when dropping the pan was that the filter wasn't the correct one for the Bronco C4 pan. I found a spare pick up tube and installed it along with the correct filter to better take advantage of that little deep sump in the pan.
View attachment 899784 View attachment 899785
And after a little paint along with a new quality gasket the pan was installed.
View attachment 899786 View attachment 899787 View attachment 899788
(Don't worry tasker, that's not pink....... it's osha safety purple)
make it stand right out


SCORE approved traction aids?

Is that a dare??Ballast.... for the big jumps!


Similar threads
- Replies
- 1K
- Views
- 268K
- Replies
- 16
- Views
- 4K
- Replies
- 21
- Views
- 2K