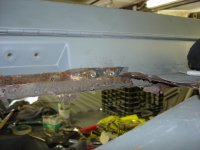
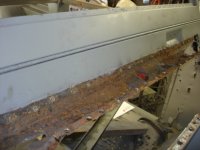
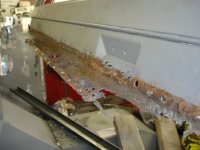
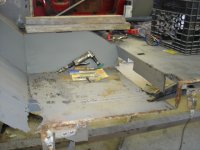
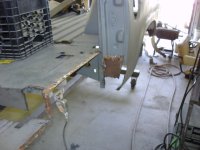
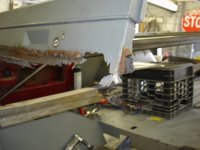
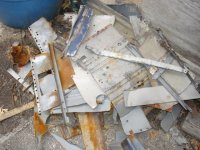
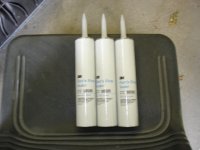
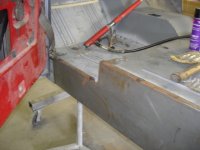
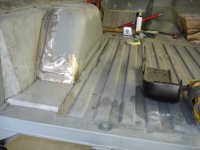
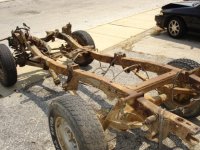
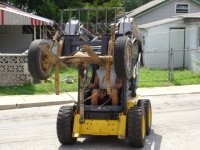
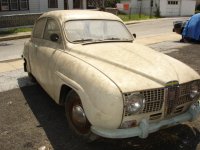
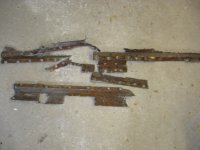
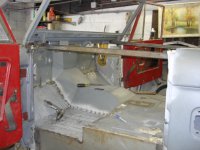
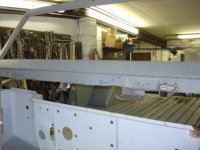
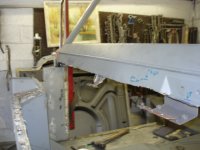
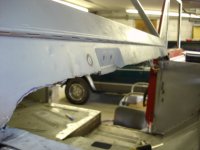
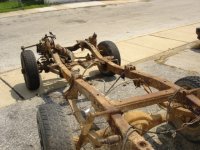
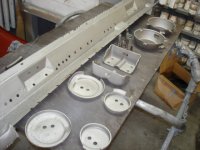
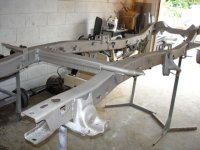
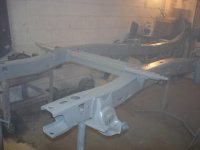
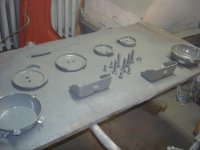
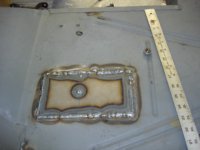
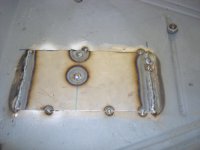
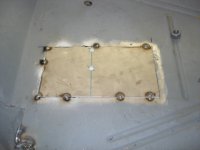
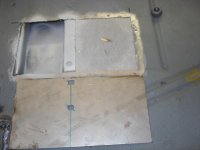
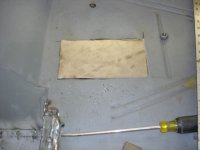
• Just a reminder that you won't be able to start new posts or reply to existings posts in the Archive forum.

    This is where all the old posts go so they can still be used for reference and searched.
  • Welcome to ClassicBroncos! - You are currently viewing the forums as a GUEST. To take advantage of all the site features, please take a moment to register. It's fast, simple and absolutely free. So please join our community today!
    If you have problems registering or can't log into your account, please contact Admin.

My 77's restoration....pics inside!!

OP
OP
sellitall

sellitall

Bronco Guru
Joined
Jul 30, 2002
Messages
1,444
Loc.
Malvern, Pennsylva
Look what the rust fairy left me this morning. The kicker is that the frame is 99% rust free. It had one spot about 3/8ths round on the pass. side lower corner blow through after I had it media blasted.
 

Attachments

  • 77windshield 002.jpg
    77windshield 002.jpg
    133.8 KB · Views: 706

Pa PITT

Contributor
Bronco Guru
Joined
Jul 15, 2005
Messages
11,279
Loc.
Stephenville TEXAS
do you have any means of adjusting the air pressure to it ...
GO TO a good paint supply store and ask for a '' SHARP'' brand air adjuster
or pinch valve ...this might help and it wont cost 25.00 to try ....
I had one that would not work and I'd gave up on it but took it to a freind that has several employees they we're working on something that needed blasting
about a day later they had it working just fine ...
 
OP
OP
sellitall

sellitall

Bronco Guru
Joined
Jul 30, 2002
Messages
1,444
Loc.
Malvern, Pennsylva
Well, I got the cowl completetly off today. Went through two double sided spotweld cutters. What a PITA!!! You'd think that with all those spotwelds the rust would be to a minimal. You be the judge. Oh yeah, the 2/3's of the missing channel was nowhere to be found. It just withered away. I'll be posting pics of the channel I'm fabbing up for it. I just got the pieces bent up Monday, July 3rd. The windshield frame is in excellent shape, so I'm just going to leave it on and repair the channel etc.
 

Attachments

  • ebayparts 010.jpg
    ebayparts 010.jpg
    141.7 KB · Views: 319
  • ebayparts 011.jpg
    ebayparts 011.jpg
    135.3 KB · Views: 335
  • ebayparts 009.jpg
    ebayparts 009.jpg
    142.5 KB · Views: 373
OP
OP
sellitall

sellitall

Bronco Guru
Joined
Jul 30, 2002
Messages
1,444
Loc.
Malvern, Pennsylva
I have a bunch of pics to put up, but I forgot my camera at the shop. Anyway, progress has been slow, but I still get a little bit done here and there. I got the entire cowl from a member (thanks Dave!!) which was in much better shape then mine. I'm bringing it down to be blasted on Monday (July 30th) along with the fenders and hopefully the frame if time permits.

Anyone have any pics of repairing the cowl support channel the way I'm attempting it? Any info will really help.
~Brian
 

carterb

New Member
Joined
Jul 25, 2006
Messages
26
education

man this is a great thread!
im a new member and a first timer.
i just bought a 75 in real good shape and im getting ready to tear it down and do exactky what your doing now. This is great info keep the pics and commentary coming

HOW LONG DOES IT TAKE TO TAKE THE BODY OFF, WHAT CAN I EXPECT?
CAN 4 PEOPLE LIFT IT OFF WITHOUT TEARING IT APART?

tHANKS
 

trailpsycho

Bronco Guru
Joined
Dec 11, 2003
Messages
4,856
Yes, 4 people can lift the body off no problem...what I would recommend is using a 2X4 or 2X6 (8 ft wide) one at the rear about mid to rear of wheel well and the other just under the front door post. Alot of people recommend tack-welding some 1" tubing across the doors (ront to back and side to side to keep everything alligned. I didnt do this and rehung a door to check flex and was OK. Proceed at your own peril...it all depends on how stable/secure your tub is...if you have poor rockers, it will fold. Use a little common sense and you will be OK, proceed slowly and think about it as you go. As far as whats involved with removing the tub from the frame...all wiring, all lines, gas tank fillers, 8 body mount bolts and any hoses should be removed. Like I said check and re-check...the only problem I had was with my clutch linkage--how do you forget that??? Too many cooks in the kitchen that day...and got rushed; its your ride, check and double check. Best of luck!

John
 
OP
OP
sellitall

sellitall

Bronco Guru
Joined
Jul 30, 2002
Messages
1,444
Loc.
Malvern, Pennsylva
Taking the tub off isn't that bad at all. Rusty bolts might make you a bit crazy, but soak everything down, and take your time. Their really isn't much to these vehicles. As for lifting it off, I did it with four guys with ease. You don't even have to do the 2x4's or whatever was recommended. The guys I did it with were all over 200lbs., but you could do it with average weight guys without any issues. The one peice of advice that trailpsycho recommended about using tube to brace the door openings and the inner quarters; consider it gospel especially if you don't have to replace alot of the sheetmetal. As for me, I'm redoing about 85% of my tub, so it has flexed because I had to remove the braces to put the posts in, but is easily jacked back into place. If you don't need to replace rockers/inner rockers/strikers/door posts, brace the hell out of the tub, or else it will do the majority of flexing when you lift it off the frame. If you are planning on a full sheetmetal overhaul, follow this link for a little literature that will come in handy. You can PM me anytime if you need any advice.

http://classicbroncos.com/forums/attachment.php?attachmentid=15301&d=1105357450
 
OP
OP
sellitall

sellitall

Bronco Guru
Joined
Jul 30, 2002
Messages
1,444
Loc.
Malvern, Pennsylva
Well, I got alot of progress done today, but my digi camrea had bum batteries. Anyway, here are the pics that were on it from a couple of weeks ago. I now have the driver's floor/inner rocker/kick panel/door post mocked up to fit the door. It needs a little work, but I think I'll have it licked and hopefully be able to weld it up tomorrow. It was 103 degrees in the shop today, AND I DESPISE THE HEAT!!!
 

Attachments

  • 77'pics 005.jpg
    77'pics 005.jpg
    155 KB · Views: 295
  • 77'pics 007.jpg
    77'pics 007.jpg
    149.9 KB · Views: 251
  • 77'pics 008.jpg
    77'pics 008.jpg
    157.2 KB · Views: 320
OP
OP
sellitall

sellitall

Bronco Guru
Joined
Jul 30, 2002
Messages
1,444
Loc.
Malvern, Pennsylva
Well, the heat's still kickin' my ass, so progress is becoming slower and slower, but here are the pics I took last week. Has anyone used 3M's fast and firm sealer (pic below)? Check out the last pic of all of the metal I cut off the tub. The scrap guy's gonna love me. The door is still giving my some problems, but I'll get it lined up once the temperature drops a bit. I moved the tub into the last bay at the shop, and left a thermometer inside the tub. It went up to 118 degrees. I'll be tearing into the frame tomorrow and Thurs. to get it ready to be blasted. I'll post some pics later on in the week.
 

Attachments

  • wolverineandderby 006.jpg
    wolverineandderby 006.jpg
    149.7 KB · Views: 298
  • wolverineandderby 004.jpg
    wolverineandderby 004.jpg
    159.8 KB · Views: 325
  • wolverineandderby 002.jpg
    wolverineandderby 002.jpg
    140.9 KB · Views: 235
  • wolverineandderby 001.jpg
    wolverineandderby 001.jpg
    138.4 KB · Views: 350
  • wolverineandderby 009.jpg
    wolverineandderby 009.jpg
    133.6 KB · Views: 472

BigFord74

Full Member
Joined
Jun 17, 2006
Messages
273
Loc.
Nixa,Mo
I love all these rebuild threads you guys post. I bought some rims off Ebay should be here roughly Friday. Hoping around Sept 1st i can get it moved up here so i can see what i have left. And then the ?'s will be pooring in from my side. It to is a '77.
 

904Bronco

Contributor
Bronco Guru
Joined
Sep 28, 2004
Messages
5,840
Loc.
San Martin, CA
I am enjoying the story that you are telling us with your pictures/words, please keep them coming. A term that I think fits you is "Craftsman", it is becoming a rarity these days. Where in PA is Havertown located? I have extended family in Uniontown, none of them are Bronco folk though...
 
OP
OP
sellitall

sellitall

Bronco Guru
Joined
Jul 30, 2002
Messages
1,444
Loc.
Malvern, Pennsylva
I'm still moving back and forth on this thing, but even chaotic progress is still progress. I seperated the frame from the rears/suspension/steering. I had to cut the pesky rear springs off with the torch AKA sparklewrench. I don't think I've ever had a set of leaf spring pins come loose without using some sort of heat. 90% of the time it's cuttin' heat. More pics to come.
 

Attachments

  • offwiththeframe 001.jpg
    offwiththeframe 001.jpg
    153.3 KB · Views: 239
  • offwiththeframe 015.jpg
    offwiththeframe 015.jpg
    153.3 KB · Views: 261
OP
OP
sellitall

sellitall

Bronco Guru
Joined
Jul 30, 2002
Messages
1,444
Loc.
Malvern, Pennsylva
904Bronco said:
I am enjoying the story that you are telling us with your pictures/words, please keep them coming. A term that I think fits you is "Craftsman", it is becoming a rarity these days. Where in PA is Havertown located? I have extended family in Uniontown, none of them are Bronco folk though...


I've heard of Uniontown, but I'm not exactly sure where it is. Havertown is a suburb of Philly. If you're ever in the area PM me if you want to talk EB's.
~Brian
 
OP
OP
sellitall

sellitall

Bronco Guru
Joined
Jul 30, 2002
Messages
1,444
Loc.
Malvern, Pennsylva
Well the frame is getting blasted along with some other parts, and I just finished welding up the last spot in the tub. I'll be grinding my ass off for the next couple of days. Here's a couple of pics of the last spot I did on the tub. I probably should have replaced the upper floor, but I was sick of drilling out spot welds and the underneath looks great. All the holes were caused by the rug the previous owner had in the tub.
 

Attachments

  • 96cherokeerdimaio 022.jpg
    96cherokeerdimaio 022.jpg
    134.1 KB · Views: 285
  • 96cherokeerdimaio 020.jpg
    96cherokeerdimaio 020.jpg
    150.8 KB · Views: 169
  • 96cherokeerdimaio 019.jpg
    96cherokeerdimaio 019.jpg
    136.1 KB · Views: 156
  • 96cherokeerdimaio 018.jpg
    96cherokeerdimaio 018.jpg
    144.2 KB · Views: 143
  • 96cherokeerdimaio 017.jpg
    96cherokeerdimaio 017.jpg
    142.7 KB · Views: 132
  • 96cherokeerdimaio 016.jpg
    96cherokeerdimaio 016.jpg
    157 KB · Views: 150
  • 96cherokeerdimaio 015.jpg
    96cherokeerdimaio 015.jpg
    129.7 KB · Views: 156
  • 96cherokeerdimaio 013.jpg
    96cherokeerdimaio 013.jpg
    120 KB · Views: 239
OP
OP
sellitall

sellitall

Bronco Guru
Joined
Jul 30, 2002
Messages
1,444
Loc.
Malvern, Pennsylva
Here's my new unit. It's a 69 Saab with 29,000 original miles. It's got a two stroke 3 cylinder engine. It hadn't been started since 1981. I put some fresh gas and a battery in it, and would you beleive it fired up. The clutch pedal is at the floor so I couldn't drive it. This thing is going to ebay. It's just not me ;D .
 

Attachments

  • 96cherokeerdimaio 003.jpg
    96cherokeerdimaio 003.jpg
    153 KB · Views: 178
OP
OP
sellitall

sellitall

Bronco Guru
Joined
Jul 30, 2002
Messages
1,444
Loc.
Malvern, Pennsylva
HotWheels said:
Wow..simply wow. Very nice work. Where the hell were u when i did mine?

:p

Mick


Thanks for the compliment HotWheels. I've seen your ride on the BB. Yours turned out just fine. I love that color combo. To answer your question, I was probably having a great time with no worries concerning automobiles and a much more respectable bank account. It should all work out in the end. At least I keep telling myself that %) ?? Baby steps, it's all about baby steps.
 
OP
OP
sellitall

sellitall

Bronco Guru
Joined
Jul 30, 2002
Messages
1,444
Loc.
Malvern, Pennsylva
I got a few hours to work on it today. Here's some pics of the progress (if you want to call it that). I'm still planning on cheating the cowl support without removing the windshield frame. I removed all the spot welds which held the brackets on. Now I just have to hope the new stuff will fit. I finally got both doors to shut like a refrigerator. The last pic is of the final piece of rust I had to remove from the tub. I'm going out for some beers in celebration tonight. Actually, I'm going down to pick up a 1987 Honda XL250R in DE. The beers will be after that.
 

Attachments

  • reesto 007.jpg
    reesto 007.jpg
    139.8 KB · Views: 187
  • reesto 006.jpg
    reesto 006.jpg
    133 KB · Views: 226
  • reesto 005.jpg
    reesto 005.jpg
    137.1 KB · Views: 271
  • reesto 003.jpg
    reesto 003.jpg
    137.5 KB · Views: 180
  • reesto 002.jpg
    reesto 002.jpg
    135.4 KB · Views: 181
  • reesto 001.jpg
    reesto 001.jpg
    143 KB · Views: 173
OP
OP
sellitall

sellitall

Bronco Guru
Joined
Jul 30, 2002
Messages
1,444
Loc.
Malvern, Pennsylva
I picked up the frame/ other miscellaneous parts today from the media blast shop, and I'm almost done with the blasting fees. All that's left is the hardtop and the hood. The doors I can chemical strip on my own. I was surprised to see all the crappy factory welds on this frame. They were hidden underneath a nice thick layer of surface rust. I shot it with two coats of PPG's DP40LF epoxy primer. I'll be topcoating it tomorrow with a couple of coats of POR15. More pics to come.
 

Attachments

  • offwiththeframe 002.jpg
    offwiththeframe 002.jpg
    149 KB · Views: 116
  • blastedframe 002.jpg
    blastedframe 002.jpg
    154.7 KB · Views: 252
  • blastedframe 007.jpg
    blastedframe 007.jpg
    134.7 KB · Views: 225
  • blastedframe 017.jpg
    blastedframe 017.jpg
    131.6 KB · Views: 168
  • blastedframe 023.jpg
    blastedframe 023.jpg
    145.7 KB · Views: 112
Top