I would say you have been busy... Doing the same things that most of us experience when working on Broncos. Keep at it, nice work so far!


Community
Message Forum
Photo Gallery
Event Calendar
Book Reviews
Bronco Wallpaper
Bronco FAQ
Link Back to CB!
Photo Gallery
Event Calendar
Book Reviews
Bronco Wallpaper
Bronco FAQ
Link Back to CB!
Buy / Sell


Bronco Tech
3 Arm Wiper Setup
Fix Motor Mount
Roll Cage Braces
Throttle Body 65mm
Wheel Alignment
Heat Riser Replacement
Vent Window Repair
Center Console Mount
Straighten Bumper
Ford 6R80 6 spd
More Tech...
Fix Motor Mount
Roll Cage Braces
Throttle Body 65mm
Wheel Alignment
Heat Riser Replacement
Vent Window Repair
Center Console Mount
Straighten Bumper
Ford 6R80 6 spd
More Tech...

Install the app
-
Welcome to ClassicBroncos! - You are currently viewing the forums as a GUEST. To take advantage of all the site features, please take a moment to register. It's fast, simple and absolutely free. So please join our community today!If you have problems registering or can't log into your account, please contact Admin.
You are using an out of date browser. It may not display this or other websites correctly.
You should upgrade or use an alternative browser.
You should upgrade or use an alternative browser.
Rebuild: Bronco the Debilitated
- Thread starter tirewater
- Start date
tirewater
Sr. Member
Yes, I think we all end up doing the same thing more or less. ")
I was hoping to be working on cosmetics now, but it'll come.
It's also annoying to see the surface rust underneath the vehicle and wish I was doing a frame off resto. Although I don't see where the time or space for that comes from.
The most annoying item has the been the endlessness of returning items. 1/2 the time is wasted dealing with issues that could've been avoided. Carburetor, camshaft bearings, radiator, etc...
tirewater
Sr. Member
Last I posted I had failed smog. I took the truck to the garage today and passed.
The main item done was replacing the catalytic converter with a new Magnaflow CA legal unit.
Of course in between the fail & pass my master cylinder leaked so...
-replaced master cylinder
-replaced brake hoses & lines (hint: avoid stainless steel lines)
-replaced rear drums & hardware
-replaced rear wheel bearings
-replaced track bar bushings (for the hell of it)
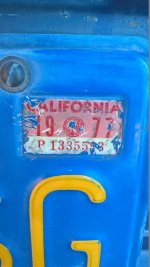
I picked off about an inch worth of registration stickers, and found the very first one. Debating on how to *not* cover it...
Of course nothing goes without a hitch. The smog tech noticed a discrepancy on my VIN - a 'B' is an '8' on my papers. The woman at the AAA DMV office said I needed to do a vin verification, and the mistype had been in the system for a long time....
The main item done was replacing the catalytic converter with a new Magnaflow CA legal unit.
Of course in between the fail & pass my master cylinder leaked so...
-replaced master cylinder
-replaced brake hoses & lines (hint: avoid stainless steel lines)
-replaced rear drums & hardware
-replaced rear wheel bearings
-replaced track bar bushings (for the hell of it)
I picked off about an inch worth of registration stickers, and found the very first one. Debating on how to *not* cover it...
Of course nothing goes without a hitch. The smog tech noticed a discrepancy on my VIN - a 'B' is an '8' on my papers. The woman at the AAA DMV office said I needed to do a vin verification, and the mistype had been in the system for a long time....
Attachments
- Joined
- Nov 3, 2003
- Messages
- 48,265
Congrats on the pass first of all!
The old sticker is way cool in my book and I always try to save them underneath the newer ones. Someday you or someone else might have just as much fun digging down the stack to see what was up.
Maybe it's just because I pay more attention to Broncos than just about anything else, but I've never known of a particular vehicle where DMV / VIN discrepancies were so common. Pain in the butt, but hopefully it's so obvious that you can get it inspected, corrected, neglected and selected without too much drama or anything else.
Good luck.
Paul
tirewater
Sr. Member
Just a test for embedding pictures. I wish the website would embed photos inside the posts instead of as attachments, but best not to complain.
..removed the driver side air vent...

..removed the driver side air vent...
tirewater
Sr. Member
More embedding tests.... I haven't cleaned up the dirt from the interior yet...sorry too much mechanical work to be done!!
Passenger side footwell

Driver side footwell, lots of pitting but no through holes

Passenger side footwell
Driver side footwell, lots of pitting but no through holes
tirewater
Sr. Member
New wheels, tires + craigslist hubcaps. 30x9.5 BFG KM2 - fills in the front fender nicely, but quite a bit of room in the rear. Uncut someday in the cloudy future.

tirewater
Sr. Member
leaks...
fixed a D20 leak, C4 leak, and tackled the steering box...


Seems 99% of the work is cleaning...degrease, wire wheel, clean, ospho, rinse, dry, prime, paint, clear coat...

fixed a D20 leak, C4 leak, and tackled the steering box...
Seems 99% of the work is cleaning...degrease, wire wheel, clean, ospho, rinse, dry, prime, paint, clear coat...
tirewater
Sr. Member
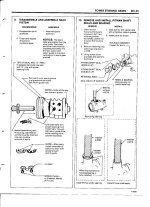
Separating the balls...I couldn't tell them apart. I used a micrometer to measure & remeasure. Then used a sharpie to make them more distinct. Ball size is for proper preload and allows the balls to rotate properly. The smaller balls will rotate reverse of the larger ones.

Used some 3/8 power steering return hose & screwdriver to make a tool to hold the balls in the piston when removing the worm gear after installing the balls.

The tip of the screwdriver is left visible so it fits into the recess in the worm gear.

Used some 3/8 power steering return hose & screwdriver to make a tool to hold the balls in the piston when removing the worm gear after installing the balls.
The tip of the screwdriver is left visible so it fits into the recess in the worm gear.
tirewater
Sr. Member
Used a cheap harbor freight ring compressor to compress the Teflon ring on the rack piston. This was most annoying part...getting the piston into the case without damaging the ring.

tirewater
Sr. Member
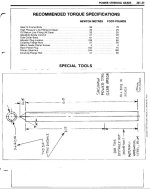
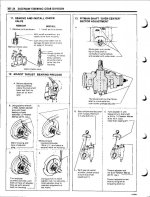
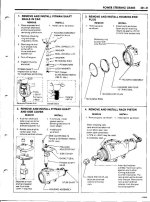
There are many references on the internet about rebuilding Saginaw power steering boxes. Out of all the videos & threads, I found the attached documentation the most helpful. There are some differences of course, the Bronco worm gear spins opposite, but it's still helpful.
Print it out, keep it...
Print it out, keep it...
Attachments

tirewater
Sr. Member
Hmm, a little update. Nothing too exciting happening these days.
Spot treating floorboards. The driver side had some pitting and got a coating of MasterSeries and filler for the pits. The passenger side didn't have any pitting, just clean and coat. The only reason to coat the passenger side was because the paint was flaking off. When it comes time for a frame off hopefully everything will sand off properly.

Drain front differential. Clean, sand, paint differential cover.

Attempt to clean this stuff off. For some reason the dirt, or whatever it is, won't come off. A lot of the engine bay has this, it may be some sort of wax protective coating. Whatever it is, it annoys the heck out of me because it makes everything look so dirty...

Spot treating floorboards. The driver side had some pitting and got a coating of MasterSeries and filler for the pits. The passenger side didn't have any pitting, just clean and coat. The only reason to coat the passenger side was because the paint was flaking off. When it comes time for a frame off hopefully everything will sand off properly.
Drain front differential. Clean, sand, paint differential cover.
Attempt to clean this stuff off. For some reason the dirt, or whatever it is, won't come off. A lot of the engine bay has this, it may be some sort of wax protective coating. Whatever it is, it annoys the heck out of me because it makes everything look so dirty...
tirewater
Sr. Member
Other minor stuff...
Adding 1" body lift. Not entirely thrilled with 1", I'd prefer 1/2" lift. Oh well. Seems I have a host of items to solve with the 1" body lift....steering, parking brake cables, fan shroud, shift linkage.
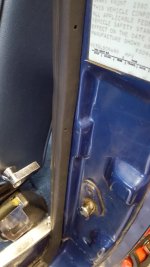
Here are the old body mount bolts. The passenger side floorboard was covered with some stick on dampening material (whatever was used before dynamat came around). This preventing moisture from getting to the bolt.

Replacing turn signal cancelling cam.

Disassemble front drive shaft for rebuild.

Trim front carpet. I bought the mass backing for the front carpet. I don't recommend it though. Dynamat or equivalent would be better. The mass backing appears like it would trap moisture between it and the floor.

Adding 1" body lift. Not entirely thrilled with 1", I'd prefer 1/2" lift. Oh well. Seems I have a host of items to solve with the 1" body lift....steering, parking brake cables, fan shroud, shift linkage.
Here are the old body mount bolts. The passenger side floorboard was covered with some stick on dampening material (whatever was used before dynamat came around). This preventing moisture from getting to the bolt.
Replacing turn signal cancelling cam.
Disassemble front drive shaft for rebuild.
Trim front carpet. I bought the mass backing for the front carpet. I don't recommend it though. Dynamat or equivalent would be better. The mass backing appears like it would trap moisture between it and the floor.
englewoodcowboy
Lick Creek Restorations
- Joined
- Jul 25, 2010
- Messages
- 4,200
Looks good. Maybe you can try some xylene on that coating you can't get off. Try an inconspicuous spot first as the xylene "should'" attack the paint but you never know.
tirewater
Sr. Member
Looks good. Maybe you can try some xylene on that coating you can't get off. Try an inconspicuous spot first as the xylene "should'" attack the paint but you never know.
Only item that I have with Xylene is carb cleaner, which also has Acetone. I can try that, but it wouldn't be something I'd use all over my engine bay.
Todd's Baja that's being cleaned was cleaned using some 3200 grit sandpaper. I'll try that as well.
englewoodcowboy
Lick Creek Restorations
- Joined
- Jul 25, 2010
- Messages
- 4,200
You def want xylene by itself. The acetone will eat into the paint. Xylene should not.
- Joined
- Nov 3, 2003
- Messages
- 48,265
...Adding 1" body lift. Not entirely thrilled with 1", I'd prefer 1/2" lift. Oh well. Seems I have a host of items to solve with the 1" body lift....steering, parking brake cables, fan shroud, shift linkage.
Wow. Well aren't you just the lucky one then. I've never heard of anyone having to deal with every one of those things with a 1" lift. One or maybe two at the most, but all of the usual suspects for the taller lifts? Not that I can remember.
What exactly did you have to do with the parking brake cables? There should be way more than enough available length to accommodate a 1" change. Even if you have that odd in-between '76 and '77 setup.
And steering too? Is it the rag joint giving you trouble?
The fan shroud I can see, as about half of the people installing this kit need to do something with the shroud. And the automatic shift linkage too, about half the time. Just saw someone mention today that theirs had more than enough adjustment to handle the lift.
Sorry you're dealing with all those issues. It's otherwise a nice thing to have!
Great work on the truck so far. Interested to see how you tackle the issues above.
You def want xylene by itself. The acetone will eat into the paint. Xylene should not.
Yep, carb cleaner is not your friend when used in any quantity, frequency or for extended times.
I've sprayed it on well cured paint many times to clean things off, but didn't leave it on very long. When sprayed on recent paint it can damage it within seconds. On old dried paint you have a few moments to deal with the cleaning, but for extended times you definitely want to try alternate methods.
The sanding method is interesting. Sure does seem to have worked for that Baja.
Good luck.
Paul
tirewater
Sr. Member
Sorry Paul, I missed your post.
Just to follow up, once the body mounts were tightened down, things weren't so bad. Tightening them to 40ft/lbs (shop manual says 40-50) squished them down some. I opened my mouth too soon.
The emergency brake has some slack. Although I'm not sure enough for full droop. I did buy new cables anyway, so I'll install those.
Steering seems fine, although i haven't installed the cowl/firewall mount yet. Interesting to note, only two bolts held the column mount to the firewall. It doesn't appear the third (bottom one) was ever installed. There's no cage nut in the square hole of the firewall & no mark from the lock washers on the mount itself.
Minor update (no pics):
Fighting with brake fluid drips from stainless steel brake lines. If I could go back I would've ordered the plain steel brake lines from ClassicTube. It appears the master cylinder to proportioning valve brake hose set I ordered from WH is from ClassicTube.
My *old* can of Goof Off! is 100% Xylene. Xylene works to remove the substance coating the paint in the battery box area. It also removes the paint, but doesn't cause it to bubble up. So if you're careful... BTW, Goof Off! is now made with Acetone...relatively recent switch.
Pulled valve covers and exhaust manifolds to check torque of lifter bolts and cylinder head bolts (all were fine).
Cleaned/waxed passenger carpet area for prep for carpet. Cleaned underneath rocker/floorboard area where carpet screws and plastic pins for door weather stripping go. Easier to clean without the screws and pins poking through.
Lol, yeah the Baja looks great. I wish the sander would come with the sand paper!!
Just to follow up, once the body mounts were tightened down, things weren't so bad. Tightening them to 40ft/lbs (shop manual says 40-50) squished them down some. I opened my mouth too soon.
The emergency brake has some slack. Although I'm not sure enough for full droop. I did buy new cables anyway, so I'll install those.
Steering seems fine, although i haven't installed the cowl/firewall mount yet. Interesting to note, only two bolts held the column mount to the firewall. It doesn't appear the third (bottom one) was ever installed. There's no cage nut in the square hole of the firewall & no mark from the lock washers on the mount itself.
Minor update (no pics):
Fighting with brake fluid drips from stainless steel brake lines. If I could go back I would've ordered the plain steel brake lines from ClassicTube. It appears the master cylinder to proportioning valve brake hose set I ordered from WH is from ClassicTube.
My *old* can of Goof Off! is 100% Xylene. Xylene works to remove the substance coating the paint in the battery box area. It also removes the paint, but doesn't cause it to bubble up. So if you're careful... BTW, Goof Off! is now made with Acetone...relatively recent switch.
Pulled valve covers and exhaust manifolds to check torque of lifter bolts and cylinder head bolts (all were fine).
Cleaned/waxed passenger carpet area for prep for carpet. Cleaned underneath rocker/floorboard area where carpet screws and plastic pins for door weather stripping go. Easier to clean without the screws and pins poking through.
The sanding method is interesting. Sure does seem to have worked for that Baja.
Paul
Lol, yeah the Baja looks great. I wish the sander would come with the sand paper!!
Wow. Well aren't you just the lucky one then. I've never heard of anyone having to deal with every one of those things with a 1" lift. One or maybe two at the most, but all of the usual suspects for the taller lifts? Not that I can remember.
What exactly did you have to do with the parking brake cables? There should be way more than enough available length to accommodate a 1" change. Even if you have that odd in-between '76 and '77 setup.
And steering too? Is it the rag joint giving you trouble?
The fan shroud I can see, as about half of the people installing this kit need to do something with the shroud. And the automatic shift linkage too, about half the time. Just saw someone mention today that theirs had more than enough adjustment to handle the lift.
Sorry you're dealing with all those issues. It's otherwise a nice thing to have!
Great work on the truck so far. Interested to see how you tackle the issues above.
Yep, carb cleaner is not your friend when used in any quantity, frequency or for extended times.
I've sprayed it on well cured paint many times to clean things off, but didn't leave it on very long. When sprayed on recent paint it can damage it within seconds. On old dried paint you have a few moments to deal with the cleaning, but for extended times you definitely want to try alternate methods.
The sanding method is interesting. Sure does seem to have worked for that Baja.
Good luck.
Paul
tirewater
Sr. Member
Some updates.
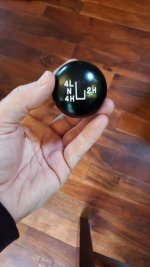
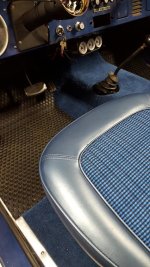
Refinished the stock transfer case knob. Even though a new knob is ~$12 I went ahead and used plastic paint along with white acrylic to refinish it. We'll see how well the paint sticks to the knob - the knob material doesn't take to paint.
Replaced the door seals with Delconik's door seals that I purchased last year. Key to getting the doors to shut properly afterwards was making sure the body was straight where the door straps are. I had to do some minor tweaking to straighten it out since it was bent from people opening the door too far.
Replaced front carpet section. I bought new carpet hold downs but was unhappy with the quality of the front and re-used the old ones. The original carpet strips have cut-outs in them and the sides are straight on the outside instead of bent over like on the repros.
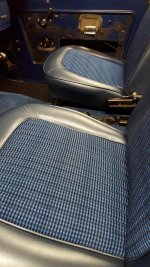
Installed re-upholstered seats. Installed driver's side door panel, along with assorted hardware.
A bunch of minor stuff...replaced fixed strap side seat belts, cleaned up retracting side, replaced seat tracks on driver side, etc...
Refinished the stock transfer case knob. Even though a new knob is ~$12 I went ahead and used plastic paint along with white acrylic to refinish it. We'll see how well the paint sticks to the knob - the knob material doesn't take to paint.
Replaced the door seals with Delconik's door seals that I purchased last year. Key to getting the doors to shut properly afterwards was making sure the body was straight where the door straps are. I had to do some minor tweaking to straighten it out since it was bent from people opening the door too far.
Replaced front carpet section. I bought new carpet hold downs but was unhappy with the quality of the front and re-used the old ones. The original carpet strips have cut-outs in them and the sides are straight on the outside instead of bent over like on the repros.
Installed re-upholstered seats. Installed driver's side door panel, along with assorted hardware.
A bunch of minor stuff...replaced fixed strap side seat belts, cleaned up retracting side, replaced seat tracks on driver side, etc...
Attachments

tirewater
Sr. Member
Arbitrary engine picture. Taken to document hose routing and item positions.
Why? Well, a few tablespoons of gold dust and flakes in the oil. The engine has been running fine, but it seemed the oil pressure has been dropping since the last oil change.
After I changed the oil last, it took about ten seconds before the oil pressure starting reading on the gauge. I presumed the sensor was being slow...now I'm wondering if there was an issue with the K&N oil filter I installed.
My last oil pressure reading was 20psi at 1000rpm idle and 45psi at cruise. *BUT* the oil pressure dropped when I shifted from park in to reverse...to below 10psi. Engine RPM in reverse (stopped) is ~700rpm. This prompted me to remove the oil filter...and a river of gold dripped out of it. Pulling the element out revealed some gold flakes, but the primary issue is *very* fine gold powder in the oil.
We'll see what the issue is when I dig into the engine. I removed the oil pan and didn't see any signs of a spun bearing. There were no squished out bearings.
I removed the engine today. I'll catch up on my picture taking...
