• Just a reminder that you won't be able to start new posts or reply to existings posts in the Archive forum.

    This is where all the old posts go so they can still be used for reference and searched.
  • Welcome to ClassicBroncos! - You are currently viewing the forums as a GUEST. To take advantage of all the site features, please take a moment to register. It's fast, simple and absolutely free. So please join our community today!
    If you have problems registering or can't log into your account, please contact Admin.

This Old Bronco build thread

rockingm82

Sr. Member
Joined
Apr 11, 2006
Messages
486
Loc.
St. Peters, MO
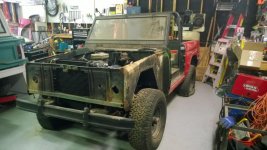
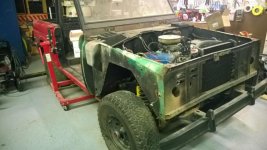
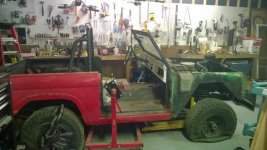
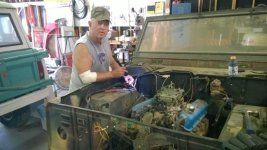
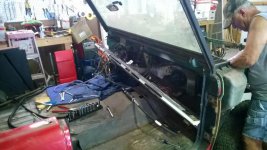
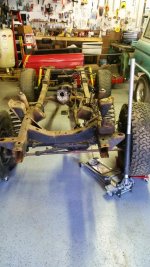
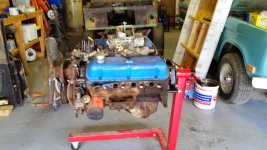
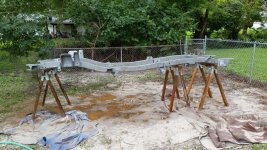
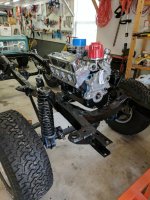
I bought this Bronco from a friend in 2009. Since then it has sat in my garage playing second fiddle to all other events in my life. The build officially started on July 26 when some family members came over to help me remove the top. I am now in the middle of the tear down. I need to get the frame to OldBarnBronco sometime in late Aug. for sandblasting.

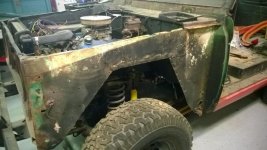
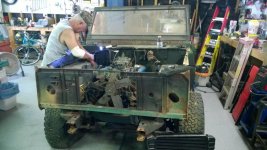
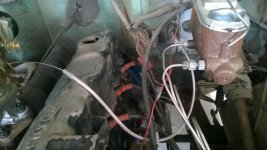
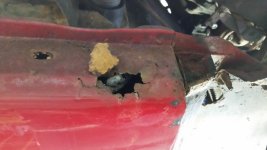
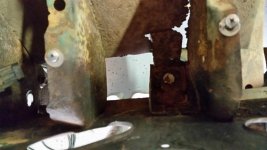
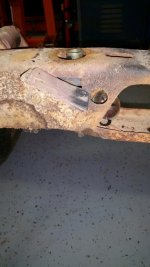
So far it looks like the front end is going to need a lot of work. New fenders, new grill, and new inner fenders. Basically, the entire thing. I think a PO must have hit something because the drivers side inner fender is wrinkled like overstressed aircraft skin.
 

Attachments

  • WP_20140729_001.jpg
    WP_20140729_001.jpg
    87.7 KB · Views: 212
  • WP_20140729_002.jpg
    WP_20140729_002.jpg
    76.1 KB · Views: 189
  • WP_20140729_003.jpg
    WP_20140729_003.jpg
    85.7 KB · Views: 204
  • WP_20140729_004.jpg
    WP_20140729_004.jpg
    87.2 KB · Views: 201
  • WP_20140729_005.jpg
    WP_20140729_005.jpg
    85 KB · Views: 214

broncobsession

Bronco Guru
Joined
Aug 12, 2001
Messages
4,049
That doesn't look too bad. What do the floors look like? Gonna go back with green or keep her red? Any other plans for it?

Also, post a pic of the torquiose one please!
 
OP
OP
rockingm82

rockingm82

Sr. Member
Joined
Apr 11, 2006
Messages
486
Loc.
St. Peters, MO
The plans are for a frame up resto-mod. Pretty much up in the air from there. First plan is to get a rolling chasis going. Probably 3.5" suspension. After that it will be the drivetrain and that depends on how things look once I tear into them. If I can reuse I will, otherwise I'll upgrade. Pretty set on the 302 NV3550 combo.

Typical rust in the floorboards. One small hole punched through the bed. Will be going with Red, not sure which one, but it will be red.

The turqoise is my 68. Working on a new carb set up. She's the drivable Bronco until the red 71 is complete. Having trouble with pics from my Smasung Tab. When I get to the laptop I'll post a few.
 
OP
OP
rockingm82

rockingm82

Sr. Member
Joined
Apr 11, 2006
Messages
486
Loc.
St. Peters, MO
Back from a 5 day trip and I have 9 days off to get cracking. Check that, make it 8. Wife's birthday is this week so that day is a no Bronco day.

Today we're working on two Broncos. Dad came over to help and I think he was having fun. We're replacing throttle linkage on the 68 (new Lokar) and continuing to tear down of the 71. I am hoping for a bear frame before I head back to work.
 

Attachments

  • WP_20140806_003.jpg
    WP_20140806_003.jpg
    83.1 KB · Views: 154
  • WP_20140806_004.jpg
    WP_20140806_004.jpg
    96.2 KB · Views: 134
  • WP_20140806_005.jpg
    WP_20140806_005.jpg
    87.8 KB · Views: 138
  • WP_20140806_001.jpg
    WP_20140806_001.jpg
    78.9 KB · Views: 126
OP
OP
rockingm82

rockingm82

Sr. Member
Joined
Apr 11, 2006
Messages
486
Loc.
St. Peters, MO
Working a little bit each day. Removed the engine today. With some help we'll remove the body in a few days.

I have a few concerns with damage and rust to the body. My capabilities are best described as amateurish and the cost of repairs may get a tad high. I am considering the possibility of a fiberglass tub.

I've had helpers these past few days. Plus, the pup is turning into a good garage dog.
 

Attachments

  • 20140808_162453.jpg
    20140808_162453.jpg
    50.9 KB · Views: 104
  • 20140808_162537.jpg
    20140808_162537.jpg
    56.4 KB · Views: 96
  • 20140808_162201.jpg
    20140808_162201.jpg
    87.1 KB · Views: 104
  • 20140808_162139.jpg
    20140808_162139.jpg
    68.3 KB · Views: 105

Ohio Bronco 21

Bronco Guru
Joined
Dec 5, 2006
Messages
4,194
Loc.
Cleveland
Seems the best these things do is RUST, Eat your Money and make me love them. I like fiber glass as well but sometimes a lot of work as well. If the Body is half decent I would keep her.
 

Stutsmo

Contributor
Bronco Guru
Joined
Jan 24, 2009
Messages
2,549
Just Buy looking through the pictures the rust on your bronco doesn't appear to be all that bad to me...... what body parts need to be replaced?
 

BluebroncoNC

Bronco Guru
Joined
Jul 30, 2007
Messages
1,718
Loc.
Asheville, NC
I have a few concerns with damage and rust to the body. My capabilities are best described as amateurish and the cost of repairs may get a tad high. I am considering the possibility of a fiberglass tub.

Well, jump right in with a grinding wheel and a welder. You may start at "amateurish" but you could end pretty decent. Plus, worse case, you end up fiberglassing it anyway. So what you end up gaining is an education.
 
OP
OP
rockingm82

rockingm82

Sr. Member
Joined
Apr 11, 2006
Messages
486
Loc.
St. Peters, MO
The parts that probably need replacement so far are
Front inner fenders. Looks like the truck took a front end impact and the inner fenders are wrinkled like an accordion. The driver's side is really bad.

Front fenders maybe. PO went at them with a sawzall to a point that the flares couldn't be properly attached. Plus fender attachment points at the bottom front are completely gone.

Driver and passenger floor pans and transmission tunnel.

Door posts possibly.

Another concern I have is that the truck appears to have been swamped in mud. Every orifice is stuffed full of dirt. I don't think I'll get a true idea of what I'm in for until I get everything blasted.
 

Stutsmo

Contributor
Bronco Guru
Joined
Jan 24, 2009
Messages
2,549
The parts that probably need replacement so far are
Front inner fenders. Looks litoto decideke the truck took a front end impact and the inner fenders are wrinkled like an accordion. The driver's side is really bad.

Front fenders maybe. PO went at them with a sawzall to a point that the flares couldn't be properly attached. Plus fender attachment points at the bottom front are completely gone.

Driver and passenger floor pans and transmission tunnel.

Door posts possibly.

Another concern I have is that the truck appears to have been swamped in mud. Every orifice is stuffed full of dirt. I don't think I'll get a true idea of what I'm in for until I get everything blasted.

The parts listed are still cheaper than a new fiberglass body. I agree you should wait till it gets blasted to decide. ..
 
OP
OP
rockingm82

rockingm82

Sr. Member
Joined
Apr 11, 2006
Messages
486
Loc.
St. Peters, MO
Continued with the work yesterday. Welded up door braces and removed the body with an engine hoist and few friends. The next group of days off I'll strip down the frame. Already found some Easter Eggs such as these welded plates.
 

Attachments

  • 20140813_182721.jpg
    20140813_182721.jpg
    62.4 KB · Views: 95
  • 20140813_182709.jpg
    20140813_182709.jpg
    77.1 KB · Views: 100
  • 20140813_182746.jpg
    20140813_182746.jpg
    81.4 KB · Views: 88
  • 20140813_182617.jpg
    20140813_182617.jpg
    113.3 KB · Views: 89
  • 20140809_125534.jpg
    20140809_125534.jpg
    90.4 KB · Views: 91
  • 20140809_125513.jpg
    20140809_125513.jpg
    84.5 KB · Views: 91
OP
OP
rockingm82

rockingm82

Sr. Member
Joined
Apr 11, 2006
Messages
486
Loc.
St. Peters, MO
Frame work

Had the frame blasted. Cut off some strange plates welded on by the PO. Welded on body mount reinforcements. Cleaned with Marine Clean, treated with Metal Prep, and Painted with POR15.

My progress is slow, but at least it is progress.
 

Attachments

  • 20140906_134355.jpg
    20140906_134355.jpg
    161.7 KB · Views: 76
  • 20141106_122134.jpg
    20141106_122134.jpg
    74 KB · Views: 83
  • 20141103_135713.jpg
    20141103_135713.jpg
    69.8 KB · Views: 73
Last edited:

OldBarnBronco

Jr. Member
Joined
Nov 25, 2009
Messages
87
Man that frame looks great! Any progress is progress. I feel your pain on the slowness though. I still have to get my engine put together.
 
OP
OP
rockingm82

rockingm82

Sr. Member
Joined
Apr 11, 2006
Messages
486
Loc.
St. Peters, MO
Rekindled the 71 Bronco after almost two years. I was busy most of the last year working on my 68, a new position at work and a move to a new house. I figured getting my 71 to rolling frame status would help me move it. I ended up employing Steve's help (AWS) to install my diffs and I'm glad I did. Steve is great to work with and an awesome resource for anyone near STL.

Here's the front and rear axles prepped and coated with POR15. New bushings and leaf springs 3.5" lift (Wild Horses), and 33s on Classic MTs.
 

Attachments

  • 20160601_115333.jpg
    20160601_115333.jpg
    78.9 KB · Views: 66
  • 20160601_133654.jpg
    20160601_133654.jpg
    76.1 KB · Views: 65
  • 20160601_133649.jpg
    20160601_133649.jpg
    76.4 KB · Views: 60
  • 20160601_115221.jpg
    20160601_115221.jpg
    75.2 KB · Views: 64
  • 20160601_115233.jpg
    20160601_115233.jpg
    48.5 KB · Views: 61
  • 20160601_115251.jpg
    20160601_115251.jpg
    107.9 KB · Views: 55
  • 20160601_115300.jpg
    20160601_115300.jpg
    116.2 KB · Views: 51
  • 20160601_115303.jpg
    20160601_115303.jpg
    105.7 KB · Views: 59
OP
OP
rockingm82

rockingm82

Sr. Member
Joined
Apr 11, 2006
Messages
486
Loc.
St. Peters, MO
Rear axle with TBP's disc brake conversion. Fitment on this is a lot of trial and error. Tom's included a long grade 8 bolt to move your lower shock mounting point inboard. The factory shock bracket sits too close to the disc brake assembly. I think I'm going to buy new brackets and weld them on rather then go the long bolt route.

I'm also debating the idea of preemptively installing shims on leaf springs. What do you think?

Next up, front axle and disc brakes. Next month though.

Sorry about the picture quality. It's mostly user error, but my phone is also dying a slow death.
 

Attachments

  • 20160607_111633.jpg
    20160607_111633.jpg
    64.9 KB · Views: 54
  • 20160609_121141.jpg
    20160609_121141.jpg
    60.3 KB · Views: 52
  • 20160609_122119.jpg
    20160609_122119.jpg
    69.8 KB · Views: 57
  • 20160609_125542.jpg
    20160609_125542.jpg
    78 KB · Views: 59
  • 20160609_122109.jpg
    20160609_122109.jpg
    77.1 KB · Views: 44
  • 20160609_103856.jpg
    20160609_103856.jpg
    50.5 KB · Views: 49
OP
OP
rockingm82

rockingm82

Sr. Member
Joined
Apr 11, 2006
Messages
486
Loc.
St. Peters, MO
Front suspension installed. Ready to move to the new house. The 68 in the back moves on Fri.
 

Attachments

  • 20160803_121606_resized.jpg
    20160803_121606_resized.jpg
    75.4 KB · Views: 84
OP
OP
rockingm82

rockingm82

Sr. Member
Joined
Apr 11, 2006
Messages
486
Loc.
St. Peters, MO
Dirt Donk asked if I had a build thread and I vaguely remember starting this one. I'm thinking about bringing it back to life. Sometimes I get a little discouraged because I work so slow. There are several reasons for my sloth like progress. The main reason being I'm teaching myself everything as I go. For that reason, if you view my posts and see something that may be askew please let me know. Paul already hooked me up on my rear shock orientation.
 
OP
OP
rockingm82

rockingm82

Sr. Member
Joined
Apr 11, 2006
Messages
486
Loc.
St. Peters, MO
So far what's done.


POR 15 on the exterior of frame
Eastman's Internal Frame coating
Body mount reinforcement brackets Bronco Graveyard
Four wheel disc brake conversion Tom's Bronco Parts
3.5" Suspension Lift Wild Horses
Heavy duty engine mounts Jeff's Bronco Graveyard
Leaf spring shims Wild Horses
347 Ford with FI Tech Blueprint Engines
Extreme duty lower spring cups Wild Horses
Rear lower shock mounts Wild Horses
New Front Axles
Front/Rear lockers and new gearing Installed by Steve AWS
 
OP
OP
rockingm82

rockingm82

Sr. Member
Joined
Apr 11, 2006
Messages
486
Loc.
St. Peters, MO
Progress today.

The engine is in the frame and the rear shocks were flipped.
 

Attachments

  • IMG_20170417_114514.jpg
    IMG_20170417_114514.jpg
    129.3 KB · Views: 33
  • IMG_20170417_114522.jpg
    IMG_20170417_114522.jpg
    128 KB · Views: 35
  • IMG_20170417_114456.jpg
    IMG_20170417_114456.jpg
    142.4 KB · Views: 40
Last edited:
OP
OP
rockingm82

rockingm82

Sr. Member
Joined
Apr 11, 2006
Messages
486
Loc.
St. Peters, MO
Progress last week.
Extreme duty Duty Lower Coil Spring Cups
Leaf spring shims
rear lower shock mounts
Rear shocks (they have been flipped over as per Paul)
Un-crated the new engine

I cannot take credit for the welding.
 

Attachments

  • IMG_20170413_191852.jpg
    IMG_20170413_191852.jpg
    112.7 KB · Views: 24
  • IMG_20170413_191840.jpg
    IMG_20170413_191840.jpg
    81.3 KB · Views: 26
  • IMG_20170413_191835.jpg
    IMG_20170413_191835.jpg
    126.6 KB · Views: 30
  • IMG_20170412_153547.jpg
    IMG_20170412_153547.jpg
    95.9 KB · Views: 30
  • IMG_20170412_153523.jpg
    IMG_20170412_153523.jpg
    81.3 KB · Views: 32
  • IMG_20170412_153520.jpg
    IMG_20170412_153520.jpg
    106.4 KB · Views: 29
  • IMG_20170412_153504.jpg
    IMG_20170412_153504.jpg
    128.5 KB · Views: 31
  • IMG_20170415_105519.jpg
    IMG_20170415_105519.jpg
    101.9 KB · Views: 27
Last edited:
Top